Happy Halloween! Finally, I'm going to finish up talking about airbrushing and next week we can move on to some new topics. I can't complete my discussion on airbrushing without talking about masking techniques.
One of the problems with the Copic Airbrush System is that for any kind of crisp edge you need to mask your image in some way so the spray goes only where you want it to go. So far I've already shown you a few different masks, but here is a rundown of some common mask types and ideas for using masks.
Different Mask types
1. Paper. This can be as simple as holding a torn piece of paper in place with your finger, or cutting out detailed shapes in paper and spraying around them. Whichever route you go, you'll want to make sure that your edges are securely held to the paper or else you'll get the spray creeping under the edge of your artwork. Sometimes I'll hold the paper in place with removable tape, sticky putty (that blue sticky stuff you use to hold paper to the wall), or I'll just use my fingers.
A lot of stampers like to cut out a mask from one of their stamps and keep the mask stuck to the top of their wood stamps so every time they use that stamp they have the mask right there with it to airbrush their background.
For crisper edges with paper- Spray straight down over the paper or aim your spray so it sprays from the paper out to your surface so your air isn't aimed up under the edge.
Pro: Easy
Con: Air wants to creep under so adhere it well
2. Adhesive Papers & tapes
This includes everything from standard masking or painting tape to low-tack stickers and sticky notes. You can buy tapes usually on a roll (like 6" wide Eclipse Tape by Judikins), or sheets of low tack adhesive. You can even put down a few sticky-notes to make crisp straight lines without much fuss. This is a good alternative to regular paper, but always test the surface you're sticking to so you don't ruin your artwork. Common masking tape was developed for painters to be removable, but on softer papers it will remove fibers so test each brand and see what works best for your surface
Pro: Easy, prevents air from sneaking under the mask better
Con: Test the different adhesives on your surface so you don't ruin your work.
3. Masking Liquids
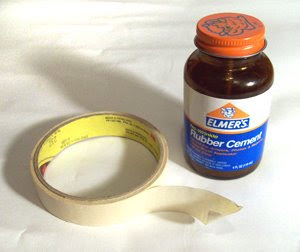
This includes liquid frisket, rubber cement, etc. I really liked how Plaza Arts' website explains this stuff, so I'm just going to quote it:
Watercolorists traditionally paint whites by leaving the white of the paper. To do so, these areas need to be protected from being painted inadvertently. This means you must plan ahead for where those areas are going to be and take care not to paint over them by mistake. An easier way to handle this is to mask them with pieces of tape or masking fluids. Masking fluid (sometimes referred to as liquid frisket) can be applied with an old, worn-out brush (never a quality, or new brush) to those areas that are to be protected then allowed to dry. Once the surrounding area is finished being painted, the masking fluid can be removed to once again expose the white of the paper underneath. To remove the mask, rub it gently with a clean dry finger or rubber cement pickup.
So frisket was created for masking watercolors, but it works for airbrushing as well. Again, test it on your surface and make sure you can easily remove it.
Pro: Apply it exactly where you need it
Con: You have to let it dry and test each surface
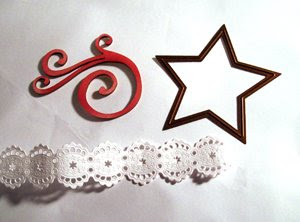
4. Masking with Objects
I've already shown you some examples of masking with objects using the fall leaves and the Spellbinders dies. Doilies, die cuts, lace, punches, gravel, leaves, ... basically anything you're willing to spray over to get a pattern will work. You have the same challenges as plain paper in keeping your edges down to prevent overspray. Some objects, like the metal dies, can be cleaned afterwards with hand sanitizer. Other objects will just get sprayed on and sprayed on and, you get the idea. Whatever you mask with be sure it's something you're OK with getting dirty.
Pro: Fun & easy to get neat shapes
Con: stick it down well so it doesn't blow all over the place.
5. Wax Masking
I already talked about this a couple weeks ago, so go look up Part 1 and Part 2. You can also buy kits for making Ukranian Eggs that have a special heated wax applicator that gives you super-fine lines. I've never used them but the concept seems simple enough.
Pro: easy
Con: doesn't work on every surface
There are many ways to mask, and some I know I haven't mentioned but this is a good list to get started with. Now that we've talked about how to mask, let's see how to effectively use a mask. Color Sequence is very important. As the frisket quote mentions, we need to plan what areas we are leaving white, what areas we color first then cover up, and what will be darkest or lightest. This is the part that will take more practice and I don't think I'll get into spray sequence much today because I want to show something else.
Airbrushing With Rubber Cement
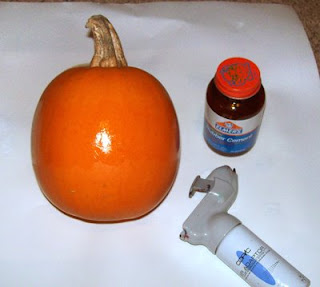
For my project today I'm going to airbrush a pumpkin.This is a pretty small pumpkin, but it's the one my son picked from the field, so I've got to decorate it, even if it's a little small for cutting. I want to have grass and a creepy tree in silhouette, with a sky that fades to orange (from the pumpkin). I want the line between grass and orange sky to be nice and crisp. If I drew straight on the pumpkin with my markers it would be streaky, so I need to airbrush to get the even coverage I want (notice that I'm working over a large piece of scratch paper to protect my carpet from getting sprayed).
First, I masked the sky line with some rubber cement (you can't see it). I let it dry completely then I sprayed my grass with a black 100. Then I carefully rubbed away the rubber cement to get my clean sky/grass transition. This part was super easy- I just had to make sure that my cement completely covered the area that might be sprayed and had to wait for it to dry completely.
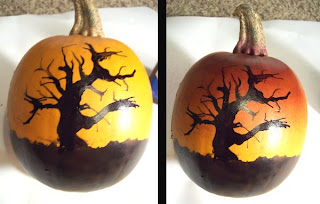
Next, I dripped on some black refill ink and blew it around carefully with a little straw (this part took much longer to get the correct). On a pumpkin, if you make a mistake just clean it up with hand sanitizer and some tissues (I must have gone through half a box of tissue and my fingers look like Dalmatians now). However, after much care and practice I got a twisted tree shape that's a little bigger than I hoped, but my pumpkin is tiny, and the drops are large for this scale.
Then, with a V09 I added my fading dark sky. I sprayed in long even strokes across the horizon of the pumpkin. I did a light layer first then I came back with the same color and added a few more layers at the top to darken it up.
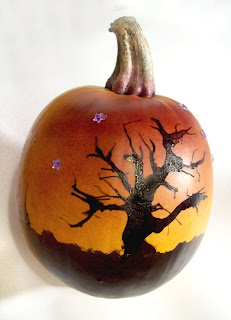
Last, I added some little sticker crystal stars in the sky. They started out clear, but that was too bright so I toned them down with the same V09 that I airbrushed the sky with. I wish the pumpkin were a little bigger so the curve isn't getting in the way of a good picture. Oh well, my son will love his pumpkin. Have a Happy Halloween, All Saint's Day, and Día De Los Muertos!
Friday, October 31, 2008
Wednesday, October 29, 2008
Airbrushing Part 7, Compressors
Many of you out there already own a compressor, or your significant other owns a compressor. How can you use that compressor with the Copic Airbrush System so you don't have to keep buying little cans of air? I get many questions "I have this compressor and I'd like to use it with my Copics, what do I need?" Hopefully today's post will clear that up.
Just to put it in perspective, there are many air compressors on the market for about $100 that would work with the Copic system. An Aircan 180 costs about $14, so if you find yourself going through more than four or five Aircan 180's you are probably a good candidate for a compressor. You'll save money and the environment (though aircans can be recycled) by not buying cans all the time.
First of all, to work with any compressor you'll need an ABS 3 or the parts that equal an ABS 3: an air grip and an air adaptor. If you have an ABS 1 then you have those parts, if you have an ABS 2, then you just need to get the air adaptor. Then you need to look for the following qualities-
If you already have a compressor:
1. PSI- most important. Your compressor needs to go between 40-60 psi. (some small compressors only go to 35 psi and I've heard of people who do fine with those).
2. Fittings- The Copic Airbrush system runs on a standard European 1/8" fitting that is found on Iwata or Sparmax compressors. Whatever compressor you have needs to either match our fittings or you'll need to find a little adaptor bolt. For most brands of art compressors (Badger, Paasche, etc.) you can find a little adaptor bolt for less than $5 from the knowledgable people at Dixie Art . If you don't know your compressor brand or it's exact hose fitting size then it's much harder to find an adaptor (over the phone or e-mail I am not much help either, since there are too many brands out there). You would need to check with a hose fitting distributor (like an industrial refrigerator store) to find out what you need.
3. Correct hose- The hose that comes in an ABS-1 is for aircans ONLY. It will not work with a compressor. Make sure that you have a hose that will work with our system and your compressor. The Copic 1/8 to 1/8" hose is what we use for compressors, but make sure that you have a correct fitting for your compressor (step 2).
When buying a compressor, things to look for:
1. All of the above. Some compressors come with a hose, some don't. Some will fit our system without any adaptors, some don't. Make sure the PSI is good. We like systems with a moisture trap but you don't necissarily need one.
2. Price. Compressors range from about $100 to $1000 or more. There are lots of used art air compressors as well as brand new ones. The air compressor we sell at Copic runs about $200 retail, but it includes a really nice airhose, so figure the hose in the pricing as well.
3. Quality. Usually price and quality go together, but in this case I want you to remember something: You are spraying air across the tip of little markers. You probably don't need the fanciest compressor with all the bells and whistles, you just need a compressor that works and is easy to use. Most hobby compressors will probably work just fine and you don't need to get the expensive fine art compressor that's used by professional detailers for auto design or something. If you are not going to be traveling with it then you probably don't need the heavy-duty models either. I've had people tell me they get great results from some discount $100 models and other brands they haven't had good results with. Do your homework and look for user feedback on whatever model you intend to purchase.
4. Size/ Noise. Mini air-compressors are usually small and relatively quiet, though each model varies. If possible ask around and see how noisy or large a compressor is.
I hope this gives you an idea of what to look for when airbrushing and getting a compressor. I am by no means an expert on airbrushes, but the Copic Airbrush system is so simple that I don't feel intimidated to use it.
What compressor brand do I use?
The Air Compressor we usually sell at Copic is the Sparmax AC 100 (pictured above). We've sold this compressor for years. Why? It is a solid, dependable air compressor. It's not the cheapest, but it's not the most expensive by a long shot. It's small (about 10" x 15" x 10" or so) and relatively quiet (though I've heard quieter airbrushes but I have no problem leaving one of these running while I comfortably talk over it). It comes packaged with a nice airhose and is already the standard fitting size we need.
Best of all, these compressors are durable. I ship mine all over, drag it to classes and use them at trade shows. We've been very pleased over the years and my personal compressor has been abused by countless workshops, yet it still works great. This is not to say that our compressor is the best, simply that we have been consistently happy with it so we haven't switched.
I hope I have helped clarify air compressors a bit. Please let me know if you still have questions. Tomorrow I'll finish up this discussion on airbrushing with some basic masking info, though I'll re-visit the topic every now and then later on.
Artwork: this is a picture that many of you who have taken my Certification class will recognize, since it's one of my favorites. I drew and colored this a few years ago, so I can't tell you what colors I used. I airbrushed the ground with a couple light colors, his pants are textured with a piece of burlap dipped in blender solution. His shirts and hair are faded with the colorless blender.
Tuesday, October 28, 2008
Classes and Upcoming Events
I want to thank everyone who's been hanging in there through all my airbrushing explanations, I still have two more segments to go, but I wanted to discuss some upcoming events before I cover the last two airbrushing parts and move on to other topics. There are a lot of things happening in the next few months, so hopefully I can meet YOU at one of these events (photo courtesy Mary Kelly, Charleston SC certification class).
Copic Certification
Seattle, November 7th, OPEN to all Lake Union Marriott 9 am to 4 pm, cost $100. I still have a few openings so I'm opening this class to anyone who would like to attend. Just call our main office toll free 866-662-6742 and we'll add you to the list. If you sent me an e-mail and I never replied, just call anyways to make sure you're on the list.
Vancouver BC, November 10th. FULL. I'll probably be heading this direction again in 2009 but it won't be until May or June at the earliest.
Early December, Eugene or Portland TBA Mailing List. There are enough people locally who have been bugging me that I want anyone who would like to attend a class in either Eugene or Portland in early December to please e-mail me and we'll see if we can get a class set-up. If I don't get enough interested people then it'll have to wait.
Anaheim, Jan 23 or 24, Pre CHA, Mailing List Anaheim Mariott, cost $100. This class is already very popular, but it is not open yet. Send me an e-mail to get on the mailing list so you get an application. As soon as I begin accepting applications get yours back to me ASAP. Also, if you are not flying in from out of town please try to take the class on the 23. This leaves the 24th open for the people coming in for CHA.
Other Locations in 2009- I will try to hold a class each month somewhere in 2009. Here are my immediate venues, please e-mail me to get on my mailing lists.
Northern Florida/Possibly New Orleans Date TBA (Last Week of Feb)
Westport CT, Rochester NY, Toronto ON dates TBA (around March 18-25)
Upcoming Classes, Demos, and Workshops
I will be teaching a variety of local classes this fall, so be on the lookout. There are more details if you click on the upcoming classes button in my sidebar.
U of O Tools of the Trade Show, Nov 19 & 20, Eugene OR, U of O Bookstore 10 am to 5:00 pm,
This is a fun, free annual event where we are demoing and you can purchase markers at a great price. There are lots of other fine-art vendors there so come and see what's new and learn hands-on about our markers. I'll be demoing all day. See you there!
Marker Rendering Workshop for Fine Art / Architecture / Illustration. Nov 19. 6:30 to 9:30
Holiday Collage Cardmaking Class Dec. 6th, time TBA,
Both of these classes are held at DIVA (Downtown Initiative for the Visual Arts). You can get more info and register from their website.
Manga Drawing class, Eugene Public Library December during Christmas break (TBA)
I'll be offering a free kids/teen workshop on drawing Manga sometime the week after Christmas, so keep checking and I'll find that date and time. Note: it will be a while before I can teach another manga class locally so come to this one if you can.
History of Manga Lecture, Eugene Public Library Jan. 2 2009. This free lecture is part of the first Friday Art walk and is free and open to the public. If you've ever wanted to know what manga is, where it comes from, and why it's so popular then this lecture is perfect for you (Teen & Adult appropriate).
Whew! There's a lot going on. Please don't hesitate to e-mail me and get on mailing lists for the certification classes. For my other workshops contact the appropriate venues for more details. Have a great day and I'll show more airbrushing tomorrow.
Monday, October 27, 2008
Airbrushing Part 6, Basic Spray Patterns
Once your Airbrush system is properly working we can now refine your airbrushing technique. Today I'll show some of the basic spray patterns and some tips for how you can get even spray patterns on your projects.
Consistent Airbrush Spray Patterns
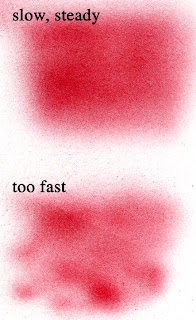
The first technique you want to master is a smooth, even background. If you look at these two spray patterns you'll see the top one is nice and even, while the bottom one is blotchy. If you want a nice even spray then you need to
1. Work Slow from a middle distance. When you go slow it's easier to see where you're spraying. Also, working slow and steady is easier on the marker. You don't have to push the trigger all the way down to get a nice, smooth spray.
2. Sweeping hand motions side to side are easiest. Try not to go back and forth part-way across your area or in circles- this will make your surface blotchy. Up and down doesn't feel as natural for me, so it's harder to be consistent.
3. Start light. You can always go darker, but it's easier to be light than dark.
4. Make a test spray of each color before trying to make a smooth background. this helps you figure out if that color is spraying consistently or is too low on ink to spray well (see troubleshooting for more help). Remember also that most colors will look different when airbrushed than they do directly on the paper,
As you practice, always work over scratch paper to protect your surface from overspray. Until you get the hang of exactly where your spray is going it's easy to accidentally spray your table, your nice project, or even your friend sitting next to you.
Distance and Pressure Differences
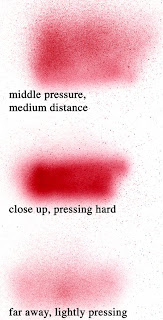
Once you master smooth, consistent strokes now you can try holding the marker different distances away from the paper and giving it different pressures (when I'm talking about pressure I am NOT talking about the settings on your compressor, rather I am talking about how hard or how soft you press on the trigger). You'll have to go back a couple posts to see the difference between the Sketch brush and these chisel spray patterns. Today I'm using the chisel nib from a Copic R59.
Most of the time I'm airbrushing subtle backgrounds. I tend to go for a far-away spray lightly pressing. Especially since I can always come back in and go darker later. It's easier to layer multiple colors when you are pressing lightly and are covering a larger area at a time.
Compare how dark the spray is when you are close and pushing hard to the other spray patterns. It almost looks like a totally different color because it is so intense. I try to avoid spraying this densely because there are so many dye particles sitting on top of the paper that your project will feel slightly sticky, especially on glossy surfaces. It's better to go lightly with a dark color than darkly with a light color.
Feathered spray from dark to light
The last technique you should practice is feathering your spray. There are two methods of doing this that most people use.
1. Layer a bunch of light coats to make one side darker. I do this when I'm darkening the edges of an airbrushed area on a small piece of paper. I color the whole background evenly but lightly, then I add one or two more light layers over the edges making those darker. This is how I did the blue on the final project today.
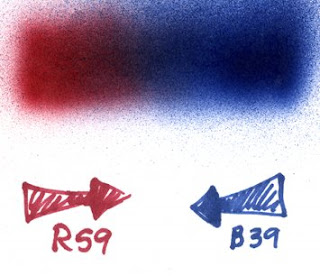
2. Apply more pressure at the beginning of a stroke and lift up at the end. Keep your arm in one place but tilt your hand so you are also lifting up at the end of the spray. This takes more practice, but it's how I achieved the nice spray pattern shown.
If you want two colors to blend into each other the easiest way is to feather each color into the other color. If you look at my example, I started with the red and left the trailing edge light, then I came back in with the blue from the opposite direction and trailed it into the red.
My final project today is this lovely stamp by Gina K. I started by airbrushing the blue sky (BG01) and I feathered it in as I got closer to the leaves. Then I sprayed close up but lightly Y08, YR16 and E34 to get the soft colored areas without masking. Finally I added a few accent speckles with the brush end of an R89 Sketch marker. Again, no masking but the project looks very nice and interesting, though the colors are better in real life than my scanner shows them to be. One bonus of airbrushing over a stamped image is that the airbrushed ink is dry almost instantly so you can use almost any stamp ink and any paper and the markers won't ruin your lines.
Saturday, October 25, 2008
Airbrushing Part 5, FAQ
Here is a list of Frequently Asked Airbrush questions. I'll talk more about spraying patterns later. Thank you to those of you who asked me additional questions and I hope I answered them completely. Most of these are straight from the Copic FAQ page (though I did add a bit after reading some of the answers- I typed up the FAQ in the first place but I wanted to elaborate). I know it's hard to print our FAQ list so I'm including the Airbrusing segment here. Please download the other airbrush info from the Copic Library. I want to thank you for bearing with me, since I probably have a couple more days of airbrushing before I'll feel that I got it all out of my system and I can move on to something else.
Airbrushing FAQ
Q. Can I use any other brand of aircan?
A. No. Copic aircans have a special extended stem that only fits in the Copic system.
Q. What do you mean about how long do Aircans last?
A. Aircan D60 lasts 7-8 minutes, Aircan 80 lasts 20 minutes, Aircan 180 lasts 45 minutes. This is of Continuous use. However, you can't get continuous use out of the ABS aircans since the markers work best if you airbrush in short bursts and the aircans get cold which prevents them from working as effectively (see troubleshooting below). However, I can usually get about 2 days of demos out of one Aircan 180. I've never timed it to see if it's a full 45 continuous minutes, but I'm going to trust Japan on this one. Needless t0 say, the large aircan lasts a long time.
Q. Will the ABS dry out my marker faster?
A. No. The Copic ABS system blows air across the tip of the marker, spraying the dye suspended in alcohol onto your surface. This dye is dry instantly because the alcohol has evaporated in that time. The dye particles are very small and they sit on the surface of whatever you are spraying. When you touch a marker to paper, the paper sucks up more dye than it needs, so you end up using less ink for covering a larger area (this does depend on how densely you spray as well). As you are airbrushing, sometimes the tip of the marker will seem dry, especially on used markers. This is OK. Just wait a moment and the marker will go juicy again.
Q. I have an ABS-1. When I disconnect my airhose I hear air escape. Is this OK?
A. Yes. If you’re following the directions from the package, and you hear air escape it’s normal. This is just the extra air from the hose escaping- it is NOT air leaking from your can. If you want to use even that small amount of leftover air, partially unscrew the bolt on top of the can- this disengages the aircan. Then, spray your last couple bursts until the hose and adaptor have used up all their air. This way you won’t waste any air.
Q. Can I leave my ABS-1 or ABS-2 hooked up for a long time? When should I take it apart?
A. It’s OK to leave them set-up if they won’t be possibly knocked over or accidentally turned on. Make sure all the fittings are snugly screwed before leaving it for any length of time. If you will be traveling with your ABS-1, then disconnect it and replace the protective cap on the aircan. You can leave the air grip and air adaptor hooked up at all times. If you have an ABS-2, then don’t worry about disconnecting it, unless you think the button on the air grip would get pushed.
Q. Can I fly with my Airbrush system?
A. Yes. Put it in your checked baggage, not your carry-on. I fly with these all the time. They are classified as a non-flammable liquid, but I know security would go bonkers if you carried it into the cabin, especially since all the markings on the aircans are in a foreign language.
Q. Will my Copic ABS work with other markers?
A. Not really. They don’t fit correctly in the air grip (more on this later, but if you are willing to manually hold another brand of marker in front of the spray path then you can get something sprayed, it is tricky though. hint: spica look cool sprayed).
Q. Can I airbrush on fabrics?
A. We don’t suggest airbrushing wearable fabrics, since the dye particles sit on top of the fabric fibers and washes out easily. If you want to draw on a t-shirt then just use the marker directly (put something under it so it won't bleed). The airbrush system is very popular however, for airbrushing teddy-bears and wigs (hairspray the wig before coloring it, since the alcohol in hairspray will interact with the dye).
Q. Is this safe to use on people?
A. Although the markers are non-toxic, we do not recommend it for obvious reasons (don't try to airbrush on your evening makeup with your favorite Copic colors). Also avoid spraying on animals.
Q. Can I airbrush on black surfaces?
A. They will not show up if you use them on a black surface. The Copic airbrush system is not like a traditional airbrush, since Copic markers are transparent and traditional systems are opaque.
Q. Is this a double action airbrush system?
A. No. You adjust the spray pattern by pushing harder or lighter on the trigger. You adjust the spray area by holding the air grip farther from the surface. It's not a traditional airbrush, it's a marker sprayed with a neat system. The results are cool but it's hard to compare it to traditional airbrushing.
Q. When you say "Aim down and spray," what do you mean? I can't seem to see where my spray is.
A. If you point straight down your air will be spraying slightly in front of your aim, so be careful. If you still can't see any color, or if the color seems too weak go through the troubleshooting below (particularly if some colors work better than others and you know it shouldn't be that way).
Troubleshooting the ABS System
When you are airbrushing there are two things that could cause you problems- either the ABS or the marker itself. If your ABS is set up properly and the can is not cold, then chances are the problem is your marker. Don't feel like it's your fault that the system won't work. Most of the time it is a minor, correctable problem that will help you get your ssytem to work properly. Carefully read through these troubleshooting tips and 95% of the time it should solve your problems.
Inconsistent spray or Splattering
Uneven spray could be caused by a few things: First, check that all your fittings are nice and tight and that your Air Adaptor isn’t punctured. If you are using aircans, check that the can hasn’t tipped over, is empty, or that it isn’t too cold. If you are using a compressor, make sure there is no moisture trapped in the line and that you are working with an air pressure between 40-60 psi.
Next, make sure that your marker is inserted correctly (if the broad nib is in upside down then your spray could look odd. If the marker is old, it may need refilling before you can airbrush evenly. Sketch markers will give a splattery look sometimes if you use the brush end as well.
Aircan gets cold
This is normal. If you are using the can for a long time and the spray gets inconsistent but it feels like there’s still plenty of air in the can, then let your can warm up a bit before continuing. This is usually only a problem on the Aircan 80’s.
No ink, but air is working
If the air is flowing correctly from the nozzle of the air grip then check these things:
• Make sure the marker is inserted correctly, with the chisel point up in the grip.
• If you are using Sketch markers check that the marker tip is straight up and down. Sometimes the med. Broad nib is not inserted all the way. Gently push on the marker tip to make sure the base of the tip is flush with the plastic edge of the marker body.
• If your marker is old or has been used a lot, it might need more ink. Also, the tip might be worn or frayed. You should replace the tip to get the best spray.
• The fine point on a Copic Marker will not work, but either end works on a Sketch.
• If you are using a compressor, make sure the pressure is correct. Too little will not spray and too much will blow out the system.
Leaking air
Tighten all fixtures. Replace any worn hoses or fittings. If you are using your own compressor, make sure the fitting is the correct size.
Tempermental Sketch Nibs
I have found that when you purchase a brand-new Sketch marker sometimes the machine that assembles them doesn't shove the chisel nib in all the way, or it could be pushed just a hair too far. If your spray pattern is weak or is an odd shape, or isn't spraying at all then the problem could be your chisel nib. With tweezers gently pull the nib out a hair more if you see little or no spray. If you are getting an odd shaped spray then just push the chisel in a bit until it is correct.
Note: Keep the airbrush system away from open flame.
Thursday, October 23, 2008
Airbrushing Part 4, Sketch markers
Sketch markers are the most popular style of Copic markers not only for their wide variety of colors, but also for their ability to airbrush. Unlike the original Copic marker, Sketch markers will give you two different airbrush spray patterns. This simple variety helps make your airbrushed areas look a bit more exciting, as if airbrushing wasn't exciting enough.
Basic Airbrushing
Once you have set up your ABS, insert either a Sketch or Copic marker's chisel end into the air grip. Make sure the point is up (see photo) for the best spray pattern. Push it until you feel it snap into place. Now you are ready to go. (Later I'll get into troubleshooting your spraying patterns, but today I want to cover fun stuff).
Here I'm picturing the ABS-2 that I mentioned yesterday, shown with a Copic marker inserted properly. Also note how they are holding the unit with the pointer finger activating the spray button, and the hand wrapped around the aircan, or for the other set-ups it would be around the air adaptor (This is an old photo that Japan gave me years ago, and I just noticed that the person in the photo seems to be either missing a finger, or they have a spare finger hidden behind the air grip- ETA: now I look at it this morning and the finger is there- weird).
The marker will spray slightly in front of where ever you think it will spray, so unlike the photo, aim STRAIGHT DOWN until you feel comfortable with where the spray is hitting your surface (I've been sprayed a few times by people wondering where their spray is going since they're not aiming down).
Airbrushing with Sketch Markers
Many people have asked me "Why does the Sketch marker even come with a chisel end? I like the brush, but the chisel is useless." This is because these people have gotten used to the smooth coloring and blending with the brush and now the streaky, chunky chisel marks don't seem as nice. It's really hard to fill in a large smooth area with the chisel (or the brush) without a lot of effort and ink.
This is where airbrushing comes in handy.
If you look at the comparison on the left, the medium broad, chisel nib allows you to smoothly airbrush. This is great for filling in backgrounds, adding soft color blends, or coating irregular shaped objects. The chisel end disperses the spray in a very uniform, fine-particle way (if you are using the original Copic markers, then the spray patterns are almost identical between the Sketch chisel and the Copic Chisel).
Note that when you compare the marker drawn straight onto the paper and the airbrushed examples, the airbrushing is a shade or so lighter than the marker would normally be. Especially on pale colors you will see that the airbrushing is very light, sometimes you won't even be able to see it at all (I had to increase the contrast on my scan to get the light blue to show up better here). Keep this in mind and try to airbrush with darker colors for more vibrancy.
Sketch markers, unlike Copic original markers have two ends that work in the airbrush. The chisel end gives smooth, predictable spray patterns, but turn it around and the Super-brush nib gives you a larger, irregular speckle pattern. This is more apparent on darker colors, or if you are spraying very lightly. The results are not as predictable however, and I strongly suggest testing and practicing to see what pressure and which colors will give you the best results. Juicy markers will give you better speckles as well.
Look at this pale blue masked example. The stars were created from Spellbinders Nestabilities Star dies placed on the paper. The stars on the left are from the chisel, the star on the right is from the brush end. Either way looks good, but like I say, the chisel is easier to get a predictable even coverage, while I had to work a little harder to find the perfect spray on the brush.
Used in conjunction with the even coating from the chisel nib, and you can achieve a neat duo-tone effect.
Here is a copper die-cut star from the same Spellbinders dies I've been using to mask with. At first glance the star looks like a nice dark red. Clock on it to see up-close and you'll see that it's not flat red, rather I added darker speckles of purple to darken up the vibrant R29. This helps add to the antique feel. The nice thing about airbrushing on metal is that if you don't like it, just wipe off the marker with some hand-sanitizer and you can start over.
How I most commonly use the two together is shown below on these paper flowers from Kaiser Craft. I pick a lighter color as my base color then with a darker marker I add accents of color that are more subtle. This is how I got the egg to look speckled a couple days ago and this is how I like layering my airbrushing on most projects.
You can see that with the airbrush it becomes much easier to color irregular shaped items, unusual surfaces (in the case of the metal star, if I had tried to color the red directly it would ahve probably been streaky and look uneven). When I buy embellishments, ribbon, or lace, I tend to always get clear or white/pale colors, since I can color them to match whatever I'm working on. If you have an airbrush you should try spraying something unusual- you might be surprized at your results (more on airbrushing tomorrow).
Wednesday, October 22, 2008
Airbrushing Part 3, ABS 1 & 2
Today I am going to step you through setting up the ABS 1 and ABS 2 kits. I know that it will be at least 3 or 4 days before I finish up all that I have to say about airbrushing right now, so if you have any questions or concerns about airbrushing start bugging me and I'll take care of those over the next few days.
Copic ABS 1
When you first open up an ABS 1 kit you have a pile of parts that look intimidating at first, but I want you to not panic. Yesterday I explained what all the parts are for, today we can stick those parts together into a working kit. Do yourself a favor and pull all the plastic wrap and packaging off, take the directions and set them aside for now, and then lay the parts out in front of you like in the next photo.
Put the Air Grip at the top, with the Air Adaptor right below it, plastic cap off. Put the air hose with the small end below the air adaptor and the larger end near your aircan. Now all the parts look like they go together more like they will when you are done setting it up.
At this point you should stop and read through all the directions before you go any farther. I know you want to get ahead, but please bear with me here.
The next step is to attach the air grip and the air adaptor. Just screw the adaptor in until it is tight but not cranked down so you'd need a wrench to get them apart. Then, attach the small end of the air hose to the bottom of the air adaptor.
Before I move on to the next step I want you to note that right now you have a basic ABS-3 set up. The only difference between what you see here and an ABS 3 is that you would be connecting a hose from your compressor to the base of the air adaptor, not the airhose from the ABS 1 (this hose will NOT work with an air compressor). I'll talk more about air compressors in another post.
Next, this is the most important step:
Before you attach the air hose to the air can, release the valve half-way. If you look at the close up you can see that I have it unscrewed part-way so that I can see the first few threads on the valve-bolt. You don't need to release it all the way, just as far as you see it shown here. Think about attaching a garden hose to your faucet. Basically what you're doing is turning off the faucet before you attach the hose, or you'd be spraying water everywhere. In this case, you'd be spraying air everywhere.
Now you can attach the aircan without worry. Again, screw it on so that it is nice and tight without being too tight. Once the aircan is attached to the hose place the can in the holder. This keeps the liquid air from tipping into the hose and splattering when you go to spray.
At this point no air should be flowing yet. If you hear air escaping then you didn't release the valve before you attached the hose. Tighten the hose down before any more air escapes.
When you are ready, slowly tighten the valve bolt until you hear air flow into the air adaptor, then tighten a little more to make sure the connection is secure. Don't over-tighten. Listen very carefully for air escaping. You should have heard air flow into the air adaptor, but that is quick and you should not hear air escaping anywhere else. Press the trigger on top of the air gripp a few times to make sure that air is flowing properly.
Now you are ready to start spraying (more on that tomorrow).
Here are some of the most common questions at this point. For a complete list you can check the FAQ section of the Copic website.
Q. What if I DO hear air escaping?
A. If air is escaping from the air grip, press the trigger a couple times and that usually evens out the pressure inside the seal inside. If that doesn't solve the problem then stop and start over.
If air is escaping from any of the connections, tighten those areas until you don't hear any more airflow. Otherwise, there should not be any air flow except when you press the trigger, or you have a faulty part somewhere.
Q. When should I take this unit apart?
A. Only when you are going to be transporting the ABS unit and the aircan could get tipped over so it would spill canned air into the line. I used to keep one of these set up at all times under my desk. It doesn't leak air so there's no harm in leaving it hooked up for long periods of time (nowdays I just use a compressor).
Q. How do I take it apart?
A. Basically in reverse of how you set it up. Release the valve half-way. Unscrew the aircan from the hose (you'll hear the air escaping from the adaptor, not the aircan). Once the air is detached the unit is safe to transport, just put the plastic cap back on the aircan to protect the stem from getting damaged. There's no reason to take the other pieces apart, unless you're trying to fit them back in the package.
Copic ABS 2
I'm not picturing it because I forgot to take a new photo, but set up is easy. Take the lid off the aircan D60 and attach the can to the air grip. You are good to spray.
I didn't show a project today mostly because I wanted to focus on the set-up process, not what you do once it's set-up. Also, this is already a long post. Tomorrow I'll show something finished.
Tuesday, October 21, 2008
Airbrushing Part 2, different kits & parts
I'm warning you now that airbrushing will take a few days, so bear with me. For those of you who don't have a Copic Airbrush System (ABS) you'll want one after a week of relentless posting about all the cool things you can do with them. Remember, all this info is available from the Copic Library, as well as setting up the other two airbrush kits. I strongly suggest you download it and read through as I step through each process.
Q. Which Airbrushing set should I get?
A. It depends on how you will be using it.
ABS-2
If you just want to try airbrushing before jumping into a larger system or you need a really portable system without much fuss, use the ABS-2. Uses Aircan D60, which hooks directly into the air grip.
Pro: This gets you started with our smallest, most basic system.
Con: The Aircan D60's don't hold much air and just when you figure out how cool it is it runs out. This can be an expensive way to airbrush.
ABS-2 includes: Air Grip, aircan D60
ABS-1
If you want our complete, most cost-effective system without buying a compressor, then you should get the ABS 1. This lets you use our larger, more efficient Aircan 80 and Aircan 180.
Pro: Cheapest unit without a compressor, larger aircans last quite a while before you need to replace them.
Con: You're still throwing away an aircan. After you've gone through 5 of the large aircans you really should start looking at getting a compressor.
ABS-1 includes: Air grip, air adaptor, air hose 1/4 to 1/8, aircan 80, and air can holder
ABS-3
If you already own a compressor, then use the ABS 3 set. You’ll need to get an adaptor to match your air compressor to our 1/8 inch hose fitting. This set-up will work with almost any compressor that can go between 40 & 60 psi, as long as you can match the hose fitting.
Pro: Never buy another can of air
Con: Compressors come in all sizes, costs, and levels of noisiness. Choose a compressor carefully since it is a long-term investment.
ABS-3 includes: Air Grip, air adaptor
Whichever set-up you get, be aware that the parts are modular. If you start with an ABS 2 and you realize that you want to use the larger aircans you don't have to buy an ABS 1, just the rest of the parts to make an ABS-1. Also, all the parts except the aircans will last a long time (until they are damaged) so you're not looking at something that you'll eventually have to throw away.
Q. What does each part do?
Air Grip: This is the main part of each airbrush system. This holds your marker and has the spraying trigger. To change a color you pop it into and out of this grip. The air sprays out of the little metal nozzle and across the tip onto the paper. There is nothing to clean-up and you never have to replace this part unless it breaks.
Air Adaptor: This evens out the airflow from either an aircan or from a compressor. The Air adaptor looks like an aircan with a bolt stuck to the bottom. If you remove the plastic cap there is a thin metal stem that screws into the air grip. You can use this part for years and years, as long as it doesn't get punctured. (I had one that was caved in because the compressor fell on it and crushed it. It still worked fine, it just looked really bad)
Aircan Holder: This is a thick piece of foam that holds your aircans upright. Very handy, since you do not want your aircans tipping over during use or else they will spill compressed air into the hose and cause spitting and splotching. Each hole is cut to accurately hold one of the sizes of aircans.
Airhose 1/4 to 1/8: This is the Airhose that comes with the ABS-1. It only works with Copic aircans, and is needed for proper use of the Aircan 80 and 180. One end has a large metal piece with a valve, the other end is a small, simple fitting. Does not work with a compressor
Airhose 1/8 to 1/8: This needs to be purchased seperately, and is an airhose for hooking the air adaptor up to a compressor. Both ends are a small fitting (not pictured). Does not work with aircans.
Aircans: Under each plastic lid is a tall metal stem. Keep the cap, since you want to protect the stem from getting bent when not in use.
Aircan D60 lasts 7-8 minutes. D stands for Direct, since this is the only aircan you can use directly into the air grip
Aircan 80 lasts 20 minutes.
Aircan 180 lasts 45 minutes. Aircan 80 and 180 are extra-compressed aircans and either one should be used with an airhose.
Q. Why does the Aircan D-60 hold less air than the other cans?
A. The Aircan D60 has a built-in regulator that allows it to be used directly in the air grip. The other size aircans need an Air Adaptor to regulate the air pressure. Because the adaptor is built in, it takes up space. If the aircan were much larger it would be uncomfortable to hold, so there really is not enough room inside to hold the air and the regulating parts. Also, the air is not as pressurized, since it is going straight through the built-in regulator.
Physically you CAN attach an aircan 80 or 180 directly into the air grip. However, this splatters and spots each time you tip the aircan becuase you're directly spraying compressed air across your page and it has no air adaptor to even out the pressure or flow. It really looks bad and is unpredictable in the spray pattern.
Decorated Eggs
For a quick final project today, here is an egg that I airbrushed. I used BG32 as my base color, then with the brush end of a V17 and a G28 I added larger speckles through the airbrush system. With the airbrush system this is super easy and fun (Notice that I'm holding the egg with the lid for my aircan).