Also, thank you to everyone who sent cards to Kris. She had a fabulous birthday (we have the best cakes when it's someone's birthday down at Copic) and appreciated all the cards. If you would like to be entered in the blog drawing you can still sign up on Wed. post until midnight. However, you don't need to send Kris a card, rather, upload some artwork to the Copic Website gallery.
 Simple Blush
I'm going to start with techniques today on a simplified face (I'll cover more detailed, realistic faces later). For this project you'll need some good pale skin colors (lighter colors are easier to practice over, I'll talk about other ethnicities later). I was about to draw a cute little face to color since I don't own many people stamps with faces big enough, and then I remembered I already had a stamp I could use for just this occasion (silly me, forget that I drew this in the first place). So today I'll be using little Anna Mae by OCL and talking about blush.
Before we get started, remember a few things
• For soft edges, work wet
• A lighter color will push a darker color out of the way if it is juicy enough
For my examples today I'm using E000 and E11. Each time I colored the face I started with E000 coloring in circles to get a smooth base color, then I added the shadows with E11, then came back with E000 and smoothly colored over the whole thing again to really blend in the shadows. I happen to be using R20, or Blush as my blush (go figure), but you'll want to try your own colors and find a blush that works for you.
 Strokes vs. Dabs
There are two basic ways to apply color with a marker. You can either stroke it on or dab it on. The key difference is how much ink are you putting down. Color that is stroked on, or one quick overlay doesn't always soak through the paper, rather it is gently resting on the surface and overlays the base color, but you can still easily see the color underneath.
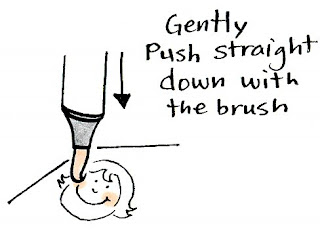
Dabbing, on the other hand, is applying so much ink that it pushes the other color out of the way. You can get this effect easiest with the brush on a Sketch or Ciao because they are so juicy (see diagram), but you can get the same effect with the firm points by coloring in the same spot so much that it soaks the paper and moves the other color out of the way (one upshot of using the brush for dabbing is that if you push straight down you can get a perfect circle each time, no scribbling in a circle and hoping it's the right shape).
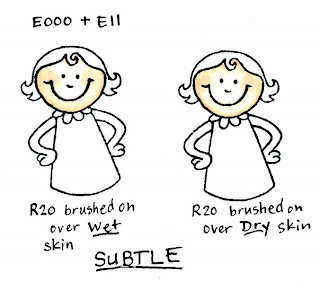 Let's look at the difference.
Brushed = Subtle
On my first example I have little Anna Mae with R20 brushed on wet skin. See how soft this is? You can barely see it, but it is subtle and the edges are very soft. The next example I brushed it on over dry skin. The edges are a little more crisp. Either way, I'm not soaking the color all the way into the page, rather, it's one quick stroke to leave a hint of pink over the skin.
If you are trying to tone down any object (if it's too dark and you want to add gray) then this is the technique that will give you the best results. You keep the color underneath, but you can still see the top color you are applying.
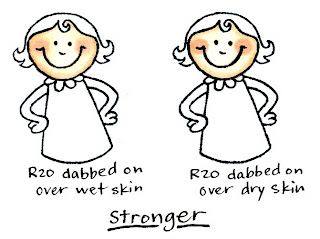 Dabbed = Stronger
On this next pair, you see that I dabbed the blush on. Look at how much darker it is. The first example I dabbed it on while the skin was still wet. This gave me softer edges.
The second example I dabbed the blush color on while the skin was dry. Notice how much crisper the edges of the blush are. Either way, the color of the blush is stronger and you see much less of the skin tone through the blush. On darker skin this would really stand out.
I like to use a variation of this technique when I add subtle highlights into hair. If you have colore dsome dark brown hair, try taking a lighter yellow and streak in some juicy highlights. This is easy to do with the fine point on a Copic original marker, just color over the same streak about 3 or 4 times until the darker color moves out of the way. By using yellow it adds tone, whereas blender would just lighten it and not look as interesting.
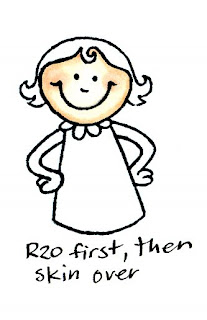 What if I do the blush first?
This is fine to try on lighter skin, since you'll still be able to see the light blush underneath, but on darker skin tones you'll have to make the base blush darker. When you do the blush first it looks a lot like the example of the blush brushed on over wet skin. If you find a color combo that you like then write it down and remember the technique you used.
For something like blush, it's usually easier to do the dark color first then add the light color. that way you can judge better how much color you need to add. When you do the light first, it just gets overwhelmed and you loose it.
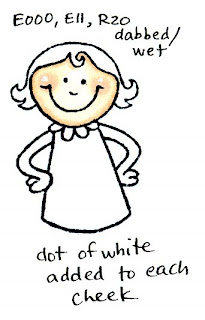
 Making shiny cheeks
If you remember back to my posts on Opaque white, you'll know that I use white to add highlights back in. This is also a good way to show something is shiny. Magnolia Stamps suggest adding a dot of white to the middle of the cheeks on their characters. The reason they do this is because the contrast grabs your attention and pulls you into the cute cheeks. Second, it makes the cheeks look like they're shiny and sticking out more (like the extra light shining off your dimples). Here I've added a dot of white to Anna Mae's cheeks. I don't know if I like the look with this particular picture, but again, it's a matter of personal taste.
None of these methods I've shown today are right or wrong- they're just different. You may prefer the look of one method better than another. The trick is for YOU to try it for yourself and get the feel that works for you.
For my final art today I broke down and drew my own picture of little Anna Mae. I added blush both to her cheeks and her bear's cheeks using the dabbing method. See how much the color on the bear was pushed out of the way? Anna Mae looks so cute, it helps me forgive her for the sleep I've been missing as her last few teeth come in.


Awesome!! Thanks so much for the tips!!!!
ReplyDeleteThanks Marianne! I agree - blush is tricky business. I've experimented with different colors myself, and I found that I love the bright blush that gradually fades into the skin color. I usually use two to three colors for the blush -_- Here's an example: http://mari-kris.deviantart.com/art/The-Vacuum-2-87776000
ReplyDeleteAnd I find myself adding the same colors to blush the elbow and finger tips.
Marianne, I really appreciate the explaining you do in your blog tutorials! I remember things so much better in life when I understand WHY to do things a certain way. :o) THANK YOU!!
ReplyDeleteTake care and STAY POSITIVE!
Thanks for the tips. I likie. :-)
ReplyDeleteYour Abigail drawing is too cute. I hope the rest of her teeth come in with a lot less of your sleep being missed. I feel for you. My daughter just turned two and I sometimes she helps me miss sleep too.
Smiles,
~nance
You have been sooo sooo sooo informative and helpful. I asked Santa for Copics for Christmas but I have been researching and studying for months. Hopefully my time spent reading up on these techniques will save me some time and products when I finally get some of these in my hands.
ReplyDeleteI enjoy reading it. I fundamental to learn more on this subject.. Thanks for the sake theme this marvellous post.. Anyway, I am gonna subscribe to your silage and I wish you post again soon. The 192.168.l.254 IP address is a common address used for accessing the login page for your private router control panel. Once you have logged in, you can change your router username, admin, password and privacy settings.
ReplyDelete