To correctly shadow pleats we are combining the technique for wrinkles on a pumpkin and coloring a cylinder. As we get into more complex shading we will be combining more of the basics, so be sure you've reviewed all the old shadow posts.
 Simple pleats
I consider this a beginner technique because it is still pretty easy to understand, as long as you color in the right order.
When working on coloring draped fabric, keep a couple things in mind:
• Always color in the direction of the wrinkles- this helps use the natural streaks of the marker to accent your layers of cloth.
• Work light to dark- it's easier to darken shadows than to leave highlights.
• Crisp folds will leave crisp shadows, softer folds will cast softer, less defined shadows.
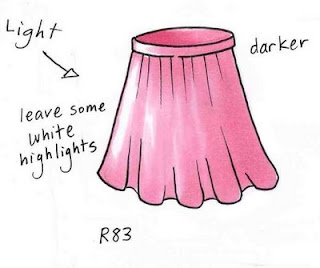
 First, I am coloring this pleated skirt (or tablecloth, depending on how you look at it) as if it were a basic cylinder. I am starting with R83 as my lightest color in the shadow sequence (if you don't understand how I choose colors, view this post).
I pick where my light is coming from and I leave that side lighter and darken the other side of the skirt. Right now I'm not really worrying about the wrinkles in the fabric, but see that I am leaving white areas on the first and the second wrinkles. These stick out more, so they will get more light.
 Note how flat the picture looks when you only use one color. I know I have said this before, but the more colors you use, the more things will look like they pop out from the page.
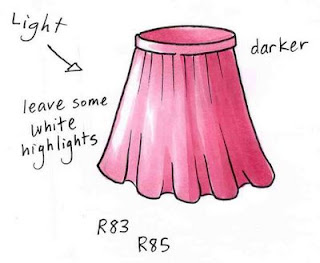
Now I can add my next darkest color, R85. Again, I'm not worrying too much about the wrinkles, except for leaving a few highlights of the lighter pink. Already with 2 colors my object doesn't look so flat, but the pleats aren't showing up much yet. If you look at the one wrinkle in the middle that I have darkened a bit you will see just how much it seems to pop out more than the other fabric wrinkles. Eventually all the wrinkles will jump out this much.
 Next I add my darkest pink, R89. Since this is my deepest shadow I need to start being careful about where I add it.
Each time I add a darker color I am layering it on in feathered streaks from the edges towards the middle, along the wrinkle lines of the fabric. This looks more natural and the feathering keeps my edges soft, as these wrinkles are gentle. R89 is added only along the back edge of the shape and in the darkest wrinkle at this point.
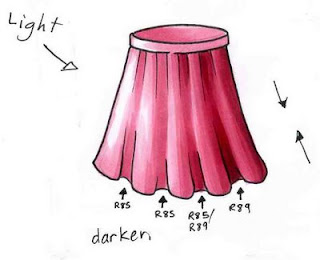
 Now I look at my shape. Not bad, but I really want to pick out those darkest shadowed areas on the pleats. So I go back one last time and darken all the shadows between wrinkles.
The first wrinkle is an area I colored with R83, so I darken it with R85. Same with the second wrinkle. The 3rd wrinkle is an area where I was switching between R83 and R85 so I shadow with R85 and touch of R89. My last wrinkle will be the darkest, so it is made with R89.
If you compare the last two steps, do you see how much more the final example looks 3 dimensional? Shadows are the key to making an object pop off the page.
 For my final artwork today I colored the pleats on this cute cheerleader that I drew with a 0.25mm Multiliner SP on color laser copier paper.
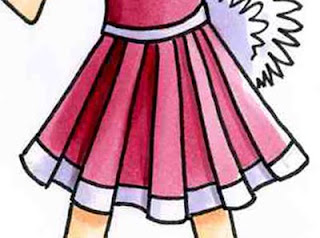
It's easy to tell where the light is coming from in this picture, and you can tell that the skirt curves around her waist, and that there are two layers of fabric.
Look at the close-up of her skirt. One thing that I did differently is that a cheerleader skirt has very flat pleats, that are crisp on the edges.
 If you look closely at the shadowed areas you will see that I added an extra dark shadow line where the top pleat overlaps. This shadow line is very crisp and sharp, because the shadow created by the flat pleat is very crisp and clean. Our other skirt had much softer pleats, so I did not need to add this extra dark shadow, rather, I wanted those to be very soft.

Oh wow!!! I've learned so much through your tutorials and your class. I am now paying better attention to the shadows. I still don't have it down but it's a start.
ReplyDeleteVery cool Marianne!
Thanks,
~nance
Great tutorial!
ReplyDeleteThanks for the tutorial. I don't know if I will ever be able to get the shading down but I sure can do a better job with the help you are providing.
ReplyDeleteThank you sooo much! :) You always make your tutorials so easy to understand! Awesome job, Marianne!
ReplyDeleteHi Marianne, although I don't have copics, I love coming by your blog and reading. You have lots of great information here! I left a "very Sweet Award" for you at my blog so come by and get it, you certainly deserve many a blog awards!! Thanks for sharing so much information!!
ReplyDeleteWow, this is a great tutorial. Now I'm going to need to find a stamp with a plait ;o)
ReplyDeleteThanks always for your instructions. They are great!!
Welcome back Marianne! Thanks for the great tips that can be used in many ways!!
ReplyDeleteTake care and STAY POSITIVE!
I love how you explain everything so clearly. You are a great teacher as well as a great artist (and nice too!).
ReplyDeleteThanks for another great tutorial!
I was wondering if you could do one on caucasion flesh tones, and showing dark shadows, like when the light is really strong. I have experimented with some blues and violet shades and those never seem to work well. Just a suggestion!
Pleats have always been a mystery!! But not any more! Thanks for the tute!
ReplyDeleteI know this is years later but just getting to this point in my coloring. I love images with pleats and folds. I like the "drama" that they present to the image. Wish I could draw but I leave that to you. lol. Thanks for all your wonderful tutorials and you have given us valuable information.
ReplyDelete