Thank you for all the well-wishes for my birthday. I had a nice, relaxed birthday surrounded by good friends and food, and some really beautiful cards made by our design team members. Here is the continuation of yesterday's post on shading cubes. Since this is a little trickier I am putting an advanced label on it.
Coloring Cubes Part 2
Crisp vs. Diffused Light
One thing I want to point out is that I don't usually color my shadows as crisply as we are in these posts because I prefer to have softer edges, or diffused lighting, on shadows. Anywhere you have sharp contrast your eye immediately goes there. When I am coloring an object I don't want people to focus on the shadows, rather, I want them to just think about the shape of things.
Choosing where to place your shadows is an artistic choice. Just because something does cast a shadow does not mean that you HAVE to make it realistic, or strong. Way back when I first started teaching about shadows on this blog I purposefully worked with diffused lighting. This means all my shadows have soft edges. However, when you start working on more realistic compositions, such as these lilacs 1, 2 from a while ago you can see that it is important to have variety in your shadows to make the image more believable.
Casting Shadows on Round Objects
Thus far we have discussed coloring a few shapes of objects- cylinders, spheres, cubes, and we have talked about casting shadows that match the shape of each object. A while ago I discussed how shadows overlap, but now that we have talked more about cast shadows I wanted to cover it some more.
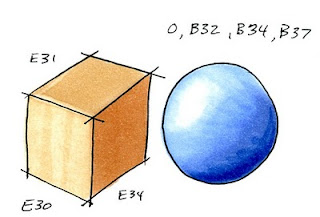
In this example we have a sphere sitting right next to our cube from yesterday. When we have a strong cast shadow from the cube we know that it has to interact with this sphere. However, a sphere is trickier to place a shadow on than the flat ground.
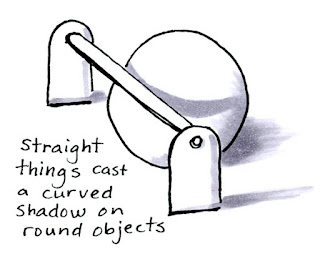
Shadows that are cast onto a rounded shape will wrap around the shape. If you look at this simple drawing you can see that a straight line will cast a curved shadow on our sphere.
Here is also an example of artistic choice in my shadows. I purposefully made the ground shadows in this image diffused because I don't want you thinking about the ground shadows, I just wanted you to see the concept of the rounded shadow on the sphere.
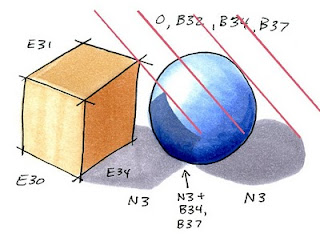
Let's apply this concept to the cube and sphere. This is where it gets tricky and we have to guess a little.
I started by drawing the shadow under the sphere, as this was much easier to tell where it was going. Next, I place the shadow under the cube, Except for the sphere.
I found the spot on my sphere where the light gets blocked at the same angle as the shadow cast from the sphere (red lines). You can easily see in this diagram where the light is hitting first. I chose to have the point of the cube in from the edge of the sphere a little bit. Then I guessed how the edge of the shadow would curve around from there. This can be tricky unless you have an example to look at. For our purposes guessing is good enough.
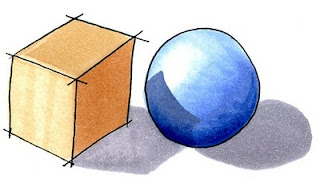
You can see, once I erase all my notes, how the final pair look with crisp shadows. It may not be exact, but it is good enough for our purposes. Now let's adapt this shadow to our final image.
The present I showed yesterday was adapted from a larger composition of gifts. Each object in the composition casts it's own unique shadows. You can see from this progression how I started with the simple shadows then gradually added more until they look more believable. Click on the image to enlarge.
Final Image: Drawn with a 0.25 mm Multiliner SP onto color laser copier paper. B32, B34, B37, B79, YG41, G21, G28, Y11, Y18, E34, E39, RV21, R22, RV29, N1, N, N5, BG10, 0. Details on the red gift were drawn with a 0.1 mm gray multiliner.
Sunday, February 28, 2010
Saturday, February 27, 2010
Shadows, Part 14 Coloring Cubes, part 1
I am finally back from Germany and getting caught up with all that I haven't done in a while. Next week I'll post updates on certification classes, but for now I wanted to post another tutorial, as I think everyone has been waiting for more examples of how to shadow.
This will have two parts, as it would be a very long post otherwise. If you have not followed along with my posts about shadows and shading, you should probably start by clicking here, then scroll back to the first post.
Basic Shadows from a Cube
This is probably easier than talking about shadows on a round object, but I realized that I haven't covered this yet in all my shadow posts. A cube is a simple, flat shape, so the coloring can be simple, or, it can get very complex.
Remember, light travels in a straight line. Any object which blocks the light will block it in a straight line.
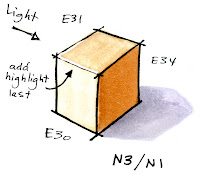
The side of a cube that is closest to the light will be the lightest. However, we need to show a slight color difference between the top and the side. The front is colored only a tiny bit lighter than the top, just to show that the light is strongest from the front.
Next, we need to think about the shadow the box casts on the ground. If you remember from this post on cast shadows, the object will cast a shadow shaped like itself. The corner points out, so we have a pointed shadow.
The edges closest to the front will catch the light more, so we add a little bit of Opaque white or a white colored pencil along the front edge. In real life, our shape would not have black lines defining the edges, so this strong highlight along the edges becomes very important.
Here is the final example of how I applied coloring shadows onto a birthday present. Today is my 30th birthday, and already I have been given some very nice gifts, so this tutorial is my Thank You!!
It is easy to see where the light is coming from in this picture. On the edge closest to the light I left a lot of areas white. With the deep blues and greens the image appears to be more dimensional, since I have a full range of contrast (contrast, part 1, 2, 3)
Notice how I softened the far edge on the cast shadow, since I really don't want people to focus on the shadow. I also made sure that the bow left a shadow as well. This can be tricky, so don't overthink it, just make a couple of lumps and a thin shadow that could represent the ribbon end.
Image: Drawn with a 0.25 mm Multiliner SP onto color laser copier paper. Sketch markers used: YG41, G21, G28, B32, B34, B37, N1, N3, Blender
Monday, February 15, 2010
Heading off to Germany...
Before I leave the country to teach in Frankfurt today, I need announce a few certification updates.
Second, the Lafayette, LA Class has been Canceled. There may still be a class in this location in the future, but as of this half of the year it is canceled.
Applications have gone out or will be going out this week for the following locations:
Feb. 21st Shawnee, KS Taught by Sally Lynn MacDonald and Lori Craig Full
March 6th, Des Moines, IA Taught by Lori Craig and Sharon Harnist Open to Stores & Designers
March 7th, Memphis TN, Taught by Sally Lynn Open to Stores & Designers
March 13, Lafayette, LA Taught by Colleen Schaan Canceled
March 21, Long Island, NY Taught by Sally Lynn Open to Stores & Designers
March 28th, Columbus, OH Taught by Sally Lynn Open to Stores & Designers
March 28, Portland, OR Taught by Sherrie Siemens, and Jennie Black Open to Stores & Designers
April, 18 Calgary, AB Taught by Sherrie Siemens Open to Stores & Designers
April 11th, St. Louis MO, Taught by Sally Lynn Open to Stores & Designers
April 19th, Ft. Lauderdale FL Taught by Colleen Schaan Open to Stores & Designers
Applications have not gone out yet for the following locations:
Mid- April (Date TBA) Phoenix, AZ Taught by Jennie Black, assisted by Marianne
May, TBA Central Michigan, Taught by Debbie Olson
May, TBA Las Vegas, NV Taught by Jennie Black
May, TBA Salt Lake, UT Taught by Jennie Black
May 23, Anchorage, AK Taught by Sherrie Siemens
May 23, Charleston, WV Taught by Sally Lynn
May 30th, Vancouver, BC Taught by Sherrie Siemens
June, TBA Branson, MO Taught by Lori Craig
June, 13 Toronto, Ont. Taught by Sally Lynn
June 13 Boise ID, Taught by Sherrie Siemens
June 27, Seattle, WA Taught by Sherrie Siemens
June, TBA Santa Barbara, CA Taught by Jennie Black
June, Los Angeles, CA Taught by Jennie Black
July, Northern California Taught by Jennie Black
and many more locations this year. If you need an application for a location that is currently open please e-mail nancy@copicmarker.com Please do NOT e-mail about locations that are not yet open! Just sign up on the mailing list through the green box on the sidebar of my blog.
OK, I will be gone this week, but part of my trip is going to be not only teaching Certifiaction classes, but I will also be taking some Marker rendering classes from German Professors. I am really excited about what I can learn from those classes. Debbie Olson and I will have a great trip!
First of all, Shawnee, KS is Full and Closed.
Second, the Lafayette, LA Class has been Canceled. There may still be a class in this location in the future, but as of this half of the year it is canceled.
Applications have gone out or will be going out this week for the following locations:
Feb. 21st Shawnee, KS Taught by Sally Lynn MacDonald and Lori Craig Full
March 6th, Des Moines, IA Taught by Lori Craig and Sharon Harnist Open to Stores & Designers
March 7th, Memphis TN, Taught by Sally Lynn Open to Stores & Designers
March 13, Lafayette, LA Taught by Colleen Schaan Canceled
March 21, Long Island, NY Taught by Sally Lynn Open to Stores & Designers
March 28th, Columbus, OH Taught by Sally Lynn Open to Stores & Designers
March 28, Portland, OR Taught by Sherrie Siemens, and Jennie Black Open to Stores & Designers
April, 18 Calgary, AB Taught by Sherrie Siemens Open to Stores & Designers
April 11th, St. Louis MO, Taught by Sally Lynn Open to Stores & Designers
April 19th, Ft. Lauderdale FL Taught by Colleen Schaan Open to Stores & Designers
Applications have not gone out yet for the following locations:
Mid- April (Date TBA) Phoenix, AZ Taught by Jennie Black, assisted by Marianne
May, TBA Central Michigan, Taught by Debbie Olson
May, TBA Las Vegas, NV Taught by Jennie Black
May, TBA Salt Lake, UT Taught by Jennie Black
May 23, Anchorage, AK Taught by Sherrie Siemens
May 23, Charleston, WV Taught by Sally Lynn
May 30th, Vancouver, BC Taught by Sherrie Siemens
June, TBA Branson, MO Taught by Lori Craig
June, 13 Toronto, Ont. Taught by Sally Lynn
June 13 Boise ID, Taught by Sherrie Siemens
June 27, Seattle, WA Taught by Sherrie Siemens
June, TBA Santa Barbara, CA Taught by Jennie Black
June, Los Angeles, CA Taught by Jennie Black
July, Northern California Taught by Jennie Black
and many more locations this year. If you need an application for a location that is currently open please e-mail nancy@copicmarker.com Please do NOT e-mail about locations that are not yet open! Just sign up on the mailing list through the green box on the sidebar of my blog.
OK, I will be gone this week, but part of my trip is going to be not only teaching Certifiaction classes, but I will also be taking some Marker rendering classes from German Professors. I am really excited about what I can learn from those classes. Debbie Olson and I will have a great trip!
Friday, February 5, 2010
Prize winner and Doodle Balloons
I want to thank each of you for going and visiting Jennie's blog and giving her a big welcome to the team. The random winner from my blog drawing is number 46, Kel !!
Kel - who wrote:
Sounds like alot of fun, wish there were classes closer to my area --MD -- Baltimore or DC--even VA or some places in PA. Love you blog.
Kel, be on the lookout for classes near you, as Sally Lynn offers many classes all over the Northeast. Meanwhile you won the set of Spica glitter pens from my blog!
Doodle Balloons
I know it's been a while since I posted a draw-it-yourself project. Here's a fun, but easy one to try as you make last-minute Valentine cards. For my project today I used either Sketch or Ciao markers in BVoo, V17, and Y11. I also used a gray Multiliner SP 0.3 for my outlines. Review this post for the original technique I'm building from.
First, we want to learn how to make a bow. Start with a single dot. Add a heart on either side, but put the halves of heart fairly close together so it's not too wide. Add another drop shape under each heart for the ribbon ends. Outline each shape with a mulitliner when you're done. You can make the ribbon ends either squared or rounded, it's your choice.
Now we can make our bundle of balloons. Start with a heart-balloon by making a regular heart, then adding a little tail. Next to that balloon, draw a yellow round balloon and add a tail. add a couple more heart balloons to finish out the bundle. Outline each balloon and add a smile to the yellow balloon. Doodle a bow to hold the balloons and draw strings down from the balloons to the bow.
I hope you have a great weekend and get a chance to doodle some cute balloons. Just to remind you, there are many classes coming up in the next month or two that are filling fast. If you are considering taking a Certification class register right away with Nancy, our Certification Coordinator, so you don't miss out. Send her an e-mail nancy@copicmarker.com to get a link to the applications.
Tuesday, February 2, 2010
Welcome Jennie & upcoming Certifications
Note: commenting is now closed on this prize drawing
New Certification Instructor
The other bit of exciting news from CHA that I've been holding back is that we have added a new Regional Certification Instructor-
Jennie Lin Black - U.S. Southwest Region
Jennie is a fabulous crafter, who has been stamping for many years. Now she spends her days teaching cardmaking classes all over Southern California. I met Jennie last year while teaching a certification class in Southern California. I was warned to keep an eye on "this one" as she was a fabulous teacher and very inspiring. Sure enough, after she was certified and began teaching Copic classes I kept hearing nothing but the most fabulous comments from stores and students who had taken her classes. Jennie is a perfect fit for the Copic team and the sparkle in her eye really inspires others to craft.
The day before CHA we announced to Jennie over breakfast that she had been chosen for our team, and with many tears of joy she accepted! I know that Jennie will have a lot of fun teaching and inspiring people to use Copics.
To welcome Jennie's sparkling personality onto the team we are offering a prize today of a Glitter 12pc set, retail value of over $30. Just leave a comment on my blog and when you're done, go leave a comment on the other Instructor blogs for a chance to win a prize from some of them as well (note: Some people will be posting prizes Tuesday, others will be posting prizes Wed. Read each blog closely to see when prizes are being offered) I will randomly choose a winner from my blog on Friday at 10 am.
Colleen • Debbie • Jennie • Lori
Sally Lynn • Sharon • Sherrie
If you are looking for either a Certification Class near you, or if you are a store and would like to have someone from Copic come and host a special event at your location then you can contact the instructor who lives nearest you and arrange a special get together. Our team is dedicated to teaching in a positive atmosphere and helping beginners to advanced users learn all they can about Copic products.
For those of you didn't get a chance to stop by the booth and meet with our team of instructors we have this fabulous photo created by Sally Lynn and Sharon Harnist of the whole Copic Instructor team:
top row (l-r) Lori Craig, Sally Lynn MacDonald, Sharon Harnist, Debbie Olsen
bottom row (l-r) Nancy Zenke, Sherrie Siemens, Marianne Walker, Jennie Black, Colleen Schaan
Check the lists below to find upcoming classes near you. If you have a location you would like to see in the future leave that comment on this post today as well. Other locations taught by our instructors around the country in the next few months include (this is an almost complete list, but be on the lookout for more locations):
Feb. 17th Frankfurt, Germany Taught by Marianne Walker and Debbie Olson
Note: This class is taught in conjunction with the European Copic Distributor, Transotype. Space is VERY limited, you can contact Britta Rumpf, Management Assistant, E-mail: b.rumpf-burblies@holtz-gmbh.de for more information.
Feb. 21st Shawnee, KS Taught by Sally Lynn MacDonald Almost Full, Open to Public
March 6th, Des Moines, IA Taught by Lori Craig and Sharon Harnist Open to Stores & Designers
March 7th, Memphis TN, Taught by Sally Lynn Open to Stores & Designers
March 13, Lafayette, LA Taught by Colleen Schaan Open to Stores & Designers
March 21, Long Island, NY Taught by Sally Lynn Open to Stores & Designers
March 28th, Columbus, OH Taught by Sally Lynn Open to Stores & Designers
March 28, Portland, OR Taught by Sherrie Siemens, and Jennie Black Open to Stores & Designers
Applications have not gone out yet for the following locations:
April, 18 Calgary, AB Taught by Sherrie Siemens
April 11th, St. Louis MO, Taught by Sally Lynn
April 19th, Ft. Lauderdale FL Taught by Colleen Schaan
Mid- April (Date TBA) Phoenix, AZ Taught by Jennie Black, assisted by Marianne
May, TBA Central Michigan, Taught by Debbie Olson
May, TBA Las Vegas, NV Taught by Jennie Black
May, TBA Salt Lake, UT Taught by Jennie Black
May 2nd, Portland, ME Taught by Sally Lynn
May 23, Anchorage, AK Taught by Sherrie Siemens
May 23, Charleston, WV Taught by Sally Lynn
May 30th, Vancouver, BC Taught by Sherrie Siemens
June, TBA Branson, MO Taught by Lori Craig
June, 13 Toronto, Ont. Taught by Sally Lynn
June 13 Boise ID, Taught by Sherrie Siemens
June 27, Seattle, WA Taught by Sherrie Siemens
June, TBA Santa Barbara, CA Taught by Jennie Black
June, Los Angeles, CA Taught by Jennie Black
July, Northern California Taught by Jennie Black
and many more locations this year. If you need an application for a location that is currently open please e-mail nancy@copicmarker.com Please do NOT e-mail about locations that are not yet open! Just sign up on the mailing list through the green box on the sidebar of my blog.
What about the new manuals?
I am still trying to finalize a few changes to the Student Certification manual. I am hoping to have them available at the end of this month for people who have already been certified to purchase. They will cost about $10.
Retaking the Certification class:
Now that more certification locations are coming up you might consider re-taking a class from a different instructor and getting the manual that way. Retaking the class only costs $40 and you get the new manual plus a chance to refresh your memory on things you may have forgotten the first time around. Also, you can take advantage of special offers from our partner companies...
NEW for 2010, Partner Company Offers
Stores who send someone to the Certification class leave with a page of special coupons from our partner companies. This is valid for a one-time wholesale-only order to over 8 different companies (you may only use the partner company offer once, valid 6 months from date of class). Some of the companies include:
Couture Cardstock • Hero Arts • Inspired Crafts •
JustRite Stampers • Our Craft Lounge • Preserve Your Memories II • Prima •
regional advertising with SplitcoastStampers •
By taking advantage of the coupon specials you can easily save the amount of money you spent to attend the Certification. Design team members and avid crafters get a coupon for a discount from My Creative Classroom as well. These offers are ONLY open to people who have taken a Certification this year however, and are not available through any other offer.
If you are a wholesale company you may contact me directly to become a partner company. During times of a tough economy we need to work together more, and helping stores bring in new products through our Partner Company Program is a great way to build new business for everyone.
New Certification Instructor
The other bit of exciting news from CHA that I've been holding back is that we have added a new Regional Certification Instructor-
Jennie Lin Black - U.S. Southwest Region
Jennie is a fabulous crafter, who has been stamping for many years. Now she spends her days teaching cardmaking classes all over Southern California. I met Jennie last year while teaching a certification class in Southern California. I was warned to keep an eye on "this one" as she was a fabulous teacher and very inspiring. Sure enough, after she was certified and began teaching Copic classes I kept hearing nothing but the most fabulous comments from stores and students who had taken her classes. Jennie is a perfect fit for the Copic team and the sparkle in her eye really inspires others to craft.
The day before CHA we announced to Jennie over breakfast that she had been chosen for our team, and with many tears of joy she accepted! I know that Jennie will have a lot of fun teaching and inspiring people to use Copics.
To welcome Jennie's sparkling personality onto the team we are offering a prize today of a Glitter 12pc set, retail value of over $30. Just leave a comment on my blog and when you're done, go leave a comment on the other Instructor blogs for a chance to win a prize from some of them as well (note: Some people will be posting prizes Tuesday, others will be posting prizes Wed. Read each blog closely to see when prizes are being offered) I will randomly choose a winner from my blog on Friday at 10 am.
Colleen • Debbie • Jennie • Lori
Sally Lynn • Sharon • Sherrie
Certification Instructors & Locations
If you are looking for either a Certification Class near you, or if you are a store and would like to have someone from Copic come and host a special event at your location then you can contact the instructor who lives nearest you and arrange a special get together. Our team is dedicated to teaching in a positive atmosphere and helping beginners to advanced users learn all they can about Copic products.
For those of you didn't get a chance to stop by the booth and meet with our team of instructors we have this fabulous photo created by Sally Lynn and Sharon Harnist of the whole Copic Instructor team:
top row (l-r) Lori Craig, Sally Lynn MacDonald, Sharon Harnist, Debbie Olsen
bottom row (l-r) Nancy Zenke, Sherrie Siemens, Marianne Walker, Jennie Black, Colleen Schaan
Check the lists below to find upcoming classes near you. If you have a location you would like to see in the future leave that comment on this post today as well. Other locations taught by our instructors around the country in the next few months include (this is an almost complete list, but be on the lookout for more locations):
Feb. 17th Frankfurt, Germany Taught by Marianne Walker and Debbie Olson
Note: This class is taught in conjunction with the European Copic Distributor, Transotype. Space is VERY limited, you can contact Britta Rumpf, Management Assistant, E-mail: b.rumpf-burblies@
Feb. 21st Shawnee, KS Taught by Sally Lynn MacDonald Almost Full, Open to Public
March 6th, Des Moines, IA Taught by Lori Craig and Sharon Harnist Open to Stores & Designers
March 7th, Memphis TN, Taught by Sally Lynn Open to Stores & Designers
March 13, Lafayette, LA Taught by Colleen Schaan Open to Stores & Designers
March 21, Long Island, NY Taught by Sally Lynn Open to Stores & Designers
March 28th, Columbus, OH Taught by Sally Lynn Open to Stores & Designers
March 28, Portland, OR Taught by Sherrie Siemens, and Jennie Black Open to Stores & Designers
Applications have not gone out yet for the following locations:
April, 18 Calgary, AB Taught by Sherrie Siemens
April 11th, St. Louis MO, Taught by Sally Lynn
April 19th, Ft. Lauderdale FL Taught by Colleen Schaan
Mid- April (Date TBA) Phoenix, AZ Taught by Jennie Black, assisted by Marianne
May, TBA Central Michigan, Taught by Debbie Olson
May, TBA Las Vegas, NV Taught by Jennie Black
May, TBA Salt Lake, UT Taught by Jennie Black
May 2nd, Portland, ME Taught by Sally Lynn
May 23, Anchorage, AK Taught by Sherrie Siemens
May 23, Charleston, WV Taught by Sally Lynn
May 30th, Vancouver, BC Taught by Sherrie Siemens
June, TBA Branson, MO Taught by Lori Craig
June, 13 Toronto, Ont. Taught by Sally Lynn
June 13 Boise ID, Taught by Sherrie Siemens
June 27, Seattle, WA Taught by Sherrie Siemens
June, TBA Santa Barbara, CA Taught by Jennie Black
June, Los Angeles, CA Taught by Jennie Black
July, Northern California Taught by Jennie Black
and many more locations this year. If you need an application for a location that is currently open please e-mail nancy@copicmarker.com Please do NOT e-mail about locations that are not yet open! Just sign up on the mailing list through the green box on the sidebar of my blog.
What about the new manuals?
I am still trying to finalize a few changes to the Student Certification manual. I am hoping to have them available at the end of this month for people who have already been certified to purchase. They will cost about $10.
Retaking the Certification class:
Now that more certification locations are coming up you might consider re-taking a class from a different instructor and getting the manual that way. Retaking the class only costs $40 and you get the new manual plus a chance to refresh your memory on things you may have forgotten the first time around. Also, you can take advantage of special offers from our partner companies...
NEW for 2010, Partner Company Offers
Stores who send someone to the Certification class leave with a page of special coupons from our partner companies. This is valid for a one-time wholesale-only order to over 8 different companies (you may only use the partner company offer once, valid 6 months from date of class). Some of the companies include:
Couture Cardstock • Hero Arts • Inspired Crafts •
JustRite Stampers • Our Craft Lounge • Preserve Your Memories II • Prima •
regional advertising with SplitcoastStampers •
By taking advantage of the coupon specials you can easily save the amount of money you spent to attend the Certification. Design team members and avid crafters get a coupon for a discount from My Creative Classroom as well. These offers are ONLY open to people who have taken a Certification this year however, and are not available through any other offer.
If you are a wholesale company you may contact me directly to become a partner company. During times of a tough economy we need to work together more, and helping stores bring in new products through our Partner Company Program is a great way to build new business for everyone.