 Avast Ye! Today be the day fer talking Like a Pirate. So cozy up on the couch with yer favorite buccaneer, watch yer favorite pirate movie, and show that mangy pirate next to you that you can make a perfect reflection in water of their scurvy vessel.
This is tricky, so it's getting an advanced tag, and a reflection is sort of a shadow (it's like an anti-shadow). I'm confident that if you follow the steps it will make sense- it looks a lot trickier than it really is. The nice thing about water reflections is that you can do it for just about anything you want sitting next to a puddle/pond/lake/ocean. I strongly suggest doing this with something simple to begin with though.
A couple of basic rules about water reflections-( I'm generalizing):
1. Still water gives crisp reflections, moving water will be broken. The more your water is moving, the more the reflection will be broken, so it's a matter of taste as to how much accuracy your reflection has. Sometimes it's easier to have still water near the object and gradually make water far away more broken.
2. Reflections are the same size as the original object. Reflections are just a trick of light on a body of water, and from a distance the reflected object looks the same size. Strange but true.
3. Water is one or two shades darker than whatever it's reflecting. This is your clue that it's a reflection. Since the sky is usually blue, your reflection water usually has a slight bluish tint to it, which is where we get the idea that water should be blue. Water is not really blue, water is clear. We just draw it blue for simplicity sake.
Go look at a photo of a mountain reflecting into a still lake and you'll see how these rules apply in real life. All we're doing is stylizing from reality.
 Reflected Pirate Ship
There are more rules about reflections on water, but this is enough to know for today. Now let's get onto our picture. I have to admit that I personally am a pirate and I stole this ship picture I'm using today. It's Captain Cook's ship the Endeavor that he sailed around discovering things. I drew it a few years ago, but last year I needed a good pirate ship, so I commandeered my old art and ran up the Jolly Roger. Now I have a good pirate vessel all fer me-self. (So this is an altered photocopy that I'm working with today)
To make this reflection it helps if you:
• Try this on thin paper
• Have a light table
• Have at least two copies of your artwork
• Have LOTS of markers in the full natural blending groups (or just a bunch of grays to tone everything down)
• optional - Have a Copic multiliner in a size that is slightly smaller than your picture's line width
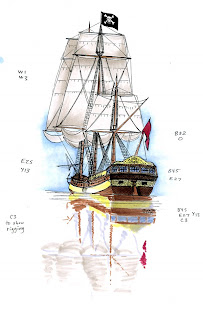
 1. Color your main picture onto a thin sheet of paper with enough space underneath to show the whole reflection. Here is my beautiful pirate ship colored onto my favorite Color Laser Copier paper (I didn't quite leave enough space, I'll explain how I compensate later). If you are comfortable with the coloring quirks of Alcohol Marker papers or tracing paper then this is a good time to use those papers. If you want to know why I picked the colors for the vessel, go back to this earlier post where I show another old sailing vessel (Try to keep your colors simple the first few times you try this).
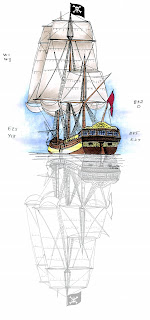
2. On a light table (or held up to a bright window) take a second copy of your artwork, flip it over, turn it around, and position it so it is the correct reflection. This is why you need thin paper (For those of you who LOVE your PTI Stamper's Select paper you're out of luck on getting it to be see-thru, sorry. Just practice on thin paper then look at your finished work on thin paper to see how to get the same effect on your heavier cardstock). Here is my photoshop simulation of what you should see.
2.5. If you're feeling brave, take your multiliner and trace a few of the key outlines from the reversed image (you can also do this last and add lines after you color). DON'T trace all the lines. You don't need to, and don't worry if your lines are a little crooked, it's a reflection. Read all of step 3 before you do this, so you can choose how much to show reflected. I'm going to do this step last, just so you see how I use it as an accent, not as a main element (too many drawn lines will distract from the main picture).
 3. Color your reflection onto your main image with the same colors you colored the first picture with (we'll tone it down later) OR color it all with colors that are 1 or 2 digits higher on the last number (if your sails were mostly W1 before, color the reflection W2).
This is where artistic license comes in. Water is not always perfectly smooth, so don't feel that your reflection has to be perfect. Scribble the colors on to show wavy water, just scribble more horizontally, rather than up & down (the water distorts things horizontally). Don't worry about being perfect! This is your interpretation of reality and doesn't have to be exact.
My sheet of paper doesn't have quite enough room for the whole ship, so I'm going to distort the picture more as I get farther from the ship, to the point that about half way down the reflection we would loose the image entirely. See how the scribbles get gradually more vague to achieve this? Crisp near the horizon, faded as we work down. You can make your whole image crisp if you want, it's all a matter of choice.
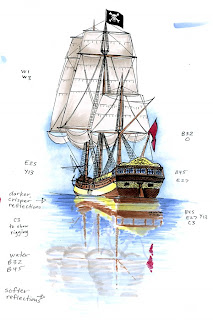
 4. Come back in and add water and darken your reflection. I'm going to use a grayer blue to tone down the whole image, since we decided that water is kind of bluish. My sky was B32 faded with 0, so I'm going to use B32 as my base water color, no blender. Then to add darkness and gray, I'm going to jump to the next color group (B40's) and a few digits higher than the 2, so my final darker water color is B45.
I'm still coloring in horizontal streaks. It's OK to overlap your colored areas, since our reflection IS on water. Be careful not to go over yellow too much with the blue, or it turns greenish and looks wrong. Same with red, it turns kinda purple and looks odd.
For my final piece I went in and added a few key reflection lines with my multiliner. I kept these very loose, and only did the areas closer to the ship, getting less detailed as I got farther from the ship. I also darkened a few spots on my reflection that faded out too much when I added the blue water. Click on the picture to see the larger version with all my notes erased. If it makes you feel better, I've never done this before either, I knew the concept but this is the first time I've ever tried it. I'm fairly pleased with my results.
Challenge: Try making a reflection of something in water and post a link to it here. Have a happy Pirate Day ye scurvy scallawags!


Tho I do not own copics, I have learned alot on this site about coloring and shading. Thanks for sharing.
ReplyDeleteThat looks beautiful!
ReplyDeleteWow!!! Awesomeness. Thanks for sharing!!! Your blog is totally awesome!
ReplyDeleteHOLY CRAPOLAAAAA, Marianne! This is amazing! Uh, I mean...
ReplyDeleteWell, BLOW ME DOWN, me hearties! Me eyes are hurtin' from seein' the most nicest ship this side of the island!
(that was the best I could do! HA!)
Wow, your artwork just floors me every time I see it! You are so awesome with your details and how you describe the shading and colors. Thank you for being such a great teacher and I enjoy your blog very much!
ReplyDeleteYou are a hoot, Marianne, and your vessel and it's reflection is AMAZING!!
ReplyDeleteYou've never done this before? Could've fooled me! It's beautiful! I love seeing your drawings and you explain things so well.
ReplyDeleteI do water alot. Thanks for the cool tutorial. You're awesome!
ReplyDeleteI love you blog but, I would really like all you tips and techniques in a book form. Do you have one I can purchase?
ReplyDeleteThank You
Cheril
Good mirror images and quality posts.
ReplyDeleteApk Rapido