 Blending opposite colors
Feather blending is the technique we use when we want to blend colors that are very different, say a pink and a green.
 If we were to layer those colors on top of each other they would turn into a muddy mess of color, however, we want them to look like they smoothly blend into each other. You can review my older post here.
This is advanced because this is the trickiest technique. I'm also adding another layer of color so my blend is going to end up more dynamic than it would if I just used 2 colors. If you can't figure this out just by reading the blog don't feel bad. This is a very tricky technique to understand unless you see it done. Even then it is hard to duplicate and takes a steady, light hand.
Today I'm working
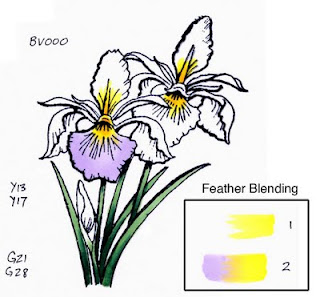
 with this Iris image by GCS Artstamps. Irises are hard because they fade from a deep, rich blue-violet purple to a bright yellow center. I start by laying down my yellow centers. I put a base of Y13 and feather it out into each petal. Then I darkened the middle with a hint of Y17 on each flower.
If you look at the inset diagram above you can see how I am going to layer on the BV000. I feather the yellow one way, VERY LIGHTLY, then I feather in from the opposite direction the light purple. When I'm done I will get a natural looking blend from yellow into BV.
 If you still see streaks on either layer then review the steps in my earlier post. You should also color in many very light layers until you've built up the smooth area you need. This is very tricky, and it works best with the side of the brush nib. Practice flicking the brush to get the proper technique.
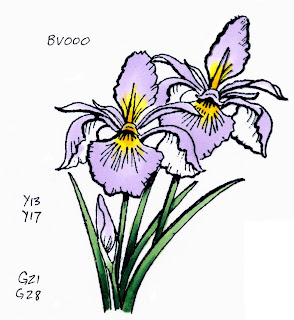
Next, I feather in my dark BV04 to each petal, following the same direction as the BV000. I am going about half-way into each lighter area. I am leaving plenty of the light purple before it touches the yellow, likewise, I am giving myself plenty of the dark area to blend back in.
Note: If it seems like your marker layers are starting to bleed outside your lines then STOP! It is very easy to oversoak the paper when using this technique. Let your paper dry out a bit before adding more of the light color, then it won't bleed so much.
 At this point I want you to look at the diagram below. Note the 3rd step where I am adding in the BV000 to blend the light and dark together. Right where the dark meets the light I am putting the heaviest flow of ink. Then I lift up and feather out in both directions from there. This pushes the darker color back into itself (note also that I am not going all the way back to the far edge of dark, but almost that far).
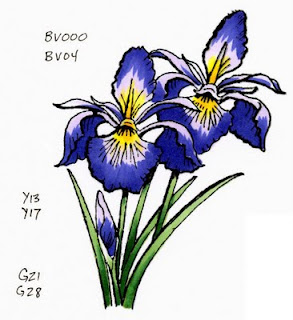
 When you look at my final Iris image you can see how the color fades smoothly from the rich, vibrant yellow to the much darker blue-violet. I could go in even more and darken the underside of each petal with an even darker purple, but I think I'll leave it for now.
Image stamped with Memento ink onto Neenah Classic-Crest solar white cardstock and touched up with a 0.1 mm multiliner SP.


Gorgeous work Marianne! You did a wonderful job explaining the method.
ReplyDeleteI deleted my comment as I just realized this was a stamped image. I think it would be great when you are doing tutorials like this that a line drawing image could be made available for us to use as practice. This was a great tutorial, will have to see if I have an iris stamp I can practice on, although a pansy would be the same technique.
ReplyDeleteSo that is what I did wrong!
ReplyDeleteI tried this blending technique in your first lesson. I even purchased the same stamp to try it with. :o)
I still had marks...Now I know what I didn't do right!
Thanks! I do beleive I have it now!
Here was my 1st attempt!
http://scrapworld-scrap2day.blogspot.com/2009/07/my-try-at-copic-marker-feather-blending.html
Absolutely stunning work. Thanks for the tutorial. I have tried this technique and still don't have it but I will continue practicing it. :)
ReplyDeletexoxo, Christine
Because of your blog and wonderful tutorials I have gotten this one down PAT! Thanks so much, Marianne!
ReplyDeleteThis is an awesome tutorial on the feather blending technique. Thank you, Marianne!
ReplyDeleteAfter reading this (really early this morning) I went back to sleep and dreamed about doing this technique. My first Copic dream!
ReplyDeleteI may have some irises in digital line art that I can practice this with. Thanks for another fantastic TUT, Marianne!
ReplyDelete~hugs~
What an interesting technique. I will keep visiting your blog to get detailed explanations. Awesome work and mad skills. Bless!
ReplyDeleteLove this tutorial, Marianne! I've been practicing, but this really helps a lot! Thanks!
ReplyDeleteThanks-this is beautiful!!!!!
ReplyDeleteThis looks beautiful. I love the blending.
ReplyDeleteBeautiful. Thanks for doing this Marianne and explaining everything so well.
ReplyDelete...... back to the drawing board for me....
So excited to find this tutorial!! I just purchased some floral digi's and this technique will be wonderful!!
ReplyDeleteThat Iris is freakin' beautiful! One of my most favorite flowers, and just found out they are poisonous!
ReplyDelete