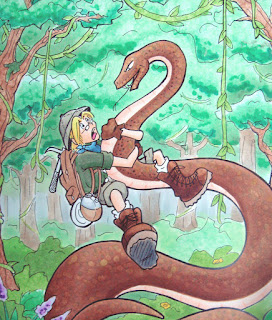
 Here is an old, kinda washed out photo of the original. The colors were pretty soft, the trees were washed out, and the whole thing was a bit flat (the photo also makes it look worse, but it was pretty bad). I had been experimenting with the markers at the time, learning how to use them better, so this was not a fabulous coloring sample, but I did like the drawing itself.
I realized when I was flipping through my portfolio that I had actually never finished coloring the image, but it looked "good enough" so I'd ignored it all these years.
Well, I pulled it out. This was a line drawing that I had photocopied onto color laser copier paper. I had colored it and stuck it away. Now, 11 years later, I pulled it out to tighten up a lot of things.
One of the most amazing traits of Copic markers is that on uncoated paper you have an infinite working time. Meaning, just because I colored something 11 years ago doesn't mean that it's done. I can pull it out and re-work the colors at any time. Once the ink is wetted with another marker again, I can mix and blend.
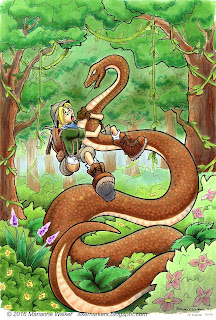 So, I throughly worked over this piece. Biggest priority was fixing the lack of contrast in the trees. Years ago I had dabbed on hand-sanitizer to affect the texture in the trees. Trouble is, hand sanitizer really fades out colors. It looks cool, but I learned through trial and error over the years since 2005 that I should have started darker on the base color first. I also crated more depth on the bushes and shrubs. Now you can clearly see which trees are in front, which bushes are in the foreground, and how dimensional the fern-things are.
Next, I made him look less flat. Again, deepening the shadows on my character makes him pop and look much more dynamic. (by the way, Tad is his name, as in "A Tad Bit of an Adventure", the comic series I was working up at the time). I added better skin tones, shadows on the snake, and generally punched up the contrast on the character.
Last, I spent a lot of time on the snake. In the first sample, you can see I had a few, irregular scales dotted in with a variety of colors. This time, I increased the contrast in the shadows and more clearly defined the scales on the belly with the colorless blender. Once all the contrast was done, then I went, scale-by-scale with the colorless blender and added more regularity to the scales.
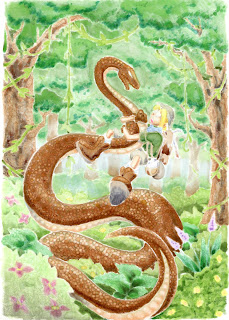 To create dots, I simply touch the tip of the colorless blender to a colored area and it pushes the color out the backside of the paper. To show you what I mean, here is a scan of the backside of this picture. Because this is on such thin paper, you can clearly see the contrast and effects of the blender on a colored area.
What is really amazing is that except for the shadows, the brown ink on the snake is the same ink I put down 11 years ago. So, all the ink pushed out the back of the paper came from a marker more than a decade ago, and I was still able to move it around. Love that about my Copic Markers!
Have a great week, and I hope to see you at some upcoming event!


