CreativeLadder.com
Friday, August 23, 2013
Creative Ladder new class
CreativeLadder.com
Wednesday, August 14, 2013
Helpful Color Chart
I hope you are having a great week! I was coloring a tutorial image for Tracing Memories outline, and I realized that a trick I use with attendees should probably be added to my blog.
 An old trick artists use when they want to figure out what color something is, they isolate that color by looking through a card with a hole cut out of it. Then they can compare that one spot with the colors they are working with.
 I know some people have taken their large Copic color charts and done something similar so they could identify color matches, by punching a small hole in each swatch. But, those charts are kinda small, and I don't have a long-arm small hole-punch. So, I made a special color chart that I wanted to share.
To make this easier for the class I'm working with, I created this helpful chart for 36 colors per half-page (72 colors per printout). This is set up so that you can punch the holes with a standard, single hole-punch.
To use this chart, right-click on the image and download it. Then, simply print it on your favorite marker paper and color in each rectangle with the colors you have. Write the color number next to it. Punch each hole. Then, line up the colored page with the area you are trying to color-match.
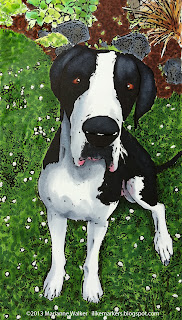
As you can see from this close-up of the dog photo, the grass is somewhere between G28 and G99. So, when I go to color, I will use a mix of those two colors. I actually want the grass a little lighter, so I threw some G24 into the picture first, then scribbled in G28 and G99.
For the lighter gray on the dog, my color guide told me that C2 is a good match. This is a really handy quick reference, especially if you have a hard time matching colors to the Copic color spectrum, or if you only have a limited range of colors and have a hard time figuring out which will match the best.
 Here is the finished picture. I colored him with G24, G28, G99, YG11, YG13, YG17, G02, E33, E27, E49, 100, C2, C5, R85, and B41. instead of worrying about keeping the daisies white while coloring, I went back after I was done coloring and added them back in using Copic Opaque White. The original photo was taken by Chelsea Lowery, of her big dog, Rupert. He's such a cutie!
Labels:
beginner,
picking colors,
tips,
tracing memories
Tuesday, August 13, 2013
Certification update
Wow! Where has this Summer gone? I can't believe that August is half-over already. I need to update my blog more often. I promise to post a tutorial later this week. Meanwhile, here is a class update. There are classes this weekend that you can still get into, so don't hesitate!
 Standard Certification
This class is an overview of everything Copic. Every papercrafter who uses Copics should take this class! We have people who have never held a marker before, to experienced users in our classes. Everyone leaves with something they never knew before. These classes are not project based, but teach you standard techniques, process, and why some things are done in a certain way.
We welcome all skill levels! Our instructors are thrilled to answer your questions and help you through your tricky concepts. You can sign up today, or e-mail with questions.
Aug. 16, St. Louis, MO taught by Lori Craig
Aug. 16, Minneapolis, MN taught by Debbie Olson
Aug. 16, Portland, OR taught by Sherrie Siemens
Aug. 23, Carlsbad, CA taught by Sherrie Siemens
Sept. 6, Milwaukee, WI taught by Debbie Olson
Sept. 13, Seattle, WA taught by Sherrie Siemens
Sept. 27, Edmonton, AB taught by Sherrie Siemens
Oct.4, Philadelphia, PA taught by Debbie Olson
Oct. 11, Hartford, CT taught by Cindy Lawrence
Oct. 11, Austin, TX taught by Lori Craig
Intermediate Papercrafting Certification
Once you've taken the Standard Certification class, you can take the Intermediate class. All sessions are back to back, making travel easier.
Learn how to color so that your images stand out more...more contrast, more believable colors, and more dynamic shading. We also teach you a bit about composition, helping you put your beautiful images together with paper and embellishments in a pleasing way. You know you want to attend so, register on our website now.
Aug. 17, St. Louis, MO taught by Lori Craig
Aug. 17, Minneapolis, MN taught by Debbie Olson
Aug. 17, Portland, OR taught by Sherrie Siemens
Sept. 7, Milwaukee, WI taught by Debbie Olson
Sept. 14, Seattle, WA taught by Sherrie Siemens
Sept. 28, Edmonton, AB taught by Sherrie Siemens
Oct. 5, Philadelphia, PA taught by Debbie Olson
Oct. 12, Hartford, CT taught by Cindy Lawrence
Oct. 12, Austin, TX taught by Lori Craig
OK, I promise to post a fabulous tutorial later this week. If you want to leave me a comment about what you'd like a tutorial on, I'd be happy to help!
 Standard Certification
This class is an overview of everything Copic. Every papercrafter who uses Copics should take this class! We have people who have never held a marker before, to experienced users in our classes. Everyone leaves with something they never knew before. These classes are not project based, but teach you standard techniques, process, and why some things are done in a certain way.
We welcome all skill levels! Our instructors are thrilled to answer your questions and help you through your tricky concepts. You can sign up today, or e-mail with questions.
Aug. 16, St. Louis, MO taught by Lori Craig
Aug. 16, Minneapolis, MN taught by Debbie Olson
Aug. 16, Portland, OR taught by Sherrie Siemens
Aug. 23, Carlsbad, CA taught by Sherrie Siemens
Sept. 6, Milwaukee, WI taught by Debbie Olson
Sept. 13, Seattle, WA taught by Sherrie Siemens
Sept. 27, Edmonton, AB taught by Sherrie Siemens
Oct.4, Philadelphia, PA taught by Debbie Olson
Oct. 11, Hartford, CT taught by Cindy Lawrence
Oct. 11, Austin, TX taught by Lori Craig
Once you've taken the Standard Certification class, you can take the Intermediate class. All sessions are back to back, making travel easier.
Learn how to color so that your images stand out more...more contrast, more believable colors, and more dynamic shading. We also teach you a bit about composition, helping you put your beautiful images together with paper and embellishments in a pleasing way. You know you want to attend so, register on our website now.
Aug. 17, St. Louis, MO taught by Lori Craig
Aug. 17, Minneapolis, MN taught by Debbie Olson
Aug. 17, Portland, OR taught by Sherrie Siemens
Sept. 7, Milwaukee, WI taught by Debbie Olson
Sept. 14, Seattle, WA taught by Sherrie Siemens
Sept. 28, Edmonton, AB taught by Sherrie Siemens
Oct. 5, Philadelphia, PA taught by Debbie Olson
Oct. 12, Hartford, CT taught by Cindy Lawrence
Oct. 12, Austin, TX taught by Lori Craig
OK, I promise to post a fabulous tutorial later this week. If you want to leave me a comment about what you'd like a tutorial on, I'd be happy to help!
Labels:
certification,
intermediate certification
Subscribe to:
Comments (Atom)


