Tuesday, September 13, 2016

Re-coloring old art

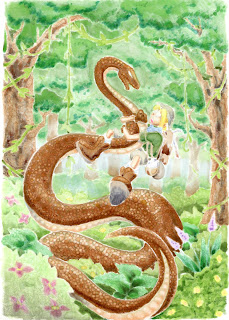
A few days ago I showed you how I re-drew an old piece from my portfolio and colored it from scratch. This time I want to show you a piece I drew and colored back in 2005, then decided to update the colors.

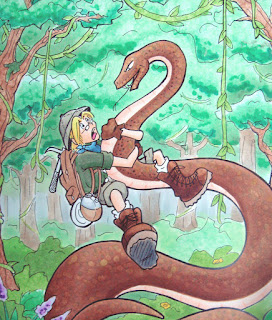
Here is an old, kinda washed out photo of the original. The colors were pretty soft, the trees were washed out, and the whole thing was a bit flat (the photo also makes it look worse, but it was pretty bad). I had been experimenting with the markers at the time, learning how to use them better, so this was not a fabulous coloring sample, but I did like the drawing itself.

I realized when I was flipping through my portfolio that I had actually never finished coloring the image, but it looked "good enough" so I'd ignored it all these years.

Well, I pulled it out. This was a line drawing that I had photocopied onto color laser copier paper. I had colored it and stuck it away. Now, 11 years later, I pulled it out to tighten up a lot of things.

One of the most amazing traits of Copic markers is that on uncoated paper you have an infinite working time. Meaning, just because I colored something 11 years ago doesn't mean that it's done. I can pull it out and re-work the colors at any time. Once the ink is wetted with another marker again, I can mix and blend.
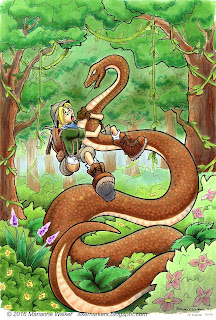
So, I throughly worked over this piece. Biggest priority was fixing the lack of contrast in the trees. Years ago I had dabbed on hand-sanitizer to affect the texture in the trees. Trouble is, hand sanitizer really fades out colors. It looks cool, but I learned through trial and error over the years since 2005 that I should have started darker on the base color first. I also crated more depth on the bushes and shrubs. Now you can clearly see which trees are in front, which bushes are in the foreground, and how dimensional the fern-things are.

Next, I made him look less flat. Again, deepening the shadows on my character makes him pop and look much more dynamic. (by the way, Tad is his name, as in "A Tad Bit of an Adventure", the comic series I was working up at the time). I added better skin tones, shadows on the snake, and generally punched up the contrast on the character.

Last, I spent a lot of time on the snake. In the first sample, you can see I had a few, irregular scales dotted in with a variety of colors. This time, I increased the contrast in the shadows and more clearly defined the scales on the belly with the colorless blender. Once all the contrast was done, then I went, scale-by-scale with the colorless blender and added more regularity to the scales.
To create dots, I simply touch the tip of the colorless blender to a colored area and it pushes the color out the backside of the paper. To show you what I mean, here is a scan of the backside of this picture. Because this is on such thin paper, you can clearly see the contrast and effects of the blender on a colored area.

What is really amazing is that except for the shadows, the brown ink on the snake is the same ink I put down 11 years ago. So, all the ink pushed out the back of the paper came from a marker more than a decade ago, and I was still able to move it around. Love that about my Copic Markers!

Have a great week, and I hope to see you at some upcoming event!


Thursday, September 8, 2016

Fall Classes and Events

I have a list of upcoming events, and I think you'll be excited. This year we've been branching out in what we teach and offer. So, classes over the next few months are really covering a wide gamut of topics. Look for classes on Fine Art as well as for Papercrafting (Click on our classes page to see all classes offered)

Papercrafting classes - 2016
Whimsical Faces & Hair $99
Vintage Values & Monotones $99
Sept. 9th Charolette NC
Sept. 23rd Las Vegas, NV
Sept. 23rd, Sacramento, CA
Oct. 14th, Boston MA
Oct. 14th Hanover, MD
Oct. 14th Portland, OR

Dress for Success, Clothing & Accessories
Sept. 10th Charolette NC
Sept. 24th Las Vegas, NV
Sept. 24th, Sacramento, CA
Oct. 15th, Boston MA
Oct. 15th Hanover, MD
Oct. 15th Portland, OR

Note if you want to take all 3 workshops in a location, we offer a package discount HERE.

New! Fine Art Workshops 2016
Fine Arts 101 class-
This is a basic overview of using Copic markers, from blending to paper choices. No experience necessary! Lots of great content, offered in a couple locations coming up soon. Only $99, classes run from 9am to 1pm

Sept. 10th Phoenix AZ, Taught by Jennifer Dove
Nov. 4th Dallas, TX, Taught by Ryan Weber

Fine Art Workshop: ThINKing Outside the Box with Copics
Fine Arts: ThINKing Outside the Box
Use a limited color palette to make amazing mini masterpieces. No experience necessary! $99, 2 to 6pm.

Sept. 10th, Phoenix AZ, taught by Jennifer Dove


Fine Arts: Portraits with Copics
This is a mid-level class that goes in-depth on how to acheive more realistic portraits with Copic markers. Learn how to achieve good skin tones, and more $99, class runs from 2 to 6pm

Nov. 4th Dallas, TX


Papercrafting Classes- 2017
Standard Certification
Jan. 18th 2017  Phoenix AZ

Coloring Flowers with Copics
Jan. 18th, 2017 Phoenix AZ

Intermediate Certification
Jan 19th, 2017  Phoenix AZ
Hand Lettering
New! Hand Lettering with Copic
  $120
Jan. 20th 2017  Phoenix, AZ


New! Copic Coloring Animals $99
Jan. 21st 2017  Phoenix, AZ

Coloring Landscapes with Copics $99
Jan 21st 2017  Phoenix, AZ


Conventions
We have booths at many events this Fall. If you are nearby any of these upcoming locations then stop by and check us out!

Sept 9-11th, Rose City Comic Con, Portland OR - Comic convention
Oct. 8th, Main St. Stamping, Portland, OR - I'll be teaching Copic coloring workshops
Nov. 4-5th, Pinners Convention, Salt Lake City UT - Hand lettering, coloring, adhesives, home decor paint, and more
Nov. 11-13th, Eucon, Eugene, OR - Comic Convention, we're hosting live art demos and ongoing workshops
Nov. 16th - 17th, Tools of the Trade, Eugene OR - I'll be doing free, live coloring demos
Nov. 18-20th, CTNX, Burbank, CA - Professional artist gathering, we'll have workshops and demos


Updating Old Work

This year has been pretty busy. I know I haven't been around for a while, but never fear, I am still here. Recently I was at Salt Lake Comic Con and I was flipping through my old portfolio. It is sadly in need of updating as a lot of the artwork I'd made was about 10 years old.

Some of the artwork I look at and cringe...I'm so much better at drawing than I was 10 years ago! (A big reason to keep a portfolio is to remind yourself how much you've improved over time).

Other artwork I looked at and decided it just needed coloring touched up, since I colored many of the pictures during conventions, with limited supplies, or while I was talking to others. And, my coloring has improved a lot in the last 10 years.

Redrawing & coloring old artwork
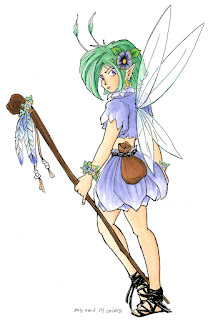
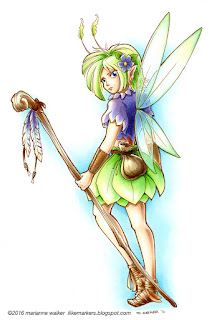
This first piece is one I originally drew about 12 years ago. Apparently when I was at a demo I only used 14 colors the first time. I've always liked this spunky fairy, so in flipping through my portfolio this weekend I figured now was the time to update her.

First, I traced her outline onto a clean sheet of our sketchbook paper using a brown multiliner 0.3mm. I have also changed my style of drawing a bit over the years, so I cleaned up my line work a little. Sometimes, just redrawing something you made previously makes all the difference in changing something from good to great.

I colored this version with way more than 14 colors! B00, BG000, YG11, Y000, E000, BV11 are the main colors used throughout, then I enhanced each area.

The wings are colored with B00, BG000, YG11, Y000, and a glitter pen (you can't see it but it sparkles). I used the colorless blender to lighten up the transparent areas that show the shirt and arm through.

The purple areas are colored with BV11, B66, and BV17, with highlights of B00 and Y000 (Heck, I used highlights of Y000 and B00 throughout all areas of the picture). Green things are colored with YG11, YG13, G02, YG17, Y000 and B00.

I used a few different earth tone families. E40's for the sack and base coat on the staff. The skin is colored with E0000, E11, BV11, E13, E15, B00, Y000. The shoes and wrist cuffs are in the E30's family, with the B00 and Y000 thrown in for good measure.

I'm excited! This came out so much cleaner, crisper, than the one I made 12 years ago. Now, at least one page in my portfolio is updated (only like 30 more images that bug me to go!). Doing this exercise really helped me see just how much I have improved in that time, so I strongly encourage you to also go through and re-color something you made a long time ago.

Ok, I'll share another updated artwork soon!