note: I fixed the link
A couple of video interviews...
Summer CHA is over, and now I'm heading off to see the Supershow a little before I head home. Be sure to stop by the Splitcoaststampers booth today and check out the Make 'N Take I'll be hosting to get your free roll of tape!
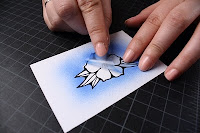
Here is a photo of Colleen Schaan coloring a beautiful butterfly stamp in our booth this week on the new blending card. Look at how gorgeously the blue and purple are as they blend into each other- wonderful!! I love this stuff!
Meanwhile, I bumped into a few friends who shot video of me this week at the show- be sure to check these out...
My dear friend Daisy, from Eclectic Paperie took a nice video at CHA of me talking about the new blending card, and it's posted on YouTube. You can view it here. Everyone who stopped by the booth and tried the blending card absolutely LOVED it!! You'll love it too, so be sure to check it out soon at your local papercrafting store.
Gina K. also interviewed me for Stamp TV. If you watch her video here, the third segment is an interview with me about our new...
Intermediate Certification!!!
Intermediate Certifications will start this fall, and spread across the nation next year. We are still gathering up exact details, but Gina's interview is a good summary of what we will cover in this class. It will be technique based, and geared for those who want to color more professionally. We won't have time to work on altered arts and mixed media, rather, we will be discussing picking colors, shadows, and how to color tricky things like faces and hair.
More information will be available soon, so stay tuned. Please do not e-mail us for applications or information, as the applications are not ready yet, and it will be a different application process than in the past. Note: You cannot take the intermediate class without having taken the beginnner certification, so sign up today for the regular classes!
Friday, July 30, 2010
Thursday, July 29, 2010
CHA 2010 Sneak peek Part 3
New Products- High Tack Double Sided tape
Another new product we are importing from our friends in Australia is something that has proven to be very popular- X Press It High Tack, Double sided tape.
This tape is extremely high tack, acid free, easy to use, and comes in 3 sizes: 1/8", 1/4", and 1/2". Originally developed for the picture framing industry in Australia, this tape is perfect for papercrafting. Rolls are very inexpensive, and, there's a lot of tape on each roll as well, 55 yards on rolls of 1/2" and 1/4", 27 yards on the 1/8" rolls.
X Press it tape is heat resistant (you can heat-emboss with it) and very strong. Members of our design team have used it for hemming their pants and it will survive the washer and dryer!
At Winter CHA we gave a roll to Splitcoaststampers for their main Make N' Take. They made over 800 projects from one roll, with quite a bit left on the roll for later. They also used the tape for attaching metal pin-backs to the project, with many happy crafters. The paper would rip before they could get the metal to come off the project. Best of all, the longer it sits the stronger it holds.
High Tack tape is easy to use. It tears cleanly with your fingers and the backing is easy to peel. I really love this stuff!
If you are coming to the CHA Supershow you can come between Noon and 2pm on Friday for the first Make 'N Take. The first 100 people to do the project get a free sample roll of tape! Be sure to stop by and try it for yourself.
CHA Pictures
Meanwhile, here are some great pictures of our fabulous instructors in the booth at CHA. Here we have Colleen Schaan, our East-Coast instructor chatting with curious people about the benefits of Copic markers. Smiling next to her is our South/Western instructor Jennie Black, who will be teaching consumer classes at the Supershow. Those classes have been sold-out of weeks, so catch her next year at the supershow in California if you want to take one of her excellent classes.
Here's a photo of sweet Jenn Balcer, our Texas/South Central instructor coloring a beautiful wooden tree by Kaiser Crafts. We have so much fun trying products from our favorite companies at this show. I'll have more pictures later!
Sunday, July 25, 2010
New Products, CHA Summer 2010, Part 2
More new Products for CHA
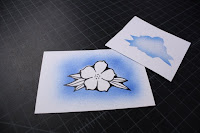
The next new product I want to share is also from Australia, new Mask-It masking film, from X-Press It Graph X. This stuff is perfect for those of you who frequently airbrush and want a high-quality mask that will last over and over again.
Mask-It is a clear, medium-tack adhesive backed film that is easy to cut, and easy to apply. It works great on cardstock and is perfect for protecting areas of your work that you want masked during airbrushing. One really nice point is that you can clean the surface between sprays, unlike using paper masks that get sticky from ink buildup. Best of all, since it's totally clear, you can assure accurate positioning every time.
Using Masking Film
If you have never used a mask before while airbrushing, then this tutorial should be really useful. There are many types and kinds of masking films, friskets, and adhesives available, but for today's tutorial we are using Mask-It, medium tack film.
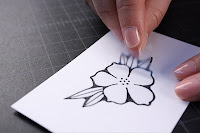
1. Start with a copy of your image stamped or photocopied onto scrap cardstock. Apply a small piece of clear film over the stamped image. Make sure there are no air bubbles under the film, as this will distort the final shape when you re-use the film. Note: test your Mask It to make sure it will not pull up the fibers of your paper. If it seems to be stronger than the paper, then gently touch the adhesive to your clothing before applying to the paper. This will make it less tacky.
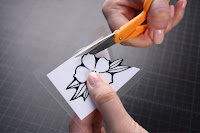
2. With sharp scissors, carefully cut around the scrap image. Save any pieces you will be using for masking. If you are airbrushing around a shape, save the inside, if you are airbrushing inside a shape and protecting the surroundings, then save the outside. You do not need to save the paper parts, just the clear Mask-It.
3. Apply the clear film to the area you want protected when you airbrush. This is tricky, since images with thin lines can shift easily, and you don't want to block any areas that should be airbrushed (it looks strange when you have an unintentional white halo around your art). Make sure that the film is smoothed down at the edges and won't move once you start blowing air.
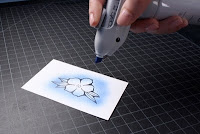
4. Airbrush from the middle out. The medium tack film is great because even on fine detail areas it doesn't blow up around the edges, even if you've used the same mask a few times.
5. Carefully remove the frisket, and you're done! Save the used piece for your next project with that image. If you get a marker buildup, simply wipe the surface with hand-samitizer.
Come check it out in our booth this week- I think you'll fall in love with it just as much as we have. OK, I hope to post a few more new items before CHA starts, but I'm off to catch my fight now. Have a great weekend!
Friday, July 23, 2010
New Products CHA Summer 2010, part 1
Finally! Here's the first sneak peek at the new releases for CHA Summer 2010. If you stop by our booth during the wholesale show, or the Splitcoaststampers booth during the Supershow you'll get a chance to use and see these fabulous new products.
X Press It Blending Card
This has us very excited! I mentioned a couple months ago that we recommend this paper to anyone living in Australia, and now it's coming to the United States!!
Why did Lori and I fall in love with this paper? Because it blends beautifully, it bleeds less than our old favorite, Neenah Classic Crest, and it has a nice, bright white color. If you have ever tried Bazzil Simply Smooth paper, the Blending Card is like a hybrid between Neenah and Bazzil.
This paper is now available for stores to purchase. It comes in a large pack with 125 sheets of letter sized paper. It is about 92 lb. paper- just a little heavier than the Neenah, but it is a much tighter grained paper, so it doesn't feel too thick.
If you look at this close up on the pink popsicle, you can see that the Neenah is a much softer paper, and it easily feathers if you don't let it dry a little between layering colors. This gets to be a big problem when you're working with intense reds and other dark colors.
The Blending Card, however, gives nice blends without bleeding and I don't have to wait or be careful! I love it! Because it is not as soft as the Neenah, it takes less ink to color on so your marker lasts longer before needing to be refilled.
Please stop by the booth to try it out, or, if you can't make it to the show, ask your favorite Copic supplier to bring some in for you. Trust me, you'll love it!
Coloring Grays more interesting
Something you may not notice on this final picture of the ant trying to run off with the popsicle is the subtle tones in the gray body.
I did not want the ant to feel too flat, so I started with a C5, a nice cool middle-dark gray. Then for accent I blended in some V17 as shadows. The purple is just barely visible within the grays (see the middle of each body section.
Then, I added faint reflections on the bottom of the ant by layering on some BG09. Why? Because the gray is blue-toned I can layer a purple (which has blue in it) and add contrasting accents with a Blue Green (which also has blue in it). Because Blue-Green is far away on a color wheel from Violet they have more contrast. However, the ant has a base gray, which brings both colors closer to each other in tone. So now, my gray has subtle tone and interest, even though it could have easily remained a plain gray.
This is a great way to add a hint of tone to a neutral image to make it coordinate with other elements in your composition. The subtle purple makes the ant match the pink popsicle a little more. OK, I need to get back to work. Stay tuned tomorrow for more sneaks from CHA!
Image: Life's a Picnic by Our Craft Lounge, X-Press It Blending Card. Colors used: RV02, RV06, C5, V17, BG09, C3, 0
Thursday, July 22, 2010
Quick Inspiration
You can learn to be more creative
I was recently sent this link to a Newsweek article from a couple weeks ago, and I think it is very telling... If you don't think you're very creative, then think about how society made you think that way and how can you counter it- trust me, your WHOLE life will improve if you think you're creative and act upon that creativity...
Newsweek Article- The Creativity Crisis
Tuesday, July 20, 2010
Certification updates
Whoops! I forgot a Certification from the list I posted on Friday...
Green Bay, WI August 21, Taught by Debbie Olson Open to Stores & Designers
and Applications are now available for:
Lincoln, NE August 7th, 2010 Taught By Lori Craig Open to public
Minneapolis MN Sept 16 (before Scrapfest) Taught by Debbie Olson and Lori Craig Open to Stores & Designers
Later this week I'll post our new products, so stay tuned!!
Friday, July 16, 2010
CHA & Certifications
July is by far the busiest month here at Copic, so I apologize for taking a bit of a break from blogging until things calmed down. Here is a fun picture I drew at Anime Expo a couple weeks ago. I think this aptly describes what I would rather be doing right now :)
CHA Demos
First of all, we would love to see you at CHA! We will have a booth at the wholesale show, July 27-29th, and you'll get a chance to see all our NEW products. Yes, you heard me, NEW products. Next week I'll be showing some sneak peeks of those new products, so stay tuned. Meanwhile, you can stop by booth #1530 and check us out. Also come and say hi to the Regional Certification Instructors, and find out what excitement is in the works for this Fall!
If you are going to the CHA Supershow on the 30-31st, you can do an ongoing Make 'N Take at the Splitcoaststampers booth. You'll also get a chance to try some one of our new products and get some to take home for yourself at the Copic/X-Press It Make 'n Take from Noon to 2pm on the 29th. I'll be there, as will Lori Craig, Sharon Harnist, and many others! Come say hi and make a cute project.
Upcoming Certifications
There are lots of certification classes coming up in the near future. However, we have had some complaints from people who thought they were taking a COPIC certification, and it has been a certification for other companies, using Copic Markers. Be sure that if you are taking a Certification class it is sponsored by by either Copic/Imagination International, Inc. in the US, X-Press Graph-X Supplies in Australia/New Zealand, or Holtz GmbH for Europe. These classes are all carefully coordinated so that the information shared at each class is the same, no matter which country you live in. Speaking of which, we are pleased to announce:
European Certification
Friday, 10th September 2010 Hagen, Germany on (one day before the Stempelmekka Fair). This class will be held in German. Taught by Diny Sprakel (she's a fabulous instructor, and you'll be sure to have a great experience!). For more information on European classes please contact Britta, at b.rumpf-burblies@holtz-gmbh.de
Australian Certification
August 30, Melbourne, VIC Taught by Mandi Lee Klinger - OPEN
October 25, Brisbane, QLD Taught by Kathy Jones
for more information please contact copicmarker.com.au
North American Certifications this Fall
Please note that when you download an application to attend a certification class there is also an information file to download as well. This has the specific location, times, and other important details.
Chicago, CHA July 26, Taught by Debbie Olson and Lori Craig Open to Stores & Designers
Lincoln, NE August 7th, 2010 Taught By Lori Craig Open to Stores & Designers
Atlanta, GA Aug. 23 Taught by Colleen Schaan Open to Stores & Designers
Albuquerque, NM Aug. 29th Taught by Jennie Black Open to Stores & Designers
Branson, MO Sept. 3, Taught by Lori Craig Open to Stores & Designers
Pittsburgh, PA Sept. 6th, taught by Colleen Schaan Open to Stores & Designers
Oakland, CA Sept 11th, taught by Jennie Black Open to Stores & Designers
New Orleans, LA Sept. 15th taught by Jenn Balcer Open to Stores & Designers
If you need an application for any of these locations you can download one here. Send in completed applications right away, even if you are not qualified, as the waiting lists fill on a first-come, first-serve basis.
Applications have not gone out yet for the following locations:
Minneapolis MN Sept 16 (before Scrapfest) Taught by Debbie Olson and Lori Craig
Salt Lake City, UT Sept 25th Taught by Jennie Black
Calgary, Canada, Sept 26th Taught by Sherrie Siemens
Buena Park CA, Oct. 2nd, Taught by Jennie Black
Jacksonville FL, Oct 8th taught by Colleen Schaan
Other Events
For Locals, I will be doing Manga demos downtown as part of the City of Eugene Art events, on Aug. 11th. I will also be doing Manga demos at the Lane County Fair on August. 20th.
Subscribe to:
Posts (Atom)