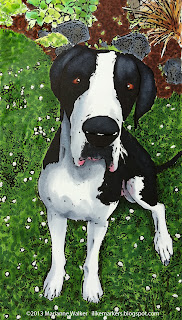
I hope you are having a great week! I was coloring a tutorial image for Tracing Memories outline, and I realized that a trick I use with attendees should probably be added to my blog.
 An old trick artists use when they want to figure out what color something is, they isolate that color by looking through a card with a hole cut out of it. Then they can compare that one spot with the colors they are working with.
 I know some people have taken their large Copic color charts and done something similar so they could identify color matches, by punching a small hole in each swatch. But, those charts are kinda small, and I don't have a long-arm small hole-punch. So, I made a special color chart that I wanted to share.
To make this easier for the class I'm working with, I created this helpful chart for 36 colors per half-page (72 colors per printout). This is set up so that you can punch the holes with a standard, single hole-punch.
To use this chart, right-click on the image and download it. Then, simply print it on your favorite marker paper and color in each rectangle with the colors you have. Write the color number next to it. Punch each hole. Then, line up the colored page with the area you are trying to color-match.
As you can see from this close-up of the dog photo, the grass is somewhere between G28 and G99. So, when I go to color, I will use a mix of those two colors. I actually want the grass a little lighter, so I threw some G24 into the picture first, then scribbled in G28 and G99.
For the lighter gray on the dog, my color guide told me that C2 is a good match. This is a really handy quick reference, especially if you have a hard time matching colors to the Copic color spectrum, or if you only have a limited range of colors and have a hard time figuring out which will match the best.
 Here is the finished picture. I colored him with G24, G28, G99, YG11, YG13, YG17, G02, E33, E27, E49, 100, C2, C5, R85, and B41. instead of worrying about keeping the daisies white while coloring, I went back after I was done coloring and added them back in using Copic Opaque White. The original photo was taken by Chelsea Lowery, of her big dog, Rupert. He's such a cutie!


13 comments:
Thank You- I used to do that for sewing too....it was a quilters tool, but worked for my smocking...... I appreciate this tip!
Thank you for the chart to print out. It is positively brilliant, and so much better than trying to gauge colors by the way your own printer prints them. Thank you so very much.
Thanks! Great idea!
What a great tool!
Thanks!!
What a great tip!!!! Thanks too for the chart - it will be a BIG help!
Paper Hugs,
Jan
PS...my favorite new tool is a Martha Stewart Screw Punch...comes with 3 bits and will punch a hole anywhere you want it...for the Oregon State Fair 2013 we are doing 66 scrapbook style 12 x 12 banners with lots of layers so we used brads...that punch was invaluable!!! ($29.95 but used a coupon) Woo Hoo!
Fantastic!!! Thank you for the tip and the chart.
Thanks so much for sharing that tip and chart! It is going to be SO useful :-)
What a wonderful idea and I know I'll use it for everything. I match my furniture nicks to Copics and it matches just fine.
Thanks
I have tried to copy this chart and print it but it comes out all blurred. Is there a way that I can get this other than copy it?
thanks, Patti
Patti, send me a note and I can send you the file.
I was thinking you could tape the circle of left over color to the pen for colors that are a bit different than the lid shows :)
I love your work! Thank you for all of the help and inspiration!
Thanks. It is so wonderfull.
Post a Comment