
 Layering bird feathers
Last week I had the pleasure of coloring for two days straight at the U of O Bookstore. What fun I had! Any chance to sit and color is a win in my book.
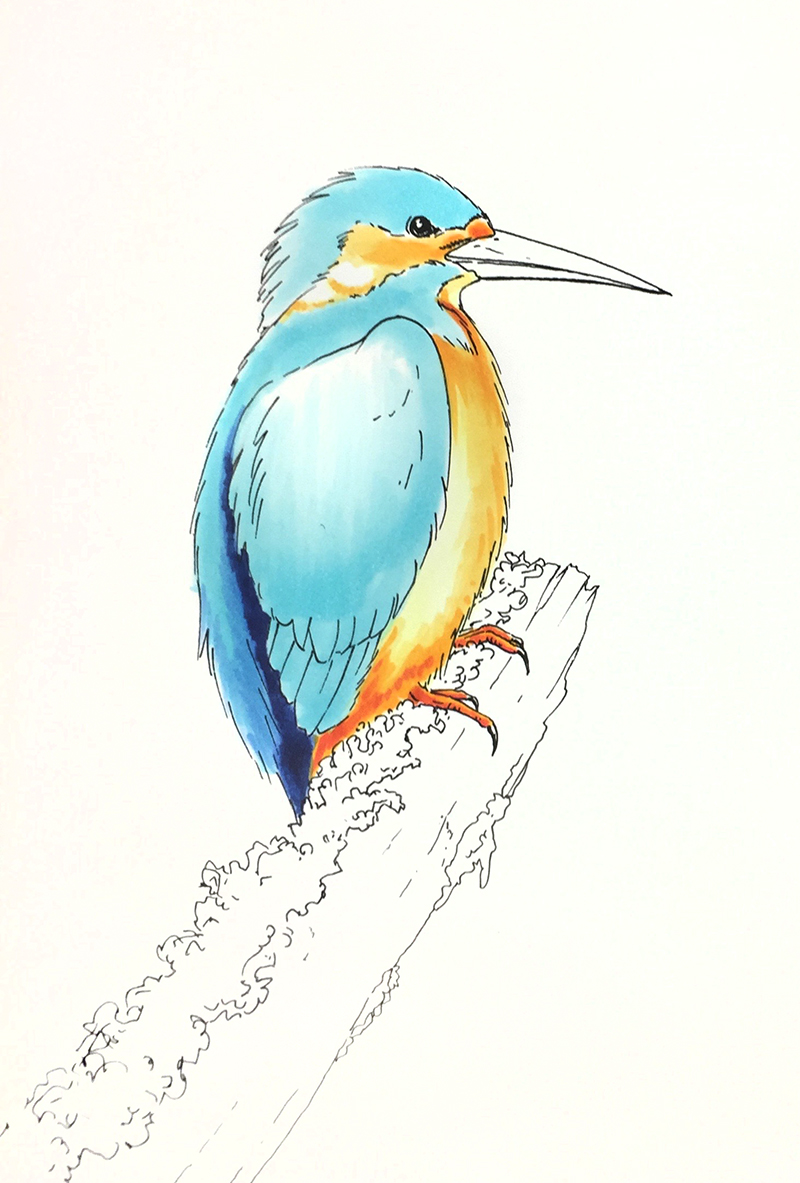
(Just so you know, this is a way more complicated bird than the ones going into my next book. It took me a little over 2.5 hrs to draw and color in this vibrant kingfisher, whereas most of the coloring projects in my books are intended to be completed in about 25-40 min.)
I started by lightly blocking in the base tones. (I apologize in advance if I leave out any colors, as I didn't write down all the colors I used, so I'm going by memory). I used BG01, B24, B39, Y11, YR31, YR14, and YR18. Notice the light feathering strokes I used on the wing and chest.
 The first spot you touch your marker nib down will be darkest, so pay attention to the affect you are trying to get, planning where your light and dark feathers will be. Sometimes I flick up the wing and other times I flick down on the wing. I try to always flick in the direction the feathers naturally grow though, so that it looks most natural.
Next, I went through section by section and darkened. I didn't have a great range of turquoise colors, so I had to build them by layering G43 and B24, frequently in feathering strokes.
I darkened the head with thin lines of different blues. Then with the very tip of the brush nib, I added tiny rows of dots to the crown of his head, to simulate the fine striped feathers.
The beak was colored with C3, C7, C9, Y32 and a hint of YR14. I was careful to darken the orange area on the head, while keeping the white areas white.
 At this point, I start really popping out the contrast and finishing details.
With B39 I added even more dots to the crest of head feathers. Notice I also punched out the contrast on the wing feathers with the B39 as well. I darkened the wing feathers in front as well with more 24 and a bit more green. BG13, BG18, B95, B9, V99 and many other colors.
This gave the feathers on the wing a bit more punch. At this point I let them dry throughly. Next, I took the finest tip of the colorless blender and carefully dotted in the white dot accents on the wing feathers. If the base color is still wet, then the dots will be soft and blurry, but by letting the base coat dry, then adding many layers of blender, letting it dry between layers, I was able to lighten up the dots.

The branch is colored with layers of E11, E13, E15, E37, and E49. Then, I softly added some YG11 over some spots to suggest a green fuzz.
The moss is colored with YG01, YG03, YG13, YG67, and hints of G99.
I faintly airbrushed a background using the chisel nib on a B02 marker, then added darker speckles of color with the brush nib on a B24. Then, I used the tip of the B24 and YR14 marker and added teeny-tiny dots carefully around the edges of the illustration, just because I thought it looked cool.
4 comments:
This is beautiful. We have kingfishers in Florida but no where near as pretty as this one.
Fabulous, Marianne--love him!
Absolutely gorgeous. Thank you so much for the tutorial. I can't wait to see your next book. ♥
AppValley | 9Apps | Panda Helper
Post a Comment