 Shadows on Faces
Admit it, this can be tricky. A drawing of a face is easy. Eyes, eyebrows, nose, mouth, chin- all these make up a simple face, but all of these alter the shadows on a face taking a simple circle and making it challenging to color (I'm not going to get into hair yet).
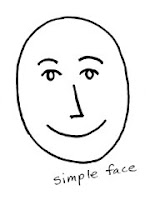 Because the lighting is trickier, we're going to look at shadows coming from up and off from one side. In this picture I'm letting the lines tell me where my shadows are. I drew this face with the line of the nose on one side. This sharp line is perfect for telling me where the most contrast will be between my brightly lit nose and my shadowed cheek on the other side, so I'm going to have my sun shine opposite my nose line. The best way to see if you're shadowing correctly is to look at a photo of a face and see where the shadows and highlights are. Some faces are smoother or flatter, and some are more wrinkled, so this is just a general shadow guide.
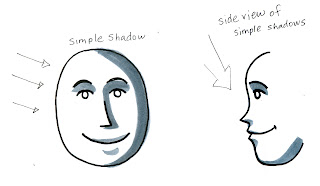 For simple shadows let's look at where the sun hits your face first. Nose, cheeks, forehead, and chin catch the light, so those will be lightest. The side view helps us remember which parts stick out the most.
Now for shadows. See how your eyebrows shade your eyes? Then, under your eyes your face gradually smooths out to your cheeks. So you'll have a deep shadow above your eyes that fades down and around to your bright cheek. Your nose casts a shadow as well, since it sticks out from your face. The sides of your face curve back, so the far edge gets a shadow. Around your mouth, the top lip casts a small shadow, the bottom lip sticks out so it is a highlight, and from your bottom lip to your chin is a slight shadow.
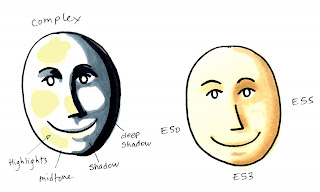 This complex view of shadows on a face shows a progression of white-light-middle-dark-black better. Remember, when you use more colors and more contrast between colors your picture looks more interesting.
On the diagram I made the highlights yellow so they really stand out. The whole right side of the face is going to be slightly darker, so I didn't give him a highlight there, I let the midtone show the lightest areas, then added my deeper shadows from there. On the colored example I mixed the simple and complex, so I used 3 colors. First I colored with E50, then added simple shadows with E53, then darkened up the deepest shadows with E55. Looks pretty good.
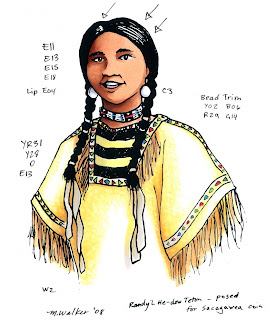
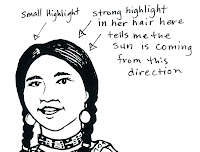 On our final image today I chose this picture I drew last week for my father-in-law. He is giving a lecture on Sacagawea, the Native American woman who accompanied Lewis and Clark as they explored the American west (and spent a wet winter in Oregon). I also chose to use this picture because her hair doesn't cast shadows on her face (less to worry about).
I drew this picture based on photos of the woman who posed for the Sacagawea coin, so I knew when drawing the picture where the shadows were and where to put my highlights. See how the shine in her hair also clues me in - it is stronger on the side where the sun is shining.
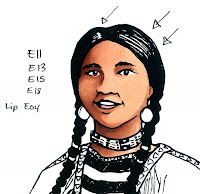 Because she is Native-American, a good deep skin color sequence is E11, E13, E15, E18. This has a hint more red in it than the E20's, which is the sequence I prefer for African skin, but is not as olive as the E50's sequence, or as pink as the E00's. See how I followed the rules for complex face coloring- All highlights are E11, then E13 for my first layer of shadows. Deeper shadows get E15 and finally E18.
I colored this wet for smoothest blends. This means that I smoothly started with the light color, then while it was still wet I added my darker shadows. Where the two colors meet I go back with my lighter color to blend the shades together.
To color her buckskin dress I colored only the edges and shadows with YR31 and Y28, then used the colorless blender to push those colors out to the edges. Once it was dry I dotted on some more colorless blender to add texture to the cloth.
Before I go, I just want to say Thank you to all of those who came to visit me at my demos in Portland on Saturday. That was lots of fun! Just a reminder for those of you interested in the upcoming Certification Classes please e-mail me and I'll send you applications or add you to my mailing list.

6 comments:
Wonderful instructions. When some of the gals on SCS asked me about shadows.....I told them to take a professional photo with shadows and just really study it. I love your explanations. I really wanted to come Saturday but was doing something with DH and couldn't! When will your next Portland gig be?
Ann in OR
acclack at msn dot com
Another superb post, Marianne! Easy-to-understand explanation, you rock!
Fabulous instructions. I have several Indian stamps and I've not got the skin tone down yet. Thank you so much.
Absolutely wonderful tutorial.
Thank you!
:-)
Wowzers!!! That is awesome!!!! I agree it is all about understanding light...
I found this very informing! I'm just a young student learning the ways in the Photography world and I must say thank you because this has helped me with one of my projects. (:
Post a Comment