 I realized as I was digging through topics that I've talked about that I haven't gone into depth about rocks yet. Here is the first of many posts about rocks. This technique is useful for adding a ground-plane to anything that needs some foundation, along a river, or livening up a garden path. It is very easy and very adaptable.
 Small Pebbles
This is one of my favorite ways to color a rock path or add some simple ground where there was nothing before. It is an easy technique that involves a lot of scribbling and dotting. You'll need to work on a paper that gives nice, crisp special effects with the blender- for stampers I really like the Neenah Classic Crest Solar White or Copic Stamping Paper , for illustration I prefer either the Copic Sketchbook or Color laser Copier Paper.
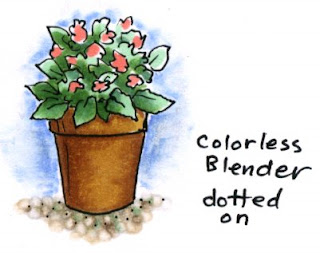
If you look at this little flowerpot I drew you will see what I mean. I could have made a plain, flat shadow, instead I gave it a pebbly ground to sit on, which is much more interesting.
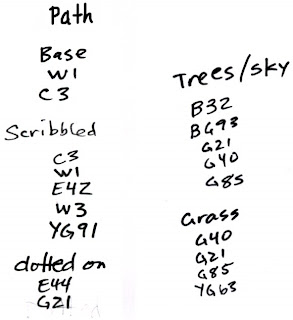
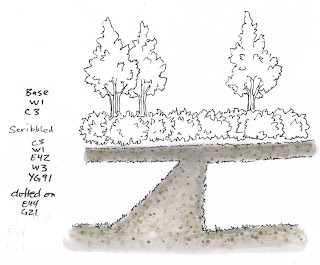 For my larger piece today I am working with a garden path that I drew on color laser copier paper. First, pick out some pale, earthy colors to give your path a base color. For things far away use cooler colors like Cool Gray 0, 1, 2 or 3. It's OK to use colors that are a little darker than you want for the final image because the colorless blender will lighten up all your colors in the end.
I like to work with a base of light gray or brown (in this case C1 & 3 and W1 & 3). I add all my shadows and shading now, without worrying as much about blending. I scribble in a slightly darker color. Scribbling leaves some spots of the base color showing through which is important to make the pebbles look irregular.
Last I add tiny dots of my darkest colors or hints of secondary colors (colors besides gray or light brown). Use little specks that are dark and larger specks that are lighter so that your final picture won't be overwhelming with dark pebbles.
 Why add tiny dots in different colors?
Adding small amounts of a variety of colors will make a big difference in the end. Dots add visual interest to areas that would otherwise be boring and flat. Look at my example here.
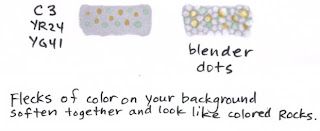 When you touch your blender to the middle of a dot it pushes the color out to the edge, making it look like there is a rock of a different color. Or, if a dot falls between two spots where you add blender it looks like a shadow of rocks that are slightly different. In this case I also added dots of G21, a pale green. Why green? Because where I live in wet Oregon, if you have a pebble path you're going to have moss. The specks of green will hint at moss in my final picture without being overwhelming.
Now I am ready to add pebbles.
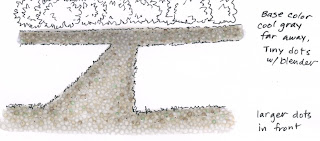 There are a couple of ways of doing this. I am using the most tedious method because I want the most control over my finished work. I am using the fine point on a Copic Original Colorless Blender and I simply touch straight down, hold it for a moment, and then the color pushes out, leaving a little pebble.
I like using this method because I can make the pebbles far away tiny and the rocks up close larger with a lot more precision. It takes a long time to make each dot for a picture this large, and I probably would have drawn a smaller picture if I had remembered how long it takes to make that many dots. If you want an easier way you can use a textured cloth dampened with colorless blender and dabbed on to create rocks. The longer you hold your blender in place the more it will push the base color out of the way.
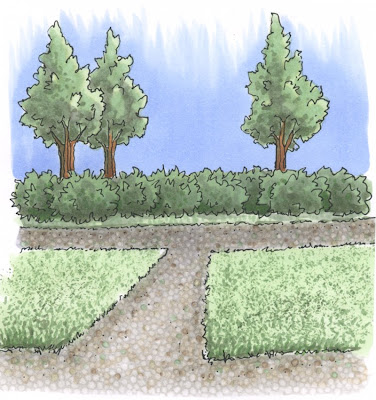
 For my final picture you can see how all my careful dotting works beautifully for the evenly textured path. You can tell that the path far away is made with smaller dots, closer I used bigger, more defined dots. I dabbed the grass texture on using an old rag that I added a darker green onto. I could have drawn the picture more evenly, but I don't mind if the path is a little crooked since it's the technique that's important.
I used a LOT of colors for this single picture, however, It takes a lot of colors sometimes to get the look you are going for. The darkest colors I used very little of since I wanted people to know that this was a bright, sunny day.
Good luck with your own projects! I'll try to post more, different rocks over time.

10 comments:
Marianne, (Waving at you from Idaho) I wanted to thank you for all you did for us at retreat! It was so stinking fun. I love your idea of putting the rocks under the pot. Why didn't I think of that? You are genious my friend! :) Have a super week!
Marianne,
Great tutorial!! I really enjoy scenes and adding 'stuff' around my stamped images. These tips will come in handy with my outdoor scenes. Thank you so much!!
Take care and STAY POSITIVE!
Marianne, thanks for substituting at Chino (even though you had a busy month)! I had such a great time, and learned so much from you! You really are an amazing instructor.
Your technique today is one my favorites! I still cannot get over those dragon scales you dotted!
Thanks for sharing all your tips and tricks with us. This blog is priceless!
Thanks so much for this great tutorial! You are such an invaluable resource!
I had been wishing for and wanting this tutorial for a long time and now you've done one!! I thank you very much, this is VERY helpful!
Fantastic - I'm going to try this one soon!
Yes, I totally agree with your title for this technique ... Coloring DOES rock! :)
EXCELLENT! WOW, that is just divine!! I have been following, just haven't had time to comment on ANYONE's blogs till lately! Hope you are doing well!! Nicole
Wow you alway's amaze me with your ability!!
I love this technique! I would of never thought of doing it if you would of never shared it.
Thank you!
:-)
Post a Comment