This will have two parts, as it would be a very long post otherwise. If you have not followed along with my posts about shadows and shading, you should probably start by clicking here, then scroll back to the first post.
 Basic Shadows from a Cube
This is probably easier than talking about shadows on a round object, but I realized that I haven't covered this yet in all my shadow posts. A cube is a simple, flat shape, so the coloring can be simple, or, it can get very complex.
 Remember, light travels in a straight line. Any object which blocks the light will block it in a straight line.
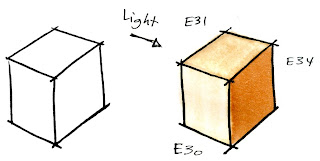
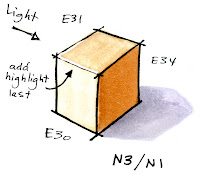
The side of a cube that is closest to the light will be the lightest. However, we need to show a slight color difference between the top and the side. The front is colored only a tiny bit lighter than the top, just to show that the light is strongest from the front.
 Next, we need to think about the shadow the box casts on the ground. If you remember from this post on cast shadows, the object will cast a shadow shaped like itself. The corner points out, so we have a pointed shadow.
The edges closest to the front will catch the light more, so we add a little bit of Opaque white or a white colored pencil along the front edge. In real life, our shape would not have black lines defining the edges, so this strong highlight along the edges becomes very important.
 Here is the final example of how I applied coloring shadows onto a birthday present. Today is my 30th birthday, and already I have been given some very nice gifts, so this tutorial is my Thank You!!
It is easy to see where the light is coming from in this picture. On the edge closest to the light I left a lot of areas white. With the deep blues and greens the image appears to be more dimensional, since I have a full range of contrast (contrast, part 1, 2, 3)
Notice how I softened the far edge on the cast shadow, since I really don't want people to focus on the shadow. I also made sure that the bow left a shadow as well. This can be tricky, so don't overthink it, just make a couple of lumps and a thin shadow that could represent the ribbon end.
Image: Drawn with a 0.25 mm Multiliner SP onto color laser copier paper. Sketch markers used: YG41, G21, G28, B32, B34, B37, N1, N3, Blender

19 comments:
Happy Birthday! And thanks for a great shadowing lesson!
Hey Marianne! I sure have missed your posts. Thanks for all you have taught me.
Happy Birthday! And thanks for all the wonderful lessons :)
Happy Birthday and thanks for always sharing your vast amount of expertise with us!
Happy, happy Birthday!
Your tutorials are super and I learn so much. You have a way of explaining that makes perfect sense to me. Thank you!
Happy Birthday! Love this blog. Thanks so much for "teaching".
Happy Birthday! Thank you for your tutorial it's great!!
Well, a super big Happy Birthday to you, Marianne!! So glad you're back from Germany safe and sound! Thanks for the great tute!
You're amazing! Happy 30th! Your tutorials are the best!! Thank you.
Your blog is so helpful. I hope you have a wonderful birthday!!!
As always, a great tutorial, Marianne. I hope you had a very happy birthday.
HAPPY BIRTHDAY Marianne! Hope you had a fantastic birthday hun!!! Thanks for all of the Copic info you share with us!!!
Hugs~ Kim
Happy Birthday! Love your tutorials, especially when you show us the steps on a plain shape, and then WOW us with a finished image. Thanks for all you do for us. KellyRae
Happy Birthday! Fantastic shading TUT - thanks so much!
Happy Birthday! Thanks for sharing all the great tutorials.
Happy Birthday Marianne?? I love reading your very interesting and educational posts! I have a long way to go with correctly using my Copics but havve a question. With my Copics from time to time, I hardly touch the nib tip to paper and it floods with a big blob of ink! Sooo frustrating when I have nearly finished colouring an image, this happens and I have to throw it all away. Please help!!
I hope your birthday was wonderful!
Thank you for the great tutorial! You always amaze me!!!
happy belated birthday! i hope it was special. thanks for the tutorial. I've got some copics coming in the mail, and I'm eager to get them so I can start playing.
Happy Birthday! And thanks for all the wonderful lessons
work at home in india
Post a Comment