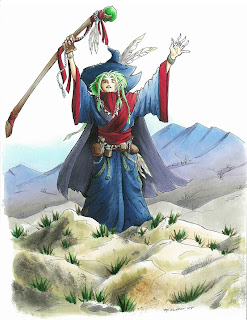
I had a great time at the Manga demo in Portland this weekend, and I had a chance to color this wizard picture I had drawn years ago. It's always fun to re-visit old images and color them with fresh eyes. I like this version a lot better than the version I colored oh so long ago.
Just to give you an idea of scale, these large manga pieces that I occasionally show are full-page sized, they are not small pictures, and are made for my example book. If you ever meet me at a show, bug me to let you look through my example books- it's fun to see bigger work sometimes, and see how I use techniques on a large scale.
You'll note in this picture how I show distance by making things in the back blueish. I know I've explained the blue-things-far-away before, but it never hurts to talk about how to make it look correct in a finished piece.
 Feather Blending - Purple Mountain Majesties
I wanted to use this piece as an example of good feather blending. I've talked about feather blending a few times before (1, 2) but it never hurts to review.
Many of the Intermediate Applications I received I have had to turn down because they did not show proper feather blending. To me, this means I must not be explaining it well enough. This is a tricky concept, so it's getting an advanced label. What really makes it tricky is the amount of practice you need in order to find good color combos and time it takes to figure out the proper technique.
If you look at the mountains in the background, you'll see that they blend from blue, to purple, to warm gray. Blue and Warm Gray are opposites, in that Warm Gray is brownish toned and Blues and Blue violets are far away from them on the color wheel.
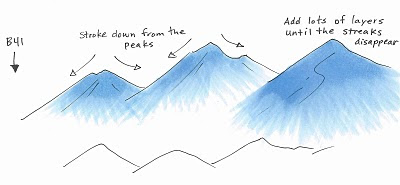
 I started the mountains by coloring with B41. I stroke from the top of each peak, down to the base, flowing in the direction of the mountain. I am lifting up at the end of each stroke so that I have less ink at the base and more at the peak. As you can see from the third peak, I apply lots of very light layers to achieve the look I'm going for. I did criss-cross my strokes slightly for a proper feather, but I am consistent with the base feathered and the top of the peak dark.
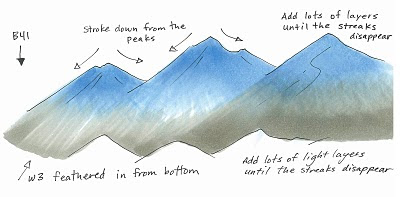
 Next, I feathered in W3 from the bottom in exactly the same technique, this time, making the base dark and the feathering go back up into the mountain. I added lots of very light layers to achieve the proper blend. I think on the actual picture I used W2, not W3, but you get the idea.
You can see on the third peak how the layers blending more and more, and you notice the streaks less and less. Sometimes I'll come back with the blue and add another light layer after I added the second color, just to get it a little smoother.

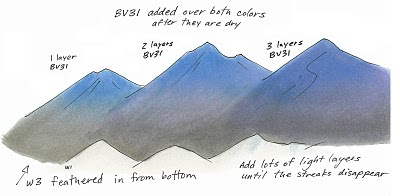
 Last, you'll notice on my final mountains that it has the pretty purple fade. After I was done feathering the blue and the gray I added a faint layer of BV31. How much is a matter of personal taste.
You can see from these mountains that the more you layer the pale purple over the whole area, the more it shows through. The third mountain is colored as if it is in front, but it looks like it has more shadow than the others, so it could have been colored as if it were in back simply by adding more BV31. The purple is strongest in the middle because there is the least amount of dye on that spot on the page. This gives the purple a place to fill in, if that makes any sense.
On the final mountains in the main picture I added a faint streak of BV23/BV25 to darken the shadows on the left side of each peak. This makes it look a little less flat, but not so much that it detracts from the main image.
I used too many random colors to list, but I did use one other technique, which you might not have noticed. On the rocks in the foreground I dampened my nasty rag and blotted off some browns and grays that were already on there. This added the hint of texture you see on the front rocks.
I hope this has inspired you to practice the feather blending again. This is tricky, but when done right, it looks really good. Have a great week!


