I was making a stack of thank you cards, and I had a wonderful polka-dot green paper that I really wanted to use. However, I also wanted to use a cute teddy-bear image, and I wanted to keep the bear brown.
Today I wanted to step you through my coloring process to find the matching colors to make my project work.
 Finding Colors that match
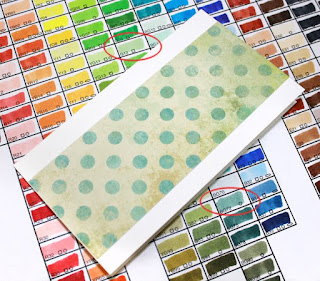
The first problem I had was that my patterned paper did not have an exact color match with any Copic colors on my hand-drawn chart. I found that it was very close to BG72, but it needed to be a hair brighter, not lighter, simply more vibrant. To accomplish this, I chose another color that was very close to the paper tone, G12. G12 is a brighter, light green. As a base to the BG72 it would help pull down the grayness, but still retain the greenish cast that I needed.

When you are having trouble finding an exact color match, try the closed color, and see what it needs to change it. If it is too dull, layer a more vibrant tone. If your color needs more yellow, don't reach for a bright yellow, try a base of a subtle, but close yellow. Many times it will take two or even three colors blended to make the right mix.
I was going to be printing the sentiment, so I chose that color a little differently. I pulled out a color chart that I had printed from the same printer. I matched the patterned paper to the closest color from my printout, then I chose that color as my text color.
 Matching the Bear
I really wanted a brown bear, and have the turquoise as my accent color. I like to work with one dominant color and two accent colors.
My other challenge, was that I had to make a few of these cards, so I wanted to keep the color spectrum simple, and one that I could easily color a bunch of without taking too much time. I like challenging myself by working with a simple color palette, and an image like this bear does not need a whole lot of colors.
I

wanted a fairly neutral brown, so I decided to work with the E30/E40's families. I started with a base of E30.
Then, I blended in E44. Those are the only two browns I used on the bear. After I had blended in the E44, I let the bear dry thoroughly, and I went back and darkened the deepest shadows with the E44. I added the cast shadows on his arms, on his legs, and from the flower. These needed to be crisp on the edges, and for crisp edges, let your base colors dry.

However, these colors were flat, and did not match my paper or chosen accent colors at all. So, my next step was to pull out the G12 I liked. I lightly brushed the G12 over the brown bear, starting in the shadows and feathering over the light areas. I did not blend. Here it may look kind of odd, but remember, this bear will be sitting on greenish paper.

In real life, if this teddy bear were actually sitting on the greenish patterned paper, then any light that hit the green paper would reflect back onto his fur, with a bit of a greenish tone to it. Lightly adding the G12 allows me to pull the bear into the background a bit more, and suggests reflected light from the paper.

Last, I colored the patches with a base of G12 and BG72 for the shadows. The flower is colored with E04 and the E44.
Not shown: I used a gold Spica glitter pen to add my darkest shadows on the brown fur areas, and a silver glitter pen along the edges of the turquoise
I added extra reflection on his nose and the flower with a dab of Copic Opaque White.
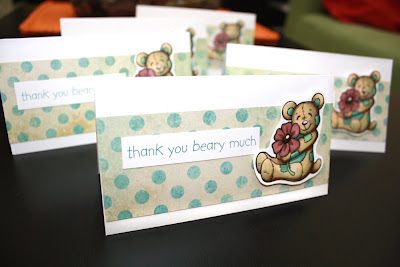
Here are the final, very simple cards. Look at how the green, while strange on the bear by itself, now pulls the bear into the paper nicely.

I think the cards are done. I may add a small accent under each sentiment, but at this point I am happy stopping. Now I get the fun of writing some thank yous!
Note that I only used 5 colors: E30, E44, E04, G12, and BG72. Accent with Opaque white, and two glitter pens. Now that is an easy image! Coloring didn't take very long, maybe 5 min. per image... which is what you want when making many cards. Paper is from Recollections Charming Paper Pad. I drew the bear with a 0.1mm Multiliner, then scanned it and printed it as needed. The bear is popped up with our X-press It Foam tape. I used Neenah Classic crest cardstock as a base, since it is slightly warmer than the Blending Card I usually color on for card projects.
 Have fun coloring!


