 Not all glossy papers are created equal
What I am showing you is a glossy paper that doesn't work very well, in my opinion. Some will work better, and some will work more like vellum with your markers. Some glossy papers you might prefer coloring on and some you might never want to look at again.
Don't avoid it until you've tried it.
 Blending on Glossy paper
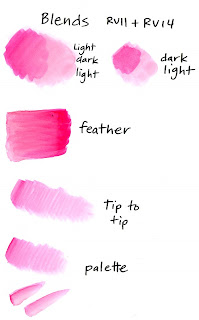
Here are my blending experiments on glossy. You'll have to dig through my archives for June/July '08 to see the comparison techniques on absorbent cardstock.
As you can see, starting with the light color, adding dark, then going back with your light marker doesn't really work on this paper. You still see the edges on the dark colored blob. Likewise, starting with dark and adding light doesn't work.
Feather blending looks a little better, but it's still pretty streaky. Also, you quickly run the risk of adding too much ink and creating blobby edges with ink buildup. Not very pretty.
Tip-to-tip blending and palette blending look much better. This is also good for the tiny areas you color in, so maybe this is going to be your best bet for smooth blending when working on glossy papers. Keep practicing to tell how much darker ink you have on your light marker tip until you get the look you are craving.
 Colorless Blender on Glossy
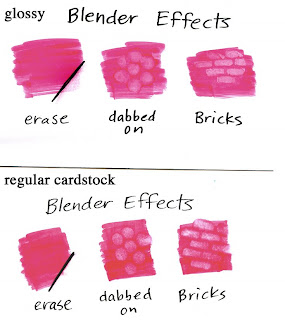
The colorless blender does not work the same on glossy paper as it does on regular cardstock. Look at my comparison here between glossy and regular paper. I strongly suggest that you compare the two for yourself side-by-side to see the subtlties, since my scanner makes the glossy look better than it does in real life.
First of all, it won't erase. The ink has no-where to suck into, so it doesn't go anywhere. It also leaves a residue in the fibers which, because they are coated they won't go away.
Special effects look different. Look at the blobbing and the bricks. You can see how the color pushes out of the way on the regular paper, but on the glossy it just gets lighter. It doesn't stand out quite as much, but the edges are crsiper than they are on regular paper. You might like one better than another.
Personally, losing the ability to erase makes glossy paper unappealing to me. This is a basic blender technique that is way too useful, so I'm not a big fan of glossy (I make a LOT of mistakes and I rely on my blender to make those mistakes go away).
 The blender is a good tool for removing heavy ink buildups even if it won't erase completely on glossy, but it also discolors the area around it slightly and can cause even more little ridges like the ones you were trying to remove in the first place. Use it carefully as a removing tool but be careful since a little goes a long way. Also remember to clean the tip really well after using it with glossy paper.
Try other colorless blender techniques on your own- Nasty Rag techniques will still give you good results. If you are dabbing blender on, test to see how juicy to add your blender, since it will spread more on glossy.
 Dirty Blender tip
Glossy paper makes the tip of your blender dirty very quickly because the ink doesn't soak into the paper, it just gets on your blender tip. Keep a piece of absorbent paper as scratch paper to clean off the tip frequently (you can't clean it off on glossy- the glossy won't soak the color off). Don't put your blender away dirty! the next time you come to use it the color will have diffused throughout the pen and might not be clear anymore.
Test each and all of your papers before you decide whether it's a winner or not. This is not to say that one is better than another, rather, each will feel different and you will like the way one works better than another. The way I test a paper that is absorbent is posted here. This doesn't work on glossy papers. Glossy you'll want to test a little differently, since you won't have feathering problems.
 To test glossy paper
1. Evenly color a blob (see glossy paper part 2). Does it seem to streak more than other glossy papers? If you can tell a difference then maybe this will be a deciding factor.
2. How well does it blend? Make swatches like I did above to try it out. Test each blending method before you make a decision.
3. How does the colorless blender work on it? Again, try making swatches just like I did to see if you like the way it works.
4. Always test your markers and inks on a new paper. This is accomplished in the same way as you would on regular cardstock, since it's the line bleeding that we're worried about, not the paper fibers spreading the ink.
Whatever paper you choose to work with, the key is practice. The more you practice techniques on that paper, the more it will look good to you. Don't give up. If someone else shows you great results on the same papers and inks that you're using ask them how they got that look.
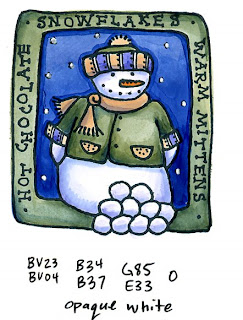
For my final example today I've colored this adorable little snowman stamp by Lockhart Stamp Co. I used Memento Tuxedo black ink on glossy cardstock. I used a lot of palette blending for the tiny details, and used the colorless blender to remove excess ink buildup. For the stars (or snowflakes) in the sky I waited until I was totally done and added opaque white. I don't like how crisp the edges are and how unforgiving this paper is, but with practice you still can get beautiful results on glossy.


5 comments:
I SO enjoy your site--it's very educational for me, as I'm in a city that doesn't sell copics, so I doen't understand allot about these markers. But, your web tells it all. THX..
err... sorry. I am a new with copic sistem... I tryed to "erase" colour on regular copic marcerpad using blender - it isn`t work. What paper you use to erase markers?
Hi I love my copics and have just done a test using different cardstock available here in the UK and found the perfect card for using copics which makes them vibrant as it sits on the surface rather than sinking in.
This is also a very good post which I really enjoyed reading. It is not everyday that I have the possibility to see something like this.
happy wheels , happy wheels demo , zombie tsunami , retrica , retrica camera
Good job! You guys do a great blog, and have some great contents. Keep up the good work. If you're looking for the best Things to do in the world, this list has something for everybody! From adventure to culture, food to history .
Post a Comment