 Coloring Horses, part 3
 Palomino
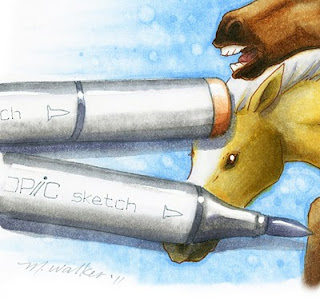
The back horse is a nice golden Palomino, (once again, thank you google for great references). The scanner makes him look slightly green, but trust me, on my paper he is a true golden with a white forehead and whitish/gray mane.
He was easy to color, as there really isn't much to see of him hiding back there. I used one of my favorite yellows, Y21, darkened with Y26. His mane is colored with the warm grays I used on the other horses, as well as a bit of C5 to make it appear more white. I darkened his muzzle with C5 as well.
I darkened the area where his neck goes into shadow with some hints of E27. At this point, I had a lot of layers of color near the base of his neck, and the colors were not absorbing into the paper as they should, so I had to go in with my colorless blender and lift out any colors that were over-saturated and mottled.
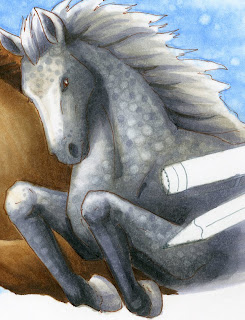
 Dappled Gray Horse
While browsing through the google images, I saw some beautiful dappled gray horses. I figured the third horse would be fun to color as a dappled gray. However, most dappled horses are a cool, steel-gray rather than a warm gray, which is what I did my base tones in. Not a problem. As I mentioned before, if you layer enough color over the top, you can push base colors out of the way, so I happily went to town with my cool grays and totally ignored the base of warm grays except as a shadow reference.
Many times, I break up my cool gray sequence slightly, though you may not notice.
For this horse I used the cool gray sequence of C1, C3, BV23, and C7. Why BV23 you may ask? I have found that BV23 is about as intense as C5, but the added hint of BV gives a nice richness and punch to the flat, gray color, without being too noticeable.
 Dappled horses usually have white spots on a gray background. However, I added gray spots over white areas and white spots over gray areas. To make the white spots, I did it just the same as the spots in the sky. I let my base tones dry then I went back with the colorless blender and touched in the white spots. However, I did use the BV23 to add in gray spots as well. Overall,t he horse looks nicely dappled.
You can notice from this close up how the hints of remaining warm gray under the coat of cool grays really helps to liven up the work- the gray does not look flat, but it is still definitely a cool gray horse.
On his mane, you can see that I streaked warms and cools in, feathered in the direction of the hairs. I did not blend these colors in, I purposefully kept them streaky to enhance the feel of individual strands.
You can see a photo of me coloring the horse on instagram.
Overall I think I was able to capture the feel of these horses, running and jumping over something (my original sketch I had toyed with the idea of having them jump over a marker, but it wouldn't fit the header format). My next task was to tackle the pen and markers in the drawing.
 Pencil, Multiliner, and Markers
The final step, once the horses were done, is to make the pencil and markers look like they were sitting on top of the picture. The only way to really accomplish this was through strong shadows.
I started with the pencil, as that was the easiest, and I was getting tired of working with neutral colors, that I was happy to throw some intense color into the image. The pencil was colored with the same Y21 I used on the golden horse, but this time, I accented it with YR04. The wooden area was colored with E11 & E13. I colored the graphite with N7, even though it looks like a deep black. Then I wrote in the pencil brand with my multiliner. (Recently I met the wonderful people at General Pencil Co, the last US-based pencil manufacturer. They use wood from trees logged right here in Oregon, so they are my new favorite pencil company!).
The multiliner is colored with N3, N7 and the cool grays I used on the horse. I colored it using the tutorial I posted a while ago about coloring metal. Sharp contrast is the key to making it look like metal. You can see how I enhanced the shininess by using Opaque White.
 The markers on the other side of the image were colored with Neutral grays as well. I blended the colors more than I did on the shiny metal of the multiliner. Again, I used Opaque white to enhance the shine on the markers, as well as add the glints of light back into each horse's eyes.
The light brown marker cap was colored with E11, E13, and hints of E35.
I added shadows to all markers and pens with C3 and BV25. I was careful to make all the cast-shadows consistent, and crisp so it is easy to tell that they are suppose dot be resting on top of the picture of horses.
I hope you enjoyed this tutorial. The final artwork is approx. 8" x 4". The whole image took about 4 hrs. to sketch, ink and color, with breaks for scanning and actually getting work-work done. Writing the tutorials took about 3 1/2 hrs, so it is almost as difficult to teach how to do it as it is to actually color it in the first place.
I hope this inspired you to color, have a great weekend!

13 comments:
OMGosh, what can I say except that your new banner is totally, awesome!!! Oh, that I could draw and color even half as good as you! Thank you for sharing all the details!!
Beautiful. Thanks for the explanation of how you did it.
Wow, thanks for the fabulous tutorial- your new blog header is gorgeous and I appreciate all the detail in these posts, I'll definitely be back sometime with markers in hand!
Thanks for taking us through the stages of colouring this, Marianne, not only useful but fascinating too! Great design on that banner! CoB
Absolutely gorgeous! The dapple gray mare is just incredible. Thanks so much for the details.
KimMJ
bast830@comcast.net
You never fail to amaze me! Your work is just spectacular and you make it look so effortless. Thank you so much for sharing the details about how you do it. You have inspired me so much over the last few years. Copic's business on the East coast is probably up just from my purchases alone! Thank you, thank you!
Fantastic tutorial and pictures. Thanks so much for showing all these different coloring techniques using a nice range of colors for the horses. Love the close ups on shading.
Gorgeous work!
Thank you for sharing the instructions. :)
Awesome banner andI love the way you colored the horses.
I really enjoyed this tutorial series. Thanks so much for stepping it all out for us!
Hello! I'm new here, and found my way via the Copic website.
I just want to say that I love the new headers and the WIP walkthrough of the process. The technique on the dapple gray was particularly interesting, and I never thought of using markers for "underpainting" as you've demonstrated throughout this piece.
FWIW--you actually got the dapple grey horse perfect. We had a grey half-Arabian mare, and the white areas of the mane and tail really are more of a yellow-white, unless you really keep at it with a whitening shampoo. So the warm undertones are spot-on (oh my, did I just make a pun?)
Great job with the tutorials--I always learn so much from you!
Hello! Love your banner! This is my first visit so I never saw the old banner, but the horses are really great. Dapple grey and palomino - wonderful! Lately I've been doing animals in strange, bright Copic colors.
Totally jealous you work at Copic! Every Saturday I go to Dick Blick's down the street, pull a test paper from the ink aisle and start testing new Copic colors. I usually buy 5 or 6 (unless I'm totally broke). I have about 60 now, a combination of Ciao and Sketch. I can't buy them online because the cap color is just not a good indicator.
Oh my gosh, sorry for the long post. I am a new (4 months or so)Copic convert. :o)
btw, found you from at a link at:
http://rcwdesign.blogspot.com/
Post a Comment