So far I this week I have explained the need for contrast in your pictures and how to achieve that when picking colors. However, I've been using black as my ink each time. Why? Black is a universal color- it goes with any other color and I know it will be the darkest tone in the picture. What if I want to use colored inks?
Contrast and Colored Inks
I don't usually use colored inks because I am a traditional pen & ink, black and white kind of person. Occasionally though, I draw something with colored lines, but I always have trouble coloring it after that. There are some different things to take into account when working with colored inks.
There's something elegant about coloring a detailed picture with all one color. I used this image in earthy grays a few weeks ago as a sympathy card. It really works well because your eye is drawn to the detail and not the coloring job when you work within one color family (monochrome). To make the colors really flow together you have to plan ahead and pick your colors more carefully than when working with plain black ink.
For Monochrome (single color) images:
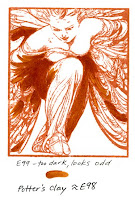
1. Know what the color equivalent of your ink is before you start coloring. On this first angel the closest color I found to match the ink is E99, but that is too dark, the next closest is E97, which is too light. So my ink color is basically E98, a non-existent Copic color.
2. Keep your ink line as the darkest color in the picture. You don't have to follow this one, but I find I get the best results when I do. This first angel I colored shadows with the E99 and it's a shade too dark. See how it runs over the ink lines and shows up bad? Keep all your marker colors lighter than your ink and you'll get better results.
3. Adjust your contrast from the ink color. Instead of black being "black", now my E98 is "black". I'm going to pick 3 colors of brown to shade down from there, plus white to make a full contrast picture. (note: the two Potter's Clay stamped pictures were side-by-side on my scanner and yet the ink colors look different and my sequence looks slightly off. Never trust a computer screen!)
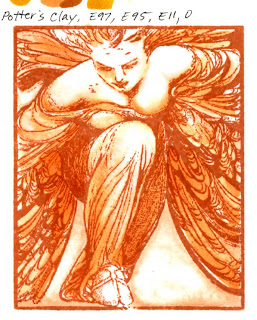
Ideally, the color sequence on the last digits of my markers for this ink would be white, 1 (light), 3 or 4 (middle), then 5 or 6 (dark), ink color of 8 or 9 (black). If the ink was equivalent to a number that ended in 5, then your sequence might be white, 0, 2, 3, with 5 as the "black", so you have a narrower contrast range because your ink is so pale.
4. Colors in a sequence might not be the best choice. For this picture, if E98 was my darkest color, then E97, E95 and E93 plus white would be my perfect sequence. Trouble is, in the E90's blending group, the pale E90's turn pink (when I use blender on the E95 it fades to pink. Pink does NOT go with this brown). So, I had to look to other color families for my lightest brown that would match.
My final marker sequence is E97, E95, and E11 for the Memento Ink Potter's Clay. See how well this works? The whole image looks nice and monochrome orange/sepia.
Sometimes you won't find a matching Copic Color to your ink.
The biggest trouble is that Copics only come in 322 colors, and there might not be an exact match for your ink. Such is the case with the Memento Paris Dusk ink.
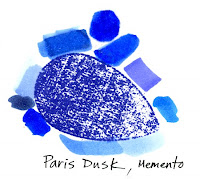
See my tests? Nothing exact, I can't even find a family it would belong to like I did with the Potter's Clay ink. I tried layering a couple colors, still nothing. So, I just went with pale colors that seemed to work and fudged that sequence. I chose B21, B24, and B26. It's close enough for me, but not quite exact if I use any darker color than B26.
If I really wanted to get picky I could layer and mix colors until I found the exact match, then take an empty ink bottle, custom mix my inks and fill an empty marker with my exact color that matches whatever I'm working with. I don't care quite that much about having the exact match though.
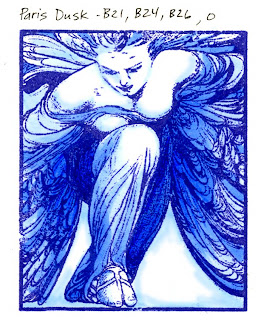
The final look of both these pieces is very simple, elegant, and yet it is visually appealing because it has the full range of values from light to dark.
Note on both these examples how much white space I leave. This goes back to the heavy contrast post from Tuesday. Because the stamp has so many dark, heavy areas I need to balance by leaving lots of white space so my overall feel is even between light and dark.
Some people prefer lighter colors overall- this would draw more attention to the angel's line work, whereas other people might go darker than I have because it would feel better for their purposes or matching embellishments. That is a choice that you have to make for yourself, but since I like balance then I chose my color range to be more balanced.
Tomorrow I'll discuss using different colors with colored inks. Have a great day!
Image: Believe by Crafty Secrets, Clear Art Stamps, Inks: Memento Potter's Clay and Paris Dusk Paper: Neenah Classic Crest
Thursday, July 31, 2008
Wednesday, July 30, 2008
Understanding Contrast part 2
Yesterday I jumped into contrast, so I want to give some further explanation as to why contrast makes your images more exciting and why you should be daring and try bumping up your contrast a bit if your work looks kinda blah (Think back to Monday's post of the snowflakes and bird, how it really got more exciting by adding white).
Why you need more color range
The human eye is pulled to things with high contrast. Most books are printed as black letters on white pages because this is easiest to follow. Think of visiting a website or blog where there is a photo background where, yes, it's a beautiful photo, but it conflicts with the text making it hard to read because there's not enough contrast between photo and text.
Going back to the range of values from yesterday, you want white, light, middle, dark, black for the full range of contrast. This is the most exciting combination.
Look at the series of circles below. See how plain the first one is? It has no definition, since it is just a light color. It is floating there without any reason to be important. This is a perfect way to show sky, water, or something without strongly defined edges, but it doesn't work as a solid shape.
The second is an improvement- it has light and black. See how the light looks a bit more important, but this is still a flat picture. Not very exciting, and it is so pale, our eye doesn't think much of the colored area.
The third circle is better. We now have black, light and middle. Notice though that the black circle still stands out - it is such a heavy contrast from the light that our eye still notices it too much.
Now, look at the last circle. I left white, and added an extra layer of dark. In this circle the black line doesn't seem so heavy, since we have a balance between our color values. By far, this is the most interesting of our circles, and we can see that it is no longer a circle, but a ball.
Applying this to artwork
Let's carry this over to a simple picture. This Riley Moose was nicely colored, but very flat. I have two colors represented, black and light brown. Not very exciting.
Next, here he is with black, light brown, and middle brown. He doesn't look so flat anymore, but he's still not very exciting.
Last, here is Riley with white, light brown, middle brown, dark brown, and black. Now he has life! See how the base color for his body and antlers is still the same, but you feel that the antlers and hooves are different because they have white, light brown, and shadows of middle brown. His body however has highlights of light, middle brown, and shadows of dark brown. They're the same tone of brown, so they match, but just by changing the contrast range in each area they look like different surfaces.
Look at the final coloring below. I still felt that there was not enough contrast on Riley, so I added even more number variation- I went with E31, E35, E39. See how he pops off the page ever so much more?
Shiny things
Shiny things have a sharper contrast between light and dark. You can represent this as crisp edges between your white and color, or, in the case of this airplane, I'm not using a light shade, I am only using white, middle, and dark. The highlights are added in as opaque white to be extra crisp, so they look like sunlight reflecting off the shiny airplane body.
Remember, if you have a hard time leaving white in your picture, you can always add opaque white to really punch some life into your work.
Image: Plane Riley by Hanna Stamps, Ink: Memento Tuxedo Black Paper: Neenah Classic Crest Other: Opaque White, 0.1 multiliner to write the sentiment on Riley's banner
Labels:
beginner,
color theory,
Natural Blending Group,
tips
Tuesday, July 29, 2008
Understanding Contrast
One of my long-term goals with this site is to explain how to use the grays and why/how to use shadows (which gets to be a very involved art concept). The best way to really understand shadows and accurate coloring is to do lots of black and white photography, so I'll be explaining concepts and how they relate to photographs and Photoshop, even though we're really coloring little pictures with markers.
The last couple posts have been really detailed, so this time I want to share something relatively simple. Here is an instance where you don't need much color to make the image look done.
Heavy Contrast Images
I had to make a couple manly birthday cards the other day and I was using this image. On a picture like this where you have very heavy black and white contrast you don't always need as much detail work in your coloring. It would look out of place to have lots of shaded colors when the shadows are so deep.
This picture is perfect for using single colors to show the color contrast, and give the illusion of more colors than you actually used.
Why would it work to use less colors?
Think about a photograph. If I had taken a picture of this person and the shadows were this deep and the white areas were so bright then it's like doing a flash when you're too close to the person. In that case the whites are super bright and there is no smooth blend from light to shadow, so I can do very crisp edges to my color. When you compare the blended version below to the crisp, heavy contrast do you see how the contrast works in this case? On the smooth blended face the heavy black areas just don't match the soft, smooth colored areas as well.
In photography it is considered good to have a range of colors from the brightest white to the deepest black. The trouble with this stamp is that there is too much black, unless we leave lots of white to balance it, much like a teeter-totter. When we color in all the white with smooth blends there is no white left to balance the black. I have only black and middle/light colors. This could make the black look too flat- it sucks the life out of the colored areas because there is less contrast (This is an opinion, you may think the smooth face looks fine).
Now compare it to the second version, with fewer colors.
When I cut out the lightest skin color I am increasing my contrast between light and dark, yet I still have my white, middle, and black values. The picture looks more dynamic, even though I used half as many colors. Also note, on the first picture I used a pale gray on the white parts of the shirt. For thin lined work without heavy contrast this would work, but because there is so much contrast on this picture my light gray is useless and lost, so I cut it out.
The shadows tell me where to put my color. In this case, for skin I'm using E11, a color I would normally use as a middle shadow, and B34. This is all I need and the picture looks fine- good contrast and a clean, crisp feel that works.
How this applies to other things:
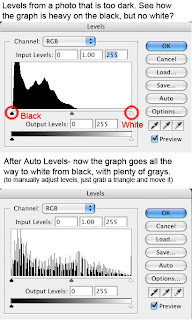
For those of you who use Photoshop, have you ever taken an OK photo that you know needs the colors tweaked a little bit and then it's a good photo? You go up to your menu and choose "Auto Levels". Now your photo looks much better. So what is "Auto Levels" doing?
Auto Levels looks at the overall color feel/balance of your picture, then it evens out the contrast so your whites are whiter and your darks are darker, but you still have a smooth range of grays in the middle. You can also do this manually under the regular "Levels" window, which is the way I usually do it, but for the most part, Photoshop does a good job.
If you give a number to these color values with 0 being white (or almost white) and 9 being black (or really dark) you can see how the last digit on Copics work. 0 is your lightest in each Natural Blending Group, 2 or 3 is your light, 4 or 5 is middle, 7 is darker, and 9 is black.
When I am coloring a picture with Copics, I have stated before that it's good to have two or 3 shades in each Natural Blending Family. A light, middle, and dark. Then, you have the white of your whitest areas and your black (usually) of your line work. This means that you have a range of 5 values - White, Light, Middle, dark, Black. Photoshop would say that you have good levels in a photo if you have each of these colors represented.
Going back to my colored image, the blended example has black, middle, and light, but no darker or white (I'm not counting the white of the shirt). This is why it looks slightly wrong. The second example has white, middle, and black- a perfect balance, and the reason why it works.
Image: Crafty Secrets Clear Art Stamps Ink: Memento Tuxedo Black Paper: Neenah Classic Crest
Labels:
advanced,
beginner,
color theory,
Natural Blending Group
Monday, July 28, 2008
Opaque White- adding snow
I hope everyone had a restful weekend. Although we haven't had record heat this summer, it's still hot enough to make you long for winter snow. The next best thing is to color a picture with snow in it...
A useful thing to help color snow is Opaque White. Opaque White is a waterbased, thick white paint that is applied as a finishing touch to your artwork. It's kind of like the icing on a cake. It gives you back the vibrant, tiny white spots that are so hard to keep when you are coloring with markers.
You use this AFTER all your coloring is done. It is not good to color over this stuff, so you want to use this when you know your marker work is done. This is similar to white-out as a no-no for coloring over (other things you don't want to color over).
Opaque white can be thinned with water, for a thin glaze over marker work, or kept thick for good coverage over dark areas.
This waterbased thick white paint is great for adding highlights, adding white where you need it, add glints of light onto shiny things, or thin it down to make clouds, smoke, etc. Eventually I'll show how this is a great accent also for making things look wet or to add water effects.
Today I'm using it on this beautiful snowy stamp. It's Christmas in July, and right now I wouldn't mind a bit of the white stuff to cool down the summer heat!
Look at how detailed the flecks of snow are in the sky on this image. Ick! Coloring around all those flecks and keeping them white yet doing a beautiful gradient sounds like a supreme pain. Also, there's snow that's accumulated on the branches, how do I show that?
Never fear. Just color the image and ignore the snow for now. It would be way too hard to try and get a smooth blend from light to dark while avoiding snowflakes in this picture. Same with the glints of light on the berries, and the light in this little chickadee's eyes. I just won't worry about it.
Once I'm all done with coloring my image looks flat (see the comparison below). Although my colors are rich, they just don't have any excitement to them. This is where we add back in the white. Using my smallest paintbrush and some Opaque white I add the snow, glints of light, and other highlights back in. Wow! What a difference white makes. Don't use this only on snow scenes, try this on any picture that looks too dark, or flat. Just go in and add highlights or glints of light back in. This works especially well on metal things (someday I'll show an example).
Opaque white is very thick so it completely covers up the marker. I had to thin mine slightly to apply it evenly, but it's water-based so thinning is easy. Best of all, you are using so little of this stuff that one jar will last a long time.
I hope you notice that many of the techniques I show you on this blog could be applied to any medium, not just marker colored pictures. If you work with colored pencils or watercolor, use the same technique. Don't stress about white areas when you can paint them in later. Also, the opaque white is really bright; brighter than your paper sometimes. Even if you do leave your snowflakes white, by painting over them they will stand out even more- that hint of dimension that paint gives will add a beautiful final touch to any artwork.
Image: Chickadee, by Carolyn Shores Wright, Stamps Happen Inc. Paper: Neenah Classic Crest Ink: Memento Tuxedo Black Other: Copic Opaque White
Note: I did not use any colorless blender on this picture.
Today I'm using it on this beautiful snowy stamp. It's Christmas in July, and right now I wouldn't mind a bit of the white stuff to cool down the summer heat!
Look at how detailed the flecks of snow are in the sky on this image. Ick! Coloring around all those flecks and keeping them white yet doing a beautiful gradient sounds like a supreme pain. Also, there's snow that's accumulated on the branches, how do I show that?
Never fear. Just color the image and ignore the snow for now. It would be way too hard to try and get a smooth blend from light to dark while avoiding snowflakes in this picture. Same with the glints of light on the berries, and the light in this little chickadee's eyes. I just won't worry about it.
Once I'm all done with coloring my image looks flat (see the comparison below). Although my colors are rich, they just don't have any excitement to them. This is where we add back in the white. Using my smallest paintbrush and some Opaque white I add the snow, glints of light, and other highlights back in. Wow! What a difference white makes. Don't use this only on snow scenes, try this on any picture that looks too dark, or flat. Just go in and add highlights or glints of light back in. This works especially well on metal things (someday I'll show an example).
Opaque white is very thick so it completely covers up the marker. I had to thin mine slightly to apply it evenly, but it's water-based so thinning is easy. Best of all, you are using so little of this stuff that one jar will last a long time.
I hope you notice that many of the techniques I show you on this blog could be applied to any medium, not just marker colored pictures. If you work with colored pencils or watercolor, use the same technique. Don't stress about white areas when you can paint them in later. Also, the opaque white is really bright; brighter than your paper sometimes. Even if you do leave your snowflakes white, by painting over them they will stand out even more- that hint of dimension that paint gives will add a beautiful final touch to any artwork.
Image: Chickadee, by Carolyn Shores Wright, Stamps Happen Inc. Paper: Neenah Classic Crest Ink: Memento Tuxedo Black Other: Copic Opaque White
Note: I did not use any colorless blender on this picture.
Friday, July 25, 2008
Marker Blending on a Palette
Yesterday I mentioned painting with your markers by applying the ink to plastic and painting it on with a paintbrush filled with blender solution to get watercolor-like effects on watercolor paper. This is a version of our last main blending technique.
Marker Blending on a Palette
This technique can be done without a paintbrush however, and is an old blending technique that people have been using for years with alcohol-based markers onto whatever paper surface they are working on. Professors at art schools have students work in this manner to mix and blend colors, since in the old days other marker brands weren't as easy to blend as Copics.
With this post, we'll have covered the 4 main methods of blending Copic markers:
1. Marker on paper
2. Feather Blending
3. Marker tip-to-tip
4. Blending on a plastic palette
This technique was also featured as a tutorial on Splitcoaststampers last year by one of our demo designers, Kathy Sanders, who has been teaching this technique for years to stampers.
This is very similar to the Marker Tip-to-Tip blending that I showed last month, in that you are using a lighter colored marker or the blender marker to pick up color and apply it to your artwork to create blends.
1. Take a few dark colors and make small dabs on your plastic palette. For my example I'm using an old CD case, though anything glossy plastic would work. Really juice up the spots, since you'll use most of that ink quickly.
2. With the lighter color that you want the dark to blend into, pick up a spot of dark and color onto your image. This is great for small spots of blended colors that would be hard to get a good feather on, or are too small for blending on the paper itself without making a blob. If you want a color to blend to white, use the blender.
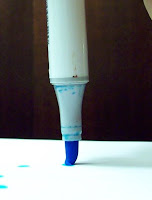
See how one stroke is blue fading out? If you need a larger area, then keep picking up color and feathering it into your work in exactly the same direction as the first stroke.
3. Scribble off the darker color onto some scratch paper to keep your light marker tips nice and clean when you're done (this blender marker is really old, so the tip is already stained).
So, why would you use this technique over tip to tip blending?
It's easier to see how much ink you're picking up. You can keep your little palette and use any residue in the future as well. You can mix a tiny "batch" of a special color blend. In the case of my finished work today, I want everything to have an antique tone, so if I have a limited color range I can use a pale gray (in this case a warm gray) to apply my colors and then everything will have undertones of warm gray.
Otherwise, it's about the same. Both techniques are good for small areas, and they work with very different color blends as well. These are also good techniques to use on glossy or coated papers, where you don't want to heavily soak the cardstock to get a blend. It looks very much like watercolor, but it doesn't soak through the paper.
How did I choose my colors?
In this example I want my blues of the water and sky to be nice, clean, and bright. I apply those with the colorless blender. See how pale the sky is? That is B34 mixed with BG49- both very dark colors on the soft paper I'm using. Yet see how subtle and washed out they look? This is thanks to the blender, and adding blender to my drops of color on my palette. If I want to darken any of these areas I can always go in and do final touch-ups directly with the markers.
The second step is with my browns. I want these to be antiqued and muted, so I'm applying them with a pale warm gray, W2, since there is brown in the Warm Grays. The sails on the finished piece are applied with the neutral gray, N1 because I want them to feel antique, yet look different than the browns. Also, I wanted subtle hints of the YG and E colors, and the Neutral tone helped to keep those from getting too brown (W) or blue (C). The markers in the photo give you an idea of how small this picture is.
I am leaving all my highlight areas white, since my paper is a slight off-white (photoshop shows it as more true-white). The whole effect is rather nice and muted for a general antique feel.
You may notice that your marker makes nice spots of color on your plastic. Later I'll talk more about using the markers on clear acrylic pages and projects, I'm just waiting for my supplies to get back from CHA to show some fun things.
Image: Cutter Shark that I drew last year and photocopied onto 100 lb Rag sketch paper by Aquabee
Labels:
beginner,
color theory,
smooth coloring,
techniques
Thursday, July 24, 2008
Copics & Watercolors, Part 2
Yesterday I talked about using watercolors with your Copics and how they wouldn't get messed up. I was working on regular Neenah cardstock. This is not a watercolor paper, so the fibers will pill if try to do regular watercolor techniques on it besides the basic coloring I showed.
If I'm using watercolors, I should use watercolor paper, right? On yesterday's paper I was starting to see the paper get destroyed. But Copics should not be used on watercolor paper, since the paper is so absorbent that it sucks the ink out of your markers and is hard to blend. This could be a problem, so what should I do?...
Solutions:
1. Just go for it
So what if it sucks your markers dry? A lot of Japanese artists will still use watercolor paper if most of the picture is going to be watercolored anyways. You're only using it for details and as long as you don't need complicated blends then it would be fine. Just remember that marker colored areas will be very vibrant and much darker than you expect compared to other papers. Unlike other cardstocks, don't try to soak the paper through, just work on the top layers of the paper. If you try to soak the paper you'll run into sucked dry markers and bad feathering.
The marker will feather quite a bit on this soft paper, so use a light hand. Work fast and you can still get the colors to blend, it's when they dry that it's harder to blend. For stampers, small areas are easier to blend, it's large areas that will be a pain, so save your large areas for watercoloring anyways. When done right, the two layers look pretty good together. You'll see the crispness of the marker details but the colors are vibrant and match the watercolored background.
On watercolor paper you will not be able to fix mistakes using the blender pens, and don't expect your other special effects to work as well either. Those need lots of juicy blender, and watercolor paper just won't allow it to be juicy enough.
2. Use a hybrid Paper
Look for other papers that are thick or slightly coated, then test them with both marker and watercolors since some papers will work better than others. Sorry I don't have an example of other papers.
For stampers, Stampin Up! Whisper white paper is a slightly coated paper intended for the SU! markers to blend better on. SU! Markers are water-based, and so are blended with water. Many people say they get good results when coloring on the SU! paper, so this might be an option.
3. "Blendercolor" with your Copics
On watercolor paper the problem is that when you touch the pen to the paper it sucks ink out and is really hard to blend. If you PAINT the ink on however, you're not drying out your marker. So how would you paint on marker ink, if it is inside your marker and it's not water-based?
I solved this problem by using a piece of plastic or a plastic painting palette. With just the darker marker colors, dab a few spots of color onto your plastic. Then, take a watercolor brush that can be filled with water and fill it with Copic blender solution (sorry I didn't get a picture of this brush). Use this blender brush to pick up the dabs of color and use that on your paper.
Now you can "paint" with Copics, the only difference is that your carrier is not water but blender solution. You can also try this method with a Sketch or Ciao blender dipped into a puddle of blender solution, but you have to work quick, because the blender wants to evaporate.
Or, you could also try pre-soaking the paper in blender solution or rubbing alcohol and working fast to add the colors while it's damp that way. I haven't done this on watercolor paper, but I have tried it with good success on fabrics.
So why would I use this roundabout method? The blender solution is much cheaper than running your marker dry trying to get a blend. I can fill a blender marker 70 times with one $13 bottle of blender refill. That's a much better price than even refilling any of the other colored markers. Plus, when you "paint" with this method it is REALLY hard to distinguish between marker and paint. On my finished piece, if you didn't know the tree was done with marker you couldn't tell the difference between it and the watercolored areas. Is it easy to do? The idea is easy, but it does take practice.
Images drawn onto Borden & Riley Cold Press Watercolor Paper with a 0.2 Multiliner SP.
Wednesday, July 23, 2008
Copics, Humidity, & Watercolors
I get lots of questions all the time, and sometimes I feel a that a question is worth sharing because someone else might be encountering the same thing, especially in the hot, humid summertime. I am so glad I'm not in Chicago anymore for CHA, since I just don't know how to deal with the humidity, especially if it messes with my coloring.
Q. My stamping area is high humidity and I keep having problems with inks bleeding that other people say should work great. I'm using the right paper and ink combo, so what's wrong?
Q. Hey! that happens sometimes to me as well! I live in a humid area and I want to stamp and color but on some days the markers work better than others.
A. I didn't think humidity would be a problem with Copic markers since they are alcohol, not water based, until I experimented to help these people. So I took some cardstock and I dampened a stamped picture with water before coloring it, to the point that it was wet. My oh my! The Copics sure hated that. The lines bled, it wouldn't color evenly, and when I tried to color in small circles to evenly coat the paper it pilled up. Bleagh! Copic markers shouldn't make the paper pill!
It's hard to see, but on this example the top snail is normal. The middle snail is just damp (it was starting to act up). The bottom snail was really wet and really bad (dark areas are where the paper was pilling)
To solve the problem here's the trick- dry out your paper. Use a heat gun, use a dry clothes iron, but you need to get the water out of the paper or it just won't work. Maybe bake your paper- nothing that will scorch the paper, just heat it up so all moisture leaves the paper before you color it. Then store that paper in an air-tight package so it doesn't get wet again. After you've colored with Copic markers you can do what you want with the paper. Go dunk it in the river or something, since at that point the marker won't get messed up. A lot of artists use the marker for fine detail areas then do watercolor washes for the background- the water won't ruin your marker areas AFTER they've been colored.
During one of my classes I proved this point by pouring a glass of water over something I had colored with Copics. The colored area didn't change at all. Copic Multiliners aren't going to be messed up either when you watercolor over them.
Image: Vintage Garden Chair by Lockhart Stamps Ink: Memento Tuxedo Black Paper: Neenah Classic Crest Other: ground line and bushes drawn with 0.1 mm Multiliner, Watercolors on ground & background
Tuesday, July 22, 2008
Picking Between markers part 4 - Ciao
I'm back! What a long trip. CHA was great, but it's good to be back. This is the 4th installment of picking between marker types. For general differences, Copic, or Sketch please see their earlier posts.
Finally I'm getting around to talking about the Ciao Markers. I know many of you have quite the collection of Ciao markers, and yest more of you are still trying to choose between the three main marker types. It can be confusing understanding the differences between a Sketch and a Ciao marker.
Ciao markers (pronounced Chow, like the Italian greeting) are a little over 10 years old. With the popularity of the Sketch marker, Japan got a lot of great feedback from artists who had fallen in love with the Super Brush. The main negative feedback for Sketch markers was the price, so Japan created the Ciao.
Ciao markers were intended as a beginner marker. All Copic markers have non-toxic ink, but Ciao markers have a special Child-safe cap. If you look close at the lid it has little holes. In case a child accidentally swallows a Ciao lid, they'll still be able to breathe. Sadly, this cap design means that they can't put the color numbers on the end like many of you prefer. Don't worry though, the cap isn't letting air into the marker, so your marker still won't dry out even if it sits in your drawer unused for a while.
Most of us are not going to go swallow marker lids and test out that useful feature, so what else makes a Ciao special? Ciao have the same two nib types as a Sketch marker, but only half as many colors. Ciao are refillable, but there are no empty markers available to mix your own colors. Ciao hold less ink to begin with, so you'll have to refill sooner (for this reason I don't use Ciao in my workshops- when you have to refill a few hundred markers every few months it gets to be a pain).
If someone asks me which are better, Ciao or Sketch, I have to say I use both since the brush is what I color with the most. Sketch has more colors and fits precisely in the airbrush, but Ciao are a great price, and many people like that they are slightly smaller, so they fit easily in your hand.
So, if you don't mind refilling sooner, love the Super Brush nib, don't mind that your colors are limited, and airbrushing isn't that important then go for the Ciao. You can always fill in those extra colors with Sketch later on.
This image is in honor of the mint that my husband didn't water while I was at CHA. To get the soft edges I used a lot of blender on the paper first, then colored it while still damp. Image: Peppermint by My Favorite Things, Ink: memento London Fog, Paper: Neenah Classic Crest,
Labels:
beginner,
Ciao Markers,
marker styles,
picking markers
Friday, July 18, 2008
Pushing with lighter colors
It's CHA, and I'm in a room full of fabulous stampers. I've got Joy Kennedy, Daisy Sparks, Mickey Harper all with a pile of Taylor Van Bruggen's markers that she doesn't know we are borrowing, since she's out of the room. I figured that we have a cool technique I just showed the ladies, so I wanted to share it with everyone.
(For those of you who aren't familiar with CHA, it's the Craft and Hobby Association. In 2002 Copic won the Best of New Innovations Award, back when the show was called HIA. Be sure to stop by Booth #2848 and see Debbie Olson, Michelle Wooderson, and Kathy Sanders along with the Copic Crew)
Pushing colors with colors
I know that I have mentioned before that you can use the blender marker to lighten up a colored area, push colors to the outside, etc. etc. But did you know that you can use ANY light color to do the same thing?
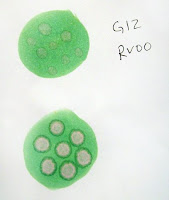
On this image I have colored with a flat, basic green. What if I forgot that I really wanted to leave pink spots. Ack! You can't put pink over green, it doesn't work. Wellllll, actually if you give it enough juice you CAN get a pink spot on a green area.
The top circle has only light dabs of pink, and they look kinda blah. Now look at the bottom circle. What's the difference? The second circle I REALLY juiced up. Just like when using the blender marker, the darker color builds up around the edges of the lighter area. Yet, instead of fading to white, it's pink.
Any light color will work over a darker color, as long as you juice it up enough. Some super dark colors may not move enough, but if you experiment you should find some that work.
It takes a lot of juice to move the darker color out of the way. To get that much juice I pushed straight down on the super brush tip- this squishes a bunch of juice out of the barrel. I can hear people cringing. This doesn't hurt your marker- if you are gently mushing. When you lift up, if the tip is slightly crooked, just nudge it back so it's straight. The super brush will go right back to it's old shape. The only thing that will really hurt the brush is pulling on it, so don't do that. I've had brush tips last for over 4 years, and you can get an idea of how hard I abuse them!
Image: Inky Antics, turtle's flowers Ink: We don't know because we took the picture from a stack of Taylor's Paper: See previous comment
Thursday, July 17, 2008
Web Award
I'm pretty busy at my workshops and pre-CHA buzz, but I have to post this before it gets totally forgotten. I don't know how I missed it, but I was nominated a week or two ago for this award by Toni at Cards N candles. Thank you so much! I'm glad that I am inspiring you.
There are too many great blogs out there, so this list includes some blogs you may not have explored as well as my personal favorites that aren't on the fabulous Copic Design Team! (You should already be reading those everyday ;)
I'm to pass this on to the papercrafting blogs that inspire me,
There are too many great blogs out there, so this list includes some blogs you may not have explored as well as my personal favorites that aren't on the fabulous Copic Design Team! (You should already be reading those everyday ;)
1. Nicole, Anderson Arts
2 Wendy, Wickedly Wonderful Creations
3 Cambria, Stamp a little Love
4 Kim Ross, Card-E-ology
5. Sherrie, Card Creme
6. Elizabeth, Ebethonline
7. Joy Kennedy, Joy of Stamping
Thanks again for the nomination and I hope you enjoy these crafting sites.
2 Wendy, Wickedly Wonderful Creations
3 Cambria, Stamp a little Love
4 Kim Ross, Card-E-ology
5. Sherrie, Card Creme
6. Elizabeth, Ebethonline
7. Joy Kennedy, Joy of Stamping
Thanks again for the nomination and I hope you enjoy these crafting sites.
Subscribe to:
Posts (Atom)