

Grass
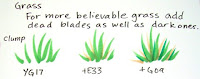 It's fine to practice large and small, until your hand can comfortably make these little grassy chunks. Keep your wrist very loose when doing this. Practice making some large clumps and some small tussocks.The trick to making believable grass is to make it irregular. Some blades are short, some are tall, and the colors range from light to dark. Add a few dead blades - see how much more dynamic it looks.

The super brush end of a Sketch or Ciao marker is very flexible, and really feels like a brush. With a little flick you can get a perfect tuft of grass. Flick a few times to build your tuft. Practice a bit, since this is a basic brush technique, yet it takes a light hand. Make your motions very quick and light.
 It's fine to practice large and small, until your hand can comfortably make these little grassy chunks. Keep your wrist very loose when doing this. Practice making some large clumps and some small tussocks.The trick to making believable grass is to make it irregular. Some blades are short, some are tall, and the colors range from light to dark. Add a few dead blades - see how much more dynamic it looks.
I'm sure that any outdoor picture you work on would benefit from a few tufts of grass and you can always dab in a few rocks for a simple accent as well. Or, use the blender pen and dot in some rocks over a simple light brown groundcover.
For a nice smooth lawn, practice making blades that are all the same length and in a nice row, since a well-manicured lawn is very clean and even. This makes a wonderful ground cover that doesn't detract from the main image. If you want a solid green area under your blades of grass then color the big green area first, then, while it's still wet on your paper, add the individual flecks of grass. That way you won't get the annoying darker spots under your blades like you see on my first lawn example. Add your darker color after you do the light color.
Sky and Grass
When you are adding grass to a picture that you also want sky in, do the sky first, since your grass will overlap the edge of the sky. Sky is usually blue, and grass is usually green, and green is made from blue so if your green overlaps the sky it won't look so bad.
Trying to carefully color sky between tiny blades of grass so you don't bleed the blades out is much harder. Trust me. Just do your sky first and add your grass later. On this picture I got tired of making softly blended skies, so I colored the blue then dabbed on the blender to get the mottled look. See how I made my first layer of grass? Now I add my darker blades over the top of this to get the overall lawn look.
Image: Gardenia Greenthumb by Stamping Bella, Ink: Memento Tuxedo Black Paper: Neenah Classic Crest

13 comments:
Oh now this I have to learn but one problem, I can't see any pictures !!!!!!!! I have tried several times.
Your Coloring absolutely amazes me. I have had my markers a year and just coloring is all i can so but your blog has helped. I am gonna get the spray gun next.
Wonderful tips. Just yesterday I was thinking I sure would like some tips for grass and sky and what colors you use most. Thank you so much.
Thank you so much for posting this. Just last week I was trying to draw grass and well it didn't turn out nearly as nice as yours LOL.
Thank you for the tip. I am learning so much with your blog. Now I want and "need" to buy the B set of 72 markers (I have the A) and the air brush. I check your blog daily. Thank you, thank you, thank you!
I love this tip. Thank you!
I LOVE the sky and all the other tips you teach for the blender pen. AMAZING class yesterday and thanks so much for all the time you put into this blog!! See you at CHA! =)
Sheesh, you are amazing!!! Thanks for all your fabulous hints!!!
WOW!! You are amazing!! I have read every one of your posts and am learning more than I could ever imagine about these markers. I am so glad I made the initial investment in a set of 72 Ciaos. Now, I plan to add to my collection as I read your posts and learn new techniques.
I wanted to especially thank you for showing us how to apply each of your techniques by using stamps that many of us have, so we can practice right along with you and actually understand what you are trying to convey.
Thank you so much for your blog. I know you receive hundreds of e-mails and comments on what you are sharing, but I wanted to reinforce our appreciation. Copics are a huge investment, but definitely worth every penny when someone like you takes the time to break down the steps and teach us how to actually use them.
YOU ARE AWESOME!!
Judy
It was great to meet you too, Marianne! Your class was amazing, and I know I'm going to have a ton of fun with the Copics in the future.
Thanks,
Susan
I would love to take a class with a certified "Copic" person. Do you know of anyone in Southern Ontario, Canada that is certified to teach a class?
I love it. I am off to try a sky like that.
how do you represent black fabric with copic markers?
Post a Comment