Wow! The wholesale event for summer CHA is now over. What a blast we had in the Copic booth. It was great to see all the excitement over the new 12 colors and to have a chance to play with them as well. I'm already excited for the next CHA.
The last day of the show we had a visiting demo artist - Lynn Mercurio. Here she is coloring a wonderfully bright Rooster by Lockhart Stamp. Co. I love how any illustration looks rich and smooth from the markers. I think all of our demo aritists had a great time coloring and answering questions so that their local stores could know which markers to bring in and share with their customers.
A big thanks to all our demos for the week - I'll miss each of you!
You should also thank your local craft and hobby stores for bringing in any product that you like. It's hard work for them to attend these shows, look for what's new and exciting, and make the choice to bring it in so that you can purchase it. This is why we attend trade shows like CHA, NAMTA, and many others - so that store owners can see and understand what products can do for you, their loyal customers. Thank you stores!
Another Copic Spotting-
Sally Lynn needed some multiliners for demoing in another booth and she happened to get this photo of their demo artist using Copic Multiliners. Who is their demo? None other than Donna Downey! Here she is enjoying the smooth feel of the multiliners- not just on paper apparently :)
What a fun photo! Thanks for sharing!
I'm going to be heading over to the CHA Craft supershow before my flight this morning. I'll try to get some more great photos. Have a great weekend!
Friday, July 31, 2009
Thursday, July 30, 2009
Demo Artists, CHA 2009
I just wanted to take a quick minute to show you what we've been doing this week in the Copic booth.
So far we've had the lovely Pat Huntoon from Technique Junkie newsletter hang out with us. She has been a fabulous roommate and I'll truly miss her when she heads up North again.
Behind Pat you'll see Jeanne Streiff, one of our other fabulous demo ladies. We love you Jeanne!
Pat colored this lovely frog more times than you can imagine today. Here's one of her little green friends that I managed to catch on camera before it hoped away. This frog was colored with light green, shaded with dark green, then Pat dabbed some colorless blender onto a rag and added the fine texture.
Our other demo person and fabulous Copic Certification instructor is Sally Lynn MacDonald. Here she is coloring some fairies and demoing basic marker tecniques to some very nice stores who are curious about the markers.
What I want you to notice about the completed fairy in this picture is the shadow on the skin. This was made with RV95, not a darker skin sequence. Please remember where I have mentioned in the past that your skin has a slighty purple/blue shadow. This grayish purple is perfect for shading skin and getting a pale, translucent feel to the delicate fairy.
Notice also on the desk with the fairy are some screen prints and clear acrylic album scraps. I'll post more technuqies with these, I promise!
I head home tomorrow, but I hope you can have a chance to wander around the Super Show for the next two days even if you don't get a chance to see the wholesale side. Have a great week!
Sunday, July 26, 2009
Here in Orlando
And I'm getting ready for Summer CHA and my certification class tomorrow. It is very hot and humid but I think it will be a very exciting week. I'll be on the lookout this week for many new and exciting products that will work with Copic markers, so keep looking with me. Do you have any suggestions of what you would like to see me pick up this week and test?
Leave me a comment with your favorite mixed-media use of Copic or anything that you would like to see me test and I'll try to meet with those companies and get some samples. Have a great week- I know I will!
Friday, July 24, 2009
Friday Art Links
Once again, here are some neat art links I think you'll like. I want to thank everyone who came to my teen workshop out at Fern Ridge Public Library yesterday- it was a fun group of kids. OK, on to the links:
Abduzeedo.com - Creating a very detailed illustration- Wow! If you want to see a step-by-step process of how to make incredible digital illustrations, check this out. Dig around and look at their other digital tutorials as well.
How to draw and Paint.com - The name says it all. These easy to follow tutorials help you draw your own things. Great for beginners.
Mailing went out today for the Southern Cali. Certification class on August 17th. Sorry about all the delays. It will be held at the Courtyard Marriott in Carlsbad, CA.
August
15th Vancouver, BC taught by Sherrie FULL
16th Eau Claire, WI taught by Sally Lynn Full
17th Carlsbad/Oceanside CA, taught by Marianne OPEN (e-mail orders@copicmarker.com for an application)
22nd Calgary, AB taught by Sherrie FULL
29th Edmonton, AB taught by Sherrie. OPEN
30th Coconut Creek, FL taught by Sally Lynn Canceled
The following classes are upcoming. Applications have NOT gone out yet, so sign up on the sidebar of my blog through Vertical Response to get on the mailing for those classes.
Sept.
Minneapolis, MN (Date TBA, Mid Sept. in conjunction with Scrapfest) taught by Marianne
October
25th Evansville, IN taught by Sally Lynn
November
22nd Myrtle Beach, SC taught by Sally Lynn
December
13th San Antonio, TX taught by Sally Lynn
Abduzeedo.com - Creating a very detailed illustration- Wow! If you want to see a step-by-step process of how to make incredible digital illustrations, check this out. Dig around and look at their other digital tutorials as well.
How to draw and Paint.com - The name says it all. These easy to follow tutorials help you draw your own things. Great for beginners.
Now, updates on certification classes
Mailing went out today for the Southern Cali. Certification class on August 17th. Sorry about all the delays. It will be held at the Courtyard Marriott in Carlsbad, CA.
August
15th Vancouver, BC taught by Sherrie FULL
16th Eau Claire, WI taught by Sally Lynn Full
17th Carlsbad/Oceanside CA, taught by Marianne OPEN (e-mail orders@copicmarker.com for an application)
22nd Calgary, AB taught by Sherrie FULL
29th Edmonton, AB taught by Sherrie. OPEN
30th Coconut Creek, FL taught by Sally Lynn Canceled
The following classes are upcoming. Applications have NOT gone out yet, so sign up on the sidebar of my blog through Vertical Response to get on the mailing for those classes.
Sept.
Minneapolis, MN (Date TBA, Mid Sept. in conjunction with Scrapfest) taught by Marianne
October
25th Evansville, IN taught by Sally Lynn
November
22nd Myrtle Beach, SC taught by Sally Lynn
December
13th San Antonio, TX taught by Sally Lynn
Wednesday, July 22, 2009
Scrapbook Memories - Dan Album
Some of you have commented that you saw me on Scrapbook Memories recently, episode 1408. If you didn't see the episode then I will step you through the main project I altered: a mini wooden scrapbook for my brother, Dan.
I made a number of other little things for that show, but today I'll step you through how I altered this album.
First, a little backstory...
Last Fall I was teaching a certification class in Kansas City with a couple of dear friends - Lori Craig and Sharon Harnist. They found out that the next week I was going to be filmed for a TV show and they wondered what project was I going to make... um... project?... well, it's for a scrapbooking show, so obviously I was going to make a scrapbook, right?
"Marianne, have you ever made a scrapbook before?" they asked me. Hey, that's a really good question! Have I ever made a scrapbook...not exactly...I mean, I've made a few odd pages, but no, never a scrapbook as they envision it (when I make books I do it on the computer and I create finished books for publication, not "scrapbooks")... so I guess the answer is NO. But I know what techniques I want to show on the TV!
After much head shaking and tsk-tsk's they took me to my first scrapbook workshop with Melissa Frances, where we made her cancer-survivor Remember Matchbook. With Lori on one side and Sharon on the other I couldn't help but succeed (though my methods were a little odd to them). And then, Ta Da! Project made. Now I was ready! I had taken my first scrapbooking class and I had two great mentors at my side, TV was waiting!
So with much giggling, we gathered our supplies and headed back to our hotel room and Lori and Sharon proceeded to teach me how to make a great scrapbook. Here is the process we used to create my fabulous scrapbook (in-progress photos by Sharon Harnist, finished photos by Marianne).
Dan Album
We made the main album and prepared embellishments in Kansas City, then when I got back to Oregon I added the photos and final touch-ups, leaving a few spots open to color during the show.
Originally we were going to make a family reunion album, but after I got to adding the final photos I changed it to an album just for my brother, Dan.
Cover
We started with a wood album and covered it with patriotic papers to create a theme of antique Americana. Each page was covered, then we used a dark brown marker to tone the edges of the wood so it was all dark. Where we added paper and had to punch out the holes for ribbon we touched up the white of the paper with appropriate markers.
The bit of twine we used to tie the red ribbon onto the large tag was colored with Copics. You can see how we took the metal star and colored it red, then I added dark purple flecks with the airbrush ssytem to give it variation. The wood flourish was wood colored until we airbrushed it red.
Here is the final cover that I created when I got home, complete with chipboard letters that were originally light green, but I airbrushed them blue to match the album. You can also see we added some small star shaped embellishments. Each of these was colored red with the markers to match the album better. I love how the markers can tie in many different elements that wouldn't match usually, but with some minor color adjustments it all works in the end.
Inside page 1
You can't tell, but the tan paper with small stars was originally white with small stars. I used an E31 or E33 wide marker and colored the whole paper to match our antique theme.
The star on the next page was also white paper colored with a wide marker in wavy stripes to create interesting journaling lines. Writing was done with a Garnet Spica pen and multiliners. You can see on the holes how they needed to be touched up before we assembled the binding.
This page went through a couple revisions. Compare the in-progress shot to the final page. I added a few more tags, each started as white and I added marker to tone it to match my paper. All twine was originally white and I changed it to match. The metal stars were also colored with red markers and airbrushed to match. I printed my photos to fit the background papers we had placed.
The last page of this mini album incorporates elements we already made from the cover and first page. Colored wood flourish, colored foil stars, colored clear star embellishments, white tags colored brown and more.
You can see in these photos the color of the twine before I altered it to be tan. I also distressed the star on this page so it was more aged looking to match the photos of my brother's dirty old cars.
It was great to get my brother's reaction when he saw the final album. When I had called his wife to get photos my brother was picturing a cute, flowery scrapbook and he was sure he wouldn't like it. When he saw my manly tribute to his dogs and rusty cars he was very pleased. He had no idea that scrapbooks could be so cool.
It is doubly cool to think that his album was shown on TV (more from the show tomorrow)...
Supplies Used for Dan Album:
- Sketch markers, assorted colors, Wide marker, Airbrush System and Spica Glitter Pens: Copic
- Beyond the page Tag Album, Occasion Planner, Wood Flourishes by Kaiser Craft
- Blue Awning Chipboard Alphabet, K&Co
- Red Ribbon, May Arts
- Star shaped Crystal Stickers, Star Metals Stickers: Mark Richards
- Freedom Collection Paper & Stickers by Reminisce
- Wizard Die Cut Machine, Star Netabilities, Rectangle Nestabilities and Copper Foil: Spellbinders
- Memento Potter’s Clay stamp pad, Tsukineko
Tuesday, July 21, 2009
CHA Summer 2009
I'm pretty busy finishing up my final details for Summer CHA next week in Orlando, FL however I have a few points to bring up if you will be coming to the wholesale show from July 28-30 (not the Craft Supershow). Come check out new products and see our great demo artists hard at work. Many of you will not get a chance to attend, so here is a rundown of what you can expect from Copic at Summer CHA this year:
• Copic Certification on Monday, July 27th Registration closes on Wed. I have a couple spots left, but you must contact us ASAP. This will be held in the Rosen Centre, the hotel adjacent the convention center.
• Copic Booth # 1516 Visit us and see all our neat displays and sets available to help your customers get the products they need.
• Demo Artists
We are pleased to announce that Pat Huntoon from Technique Junkie newsletter will be our main demo artist this week. Also there will be appearances from many other great names like Sally Lynn MacDonald, Cambria Turnbow, Jeanne Streiff, and many others, so stop by and see who's hanging out at the Copic Booth.
• New Products
If you haven't seen them already you can catch a glimpse of our new 12 Sketch Colors. Also come see our new Trace Pad, it's an ultra-thin LED light table. These will be shipping in September and are perfect for tracing, embossing, and more (I can't wait 'til I get one!). If you stopped by our booth at Anime Expo you could see the 12 x 18" model. I'll feature these here on my blog as soon as we get those in. Be sure to ask about our show specials as well.
Then, for those of you visiting the Craft Supershow you can see and try Copic Products at many booths. If you know a store or company also using Copics in their make 'n take projects, please add a comment with the company name and/or booth number.
I can't wait to meet everyone!
Friday, July 17, 2009
Friday Art Links & Certification
Time for some more art links and a few other updates. Let me know if you find something neat and want to share it with the blogging world.
Copic Marker News Blog- This is different than my I Like Markers blog. You can see photos of our trade-show booths and get other neat information from Copic.
Trev Murphy - This is an incredible illustrator who has posted some fabulous videos on how he uses Copic Markers for ATC portraits. Definitely worth watching, even if you don't consider yourself an artist.
'skine art - Celebrating Moleskine lovers and their art. If you haven't tried a moleskine, they are a fine journal/sketchbook that has been around for centuries. The paper is fabulous! check out these illustrations and sketches for inspiration
Mostly Markers- Cindy Overmeyer has done a fabulous job of uploading her artwork, so poke around and leave some comments. There's some great stuff here!
There are a few more certification classes this Summer, so contact us if you need to register: orders@copicmarker.com or in the US, toll free (866) 662-6742 Canada (541) 684-0013
July
27th Orlando, FL taught by Marianne This class will close Wednesday next week, so get your application in ASAP. Only open to Stores, teachers, and Design Team Members
August
16th Eau Claire, WI taught by Sally Lynn e-mail for an application
30th Coconut Creek, FL taught by Sally Lynn e-mail for an application
Vancouver, BC August 15th taught by Sherrie e-mail for an application
San Diego, CA August 17th taught by Marianne - Note - This class is still taking place, though it will be moving to Oceanside, Same date. Applications have NOT gone out yet, those will go out next week.
22nd Calgary, AB taught by Sherrie. FULL
29th Edmonton, AB taught by Sherrie. e-mail for an application
Upcoming locations
Minneapolis, MN (Date TBA, Mid Sept.) taught by Marianne. Applications have not gone out yet.
Coos Bay, OR - Fall
San Antonio, TX - December
Other events this Summer / Fall:
I will be doing some Make 'n Takes while I am in So. Cal next month, so keep a lookout for my finalized trip details soon.
If you are in the Eugene area, I will be teaching a Teen Manga Workshop at Fern Ridge Library next Thursday, July 23rd from 3 to 5 pm (FYI: their website is incorrect with the date).
Meanwhile, those of you in Calgary can visit Sherrie as she teaches workshops at Scrapbook Pantry and Scrapbooker's Paradise in Calgary.
We at Copic will only be attending the first half of the show, however, if you are going to the CHA Craft Supershow July 31- August 1st in Orlando, FL be sure to look for demos using Copic Markers. I know of at least a dozen going on throughout the show, as well as workshops, so look for those.
Copic Marker News Blog- This is different than my I Like Markers blog. You can see photos of our trade-show booths and get other neat information from Copic.
Trev Murphy - This is an incredible illustrator who has posted some fabulous videos on how he uses Copic Markers for ATC portraits. Definitely worth watching, even if you don't consider yourself an artist.
'skine art - Celebrating Moleskine lovers and their art. If you haven't tried a moleskine, they are a fine journal/sketchbook that has been around for centuries. The paper is fabulous! check out these illustrations and sketches for inspiration
Mostly Markers- Cindy Overmeyer has done a fabulous job of uploading her artwork, so poke around and leave some comments. There's some great stuff here!
Certification Updates
There are a few more certification classes this Summer, so contact us if you need to register: orders@copicmarker.com or in the US, toll free (866) 662-6742 Canada (541) 684-0013
July
27th Orlando, FL taught by Marianne This class will close Wednesday next week, so get your application in ASAP. Only open to Stores, teachers, and Design Team Members
August
16th Eau Claire, WI taught by Sally Lynn e-mail for an application
30th Coconut Creek, FL taught by Sally Lynn e-mail for an application
Vancouver, BC August 15th taught by Sherrie e-mail for an application
San Diego, CA August 17th taught by Marianne - Note - This class is still taking place, though it will be moving to Oceanside, Same date. Applications have NOT gone out yet, those will go out next week.
22nd Calgary, AB taught by Sherrie. FULL
29th Edmonton, AB taught by Sherrie. e-mail for an application
Upcoming locations
Minneapolis, MN (Date TBA, Mid Sept.) taught by Marianne. Applications have not gone out yet.
Coos Bay, OR - Fall
San Antonio, TX - December
Other events this Summer / Fall:
I will be doing some Make 'n Takes while I am in So. Cal next month, so keep a lookout for my finalized trip details soon.
If you are in the Eugene area, I will be teaching a Teen Manga Workshop at Fern Ridge Library next Thursday, July 23rd from 3 to 5 pm (FYI: their website is incorrect with the date).
Meanwhile, those of you in Calgary can visit Sherrie as she teaches workshops at Scrapbook Pantry and Scrapbooker's Paradise in Calgary.
We at Copic will only be attending the first half of the show, however, if you are going to the CHA Craft Supershow July 31- August 1st in Orlando, FL be sure to look for demos using Copic Markers. I know of at least a dozen going on throughout the show, as well as workshops, so look for those.
Wednesday, July 15, 2009
How to draw a Manga Head
What is Manga you may ask?
If you aren't familiar with the history of Copics, I suggest you review this brief post. To sum it up, Manga is the word for Japanese Comic Books, and Anime is a Japanese Animation. Copic markers were developed for coloring this style of artwork.
One defining feature of the Japanese comic style is the unique head shapes, eyes, and the way they draw hair. I used to teach a 6 week class to teenagers on how to draw in this style, but I'm way too busy nowdays. However, I have all these great instructional handouts that I will occasionally share with the blogging world.
Even if you don't consider yourself an artist I suggest you at least try to draw a simple manga head on your own. It won't hurt, I promise! These directions were designed for giving away as worksheets when I do demos at children's events. I have no problem with you sharing these handouts as long as it is for educational use only. Enjoy!
After going to Anime Expo a few weeks ago I figured now is a good chance to share a handout I made a few years ago for a teen workshop I regularly teach. This is a simple guide to drawing a manga-style head. Great for kids who want to learn how to draw their own manga characters. Someday when I get the chance I'll step you through each stage in a full post. You'll need a piece of paper, a pencil, and a good inking pen for this project.
If you aren't familiar with the history of Copics, I suggest you review this brief post. To sum it up, Manga is the word for Japanese Comic Books, and Anime is a Japanese Animation. Copic markers were developed for coloring this style of artwork.
One defining feature of the Japanese comic style is the unique head shapes, eyes, and the way they draw hair. I used to teach a 6 week class to teenagers on how to draw in this style, but I'm way too busy nowdays. However, I have all these great instructional handouts that I will occasionally share with the blogging world.
Even if you don't consider yourself an artist I suggest you at least try to draw a simple manga head on your own. It won't hurt, I promise! These directions were designed for giving away as worksheets when I do demos at children's events. I have no problem with you sharing these handouts as long as it is for educational use only. Enjoy!
Drawing a simple Manga Head
After going to Anime Expo a few weeks ago I figured now is a good chance to share a handout I made a few years ago for a teen workshop I regularly teach. This is a simple guide to drawing a manga-style head. Great for kids who want to learn how to draw their own manga characters. Someday when I get the chance I'll step you through each stage in a full post. You'll need a piece of paper, a pencil, and a good inking pen for this project.
Monday, July 13, 2009
Light from a candle- part 2
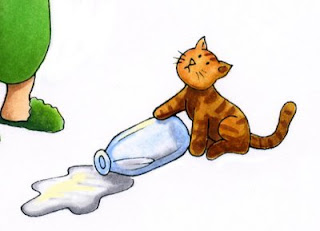
Here is the second part of my advanced post on coloring light from a candle. This time I'm coloring the kitten and the jar of milk.
Kitten
Coloring the kitten is pretty easy. I started with a base of YR31, added shadows with YR24, and added the stripes with E37. I also darkened the shadow areas with E37. Note that his face and the paw are the lightest parts since they are on the side closest to the candle. When I add a final background I may darken him up a bit (especially his tail) but for now I like his colors.
Bottle & Milk
Coloring the bottle and milk are the tricky parts. The bottle and milk are colored with B32, colorless blender, C1, C3, and a hint of Y11. Once I add the background I will add some glints of light with my opaque white.
First, I colored the bottle with B32. I colored only the edges and then I faded it out with the colorless blender (see these posts on coloring a glass of water, part 1, part 2). This makes the edges strong blue yet clear looking in the middle. At this point I would add a pale version of whatever my background color is to the inside of the bottle so you could see the floor through it. However, since I haven't chosen a background yet I will just hold off adding any color until later.
You can note that I am also trying to make the bottle darker than it would be in a bright light. I added hints of C3 to the base of the bottle and as a shadow under the kitten's paw so you can see the shape of the bottle better.
The liquid inside is NOT transparent however, it is milk, so it needs to remain white. To keep it white and to make sure you know it is not the glass jar I shadowed the liquid with my cool grays. I did this both to the milk on the floor as well as the bottle. With a white background the milk looks a little dark, but remember, our background will be dark, so having the milk kind of dark is OK.
You can see that I added some pale yellow highlights to both the milk and the bottle. This is the candlelight reflecting, so it stays yellow, but it is not as strong a yellow as the highlights on his face and arm. Once again, after I add my background I will add some white in with my opaque white to really get the shiny things to look shinier.
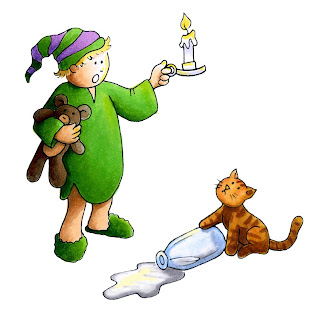
The final artwork now looks like this, where the boy and the cat are both lighted correctly and ready for a background.
Background
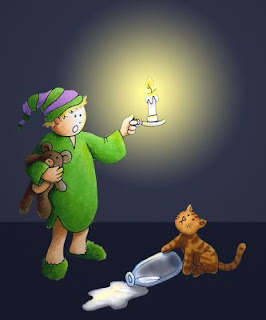
I keep mentioning how I am picturing the background. Here is a quick mock-up that I made in photoshop as a way of planning how my final background will look. I haven't made my background yet in real life, but I want you to get an idea of how it will change once I airbrush it. I will need to make masks and carefully plan my airbrushing. Using Photoshop is a cheater way of seeing how it will look without doing all the work (or making a mistake on something I just worked so hard on). Hopefully this week I will have a chance to show you how to actually make this background with the airbrush system.
Friday, July 10, 2009
Friday Art Links
I hope you've had a great week. It's Friday, and since I'm in town then I can share some more good art links. Let me know if you find these helpful or not.
ArtAlly Blog- This blog is a voice for the arts. Find links to interesting art articles, art therapy, art education, and useful info for art teachers. Full of great stuff, I strongly encourage you to read.
Art House Co-Op, Sketchbook Project Library - Sign up to get a sketchbook. Fill the sketchbook, then it goes on display in galleries and eventually into a library. Their goal is to collect original sketchbooks from around the world.
Rate My Drawings.com - this website is really great for the beginning to advanced artist. It offers a chance to draw online, view tutorials, join discussions, and enter artwork into daily competitions. Look at artwork from many people and give feedback.
Tomorrow I'll post the continuation of my boy and the candlelight. Have a great weekend!
Thursday, July 9, 2009
Light from a candle
This is a continuation of my last post on shadows. Although this seems like a very simple picture, I'm labeling this advanced because of how much I'll be going in-depth about the image.
Light from a candle
I drew a really cute scene and I want to step you through the process I use for coloring it. At first glance the picture is very simple. However, we have a lot of complex things going on once we try to color it.
Light from a single source, or candle
The main light source in this artwork is a candle, which is very different than the sun. From my earlier post we know the following:
• Our shadows will all move in a circle out from that point of light
• Light farther away from the candle is softer and muted.
• Shadows close to the candle are strong.
Another couple rules I want to include in our list:
• Reflective/shiny surfaces pick up light from far away in the dark, even if they are in the darker areas of your image.
• In the dark, furry things don't show up as well because light has a harder time bouncing off their surface.
• Colors quickly lose intensity in the dark, so shadows will turn more gray than they would in strong sunlight.
• Things close to the light make bigger shadows than objects farther away (I'll talk about this later, not in this illustration)
Some new points to consider about candlelight:
• Candles throw a warm (yellow) glow over everything that they light up.
• Light from a candle flickers and wavers, so your shadows can be softer.
• The candle wax glows from the candlelight.
• Intensity of the candle light is an artistic choice, however, in real life, candles don't give much light.
This is by no means a complete list, but these are the most important things to keep in mind.
Wow. That's a lot of things to think about. Now you see why I consider this a complex image to color. Let's break this artwork down into smaller parts and tackle it over the course of a few days.
Shadow Study
The first place to start is with a shadow study. We have to look at the whole picture to get an idea of how it will work as a completed composition.
Instead of drawing lines where my light is coming from I am using concentric circles to show intensity. Things that are in the first circle are going to be brighter than the outer circles. How close you make your circles is an artistic choice. My circles are'nt perfect, but it gives you an idea.
I chose to make my circles pretty large and make the candle light brighter than real life so that we can see the cat on the floor better.
Notice that the teddy bear is in the arm opposite the candle and so it will mostly be in shadow. I am not going to talk about the spilled milk today, since that is a reflective surface I am going to cover it later.
Coloring the Boy
Here is the boy colored by himself. On his night shirt I used YG06 for the lightest areas, shadowed with YG17 (a little more gray) and I blended in G28 for the deepest green areas, with a touch of BG96. His cap is V12 and V17 along with the greens.
On his skin I used E01, and I shadowed it with E33. E33 is not what I would usually use for skin shadows, but remember, in the dark the skin loses it's color intensity, so it gets dull faster. On the deepest shadows I used a touch of E44. On his face, which is closest to the candle I left it white and added a yellow highlight.
The teddy bear is E33, E44, E29 and W7. The W7 I added to make the darkest areas grayer, as they would naturally be in the dark. His hair is Y02, YR24, and E33. The candle is Y02, C1, and BV23.
Highlights
I left most highlight areas close to the candle un-colored so that I could add a nice, strong yellow (y02). You can see from this diagram where I added highlights. Things farther away from the candle, like the bottom of his night-shirt, I just added the yellow over the base color. If you swipe a pale color over a darker color enough times it will push the darker color out of the way. I did add some faint yellow hints to his slippers, but that's optional.
Don't forget to color the candle and the highlights on the candle holder yellow as well, since this is a source of the glow. I may add yellow to the background behind the candle after I'm all done, but I'm not worrying about that at this point (I'm thinking of airbrushing the background).
Night Shirt
As you are coloring, keep referring back to your shadow study. Notice that the boy's shirt is long, and it passes through a couple of the light circles. This means that the shirt wil gradually get darker as it gets farther away from the candle, even though the front side is well-lit from the candle.
If you look at the shadows on his legs you will also see that they fall in line from the candle, so they are darkest under his night shirt and lightest on the front side, though they aren't as pale as the skin on his face where the candle light is strongest. I also did not give his legs any yellow highlights.
What really makes this picture work so far is the contrast. Although the background is still white, you can tell at this point that the candle is bright and the boy will likely be standing in a dark room. His side far away from the candle is dark and deeply shadowed, but everything close to the candle is bright and vibrant.
I'll try to finish this picture over the next few days. I hope this has given you some things to think about. Click here to go to part 2.
Light from a candle
I drew a really cute scene and I want to step you through the process I use for coloring it. At first glance the picture is very simple. However, we have a lot of complex things going on once we try to color it.
Light from a single source, or candle
The main light source in this artwork is a candle, which is very different than the sun. From my earlier post we know the following:
• Our shadows will all move in a circle out from that point of light
• Light farther away from the candle is softer and muted.
• Shadows close to the candle are strong.
Another couple rules I want to include in our list:
• Reflective/shiny surfaces pick up light from far away in the dark, even if they are in the darker areas of your image.
• In the dark, furry things don't show up as well because light has a harder time bouncing off their surface.
• Colors quickly lose intensity in the dark, so shadows will turn more gray than they would in strong sunlight.
• Things close to the light make bigger shadows than objects farther away (I'll talk about this later, not in this illustration)
Some new points to consider about candlelight:
• Candles throw a warm (yellow) glow over everything that they light up.
• Light from a candle flickers and wavers, so your shadows can be softer.
• The candle wax glows from the candlelight.
• Intensity of the candle light is an artistic choice, however, in real life, candles don't give much light.
This is by no means a complete list, but these are the most important things to keep in mind.
Wow. That's a lot of things to think about. Now you see why I consider this a complex image to color. Let's break this artwork down into smaller parts and tackle it over the course of a few days.
Shadow Study
The first place to start is with a shadow study. We have to look at the whole picture to get an idea of how it will work as a completed composition.
Instead of drawing lines where my light is coming from I am using concentric circles to show intensity. Things that are in the first circle are going to be brighter than the outer circles. How close you make your circles is an artistic choice. My circles are'nt perfect, but it gives you an idea.
I chose to make my circles pretty large and make the candle light brighter than real life so that we can see the cat on the floor better.
Notice that the teddy bear is in the arm opposite the candle and so it will mostly be in shadow. I am not going to talk about the spilled milk today, since that is a reflective surface I am going to cover it later.
Coloring the Boy
Here is the boy colored by himself. On his night shirt I used YG06 for the lightest areas, shadowed with YG17 (a little more gray) and I blended in G28 for the deepest green areas, with a touch of BG96. His cap is V12 and V17 along with the greens.
On his skin I used E01, and I shadowed it with E33. E33 is not what I would usually use for skin shadows, but remember, in the dark the skin loses it's color intensity, so it gets dull faster. On the deepest shadows I used a touch of E44. On his face, which is closest to the candle I left it white and added a yellow highlight.
The teddy bear is E33, E44, E29 and W7. The W7 I added to make the darkest areas grayer, as they would naturally be in the dark. His hair is Y02, YR24, and E33. The candle is Y02, C1, and BV23.
Highlights
I left most highlight areas close to the candle un-colored so that I could add a nice, strong yellow (y02). You can see from this diagram where I added highlights. Things farther away from the candle, like the bottom of his night-shirt, I just added the yellow over the base color. If you swipe a pale color over a darker color enough times it will push the darker color out of the way. I did add some faint yellow hints to his slippers, but that's optional.
Don't forget to color the candle and the highlights on the candle holder yellow as well, since this is a source of the glow. I may add yellow to the background behind the candle after I'm all done, but I'm not worrying about that at this point (I'm thinking of airbrushing the background).
Night Shirt
As you are coloring, keep referring back to your shadow study. Notice that the boy's shirt is long, and it passes through a couple of the light circles. This means that the shirt wil gradually get darker as it gets farther away from the candle, even though the front side is well-lit from the candle.
If you look at the shadows on his legs you will also see that they fall in line from the candle, so they are darkest under his night shirt and lightest on the front side, though they aren't as pale as the skin on his face where the candle light is strongest. I also did not give his legs any yellow highlights.
What really makes this picture work so far is the contrast. Although the background is still white, you can tell at this point that the candle is bright and the boy will likely be standing in a dark room. His side far away from the candle is dark and deeply shadowed, but everything close to the candle is bright and vibrant.
I'll try to finish this picture over the next few days. I hope this has given you some things to think about. Click here to go to part 2.
Labels:
advanced,
color theory,
composition,
shadows,
tips
Wednesday, July 8, 2009
FAQ- Summer Traveling with Copics
I just had a really good question come through my e-mail, and I figured this is the perfect place to share it.
Q- I have a couple of hundred Copic markers now and plan to take them with me while traveling which means they will be left in a hot car for several hours one day. Will this hurt them in any way? If it will I could take a cooler.
A- No this won't hurt your markers, they are very air tight
Let me tell you a little story...
Our European counterpart had a shipment of markers get stuck in the Saudi Desert during the Persian Gulf War. They were stuck in the desert for about 5 months, in temps of over 120Āŗ F. When they got the markers back they were sure that all had been ruined, however NONE of them had any problems. All were juicy and good.
I have left them in a hot car on many occasions with no problems, as they are super air tight. The only problem you may have is if you color with them in super-hot weather and then you next color with them in a much cooler temp or much higher elevation. The marker will have picked up the air pressure of the first climate and may blob upon use in the other air pressure. Just pull the caps off both sides and then their air pressure will return to normal and you won't have any problems. (this happened to me last summer).
For more marker travel tips you can check this post I made last summer. Happy Traveling!
Tuesday, July 7, 2009
Shadows Part 12 - Light from a single point
I'm back from Anime Expo and I hope to post a lot of useful tutorials before I need to leave again for CHA at the end of the month. Today's coloring tutorial is a continuation of the explanation I gave on coloring pleats a few days ago, as well as a new way of understanding shadows.
Light from a single point, not the Sun
This is an important distinction between light coming from one big source- the Sun, which is far away and very big, versus light coming from a single source that is much closer and smaller. Let's look at the differences between light sources.
A few things to understand:
• Light from the sun hits all objects from the same direction- If you have an object and the sun is shining on it then all your shadows will be consistent.
Look at this diagram of a holiday centerpiece. This is lit from the sun, so all the things in the picture have the same shadows on one side and highlights on the other. This is the kind of lighting I have been talking about so far in my tutorials.
However, what would happen if it were night time and we lit the candle?
• Light from a single source radiates out and casts shadows in a circle - If you have an object at night and you put a light next to it then the sides of anything closest to the object will be lit.
Now look at the lighting on our centerpiece. The bottles on either side are throwing shadows in opposite directions because the light is between them. Do you see how much our shadows have changed?
Also keep in mind- Contrast will be stronger the closer you get to a single light source. In our diagram above everything is pretty close to the candle so everything has good contrast. If we had another bottle on the other side of the table it would be more shadowed, with softer/darker shading becuase it is far away.
Before I confuse you with more shadows and turn this into an advanced post, I want to apply this basic principle to the colored pleats we learned about before.
Let's turn those same pleats into curtains hanging over a window. Without getting more complex you can see that the window acts like a candle. We know that light is coming in from the window, so anything close to the window will have highlights, and anything away from the window (the far sides of the curtains and under the window sill) will be in shadow. Now we can easily see that there is light coming in from outside (at this point I'm not worrying about which direction the sun is coming from, just that it is light outside). In the future I will try to draw something in the window and show a tutorial on coloring glass.
I hope this helps clear up a little more of the mystery about shadows. All artwork today I drew, using a 0.1 mm multiliner onto color laser copier paper.
Thursday, July 2, 2009
Anime Expo 2009
Today is the first day of Anime Expo and our booth looks great! We worked hard all day yesterday to set up the biggest, coolest Copic store you've ever seen. 900 square feet of Copic goodies all for sale.
Among the new things you'll be able to buy at the show:
12 New Sketch colors
They just arrive, fresh from Japan, and we are selling them here first. Get your set today!
New Airbrushing DVD
The Second DVD in our series just arrived, Copic Airbrushing for Comics. You can see a special promo video playing all week in our booth and pick up your copy today.
The first DVD in the series, Airbrushing for Papercrafting should be shipping in a few weeks, and the 3rd DVD is almost done, Airbrushing for Landscape Architecture. Be looking for all three this summer.
Workshops & Guests
I will be in the booth answering questions all week. Come and play, enter to win prizes, and get autographs from our guest artists. If you want to learn more about Copic coloring techniques I will be teaching two beginner workshops:
Friday, July 3rd, 2:45 pm in Workshop Room 1
Saturday, July 4th 3:30 pm in Workshop Room 1
Prizes
Every hour we will be doing a prize drawing. Get your name in the drawing- one ticket free with purchase. At the end of the day we'll have a big drawing. (Must be present to win). There are some really neat prizes you can win, from T-shirts, to special Anime Expo Banners, to markers and inking pens. Stop by for a chance to win!
I need to get going, but I hope to see you at the show!
Among the new things you'll be able to buy at the show:
12 New Sketch colors
They just arrive, fresh from Japan, and we are selling them here first. Get your set today!
New Airbrushing DVD
The Second DVD in our series just arrived, Copic Airbrushing for Comics. You can see a special promo video playing all week in our booth and pick up your copy today.
The first DVD in the series, Airbrushing for Papercrafting should be shipping in a few weeks, and the 3rd DVD is almost done, Airbrushing for Landscape Architecture. Be looking for all three this summer.
Workshops & Guests
I will be in the booth answering questions all week. Come and play, enter to win prizes, and get autographs from our guest artists. If you want to learn more about Copic coloring techniques I will be teaching two beginner workshops:
Friday, July 3rd, 2:45 pm in Workshop Room 1
Saturday, July 4th 3:30 pm in Workshop Room 1
Prizes
Every hour we will be doing a prize drawing. Get your name in the drawing- one ticket free with purchase. At the end of the day we'll have a big drawing. (Must be present to win). There are some really neat prizes you can win, from T-shirts, to special Anime Expo Banners, to markers and inking pens. Stop by for a chance to win!
I need to get going, but I hope to see you at the show!
Subscribe to:
Posts (Atom)