 New Year Rabbits
At first glance you may think "No way could I color that image! It's way too complex!" I beg to differ. You could color this image, you just have to work at it, piece by piece, rather than getting overwhelmed by the whole. Someone once said, the way to eat an elephant is one bite at a time. So, let's look at the rabbits, and tackle them, step by step.
 When coloring a tricky image that you might mess up on, color the hardest part first. That way, if you really mess up, you won't have to go back and color the rest of the picture again. Remember, the only thing you're wasting is a piece of paper, so don't be afraid to experiment!
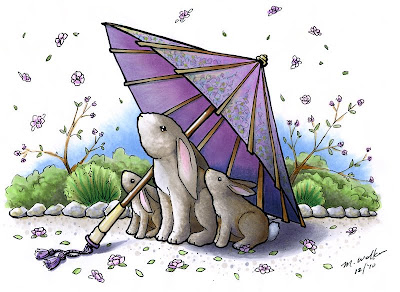
I started by drawing lightly with a pencil the main scene, then I traced the pencil work with Copic Multiliners using a TracePad light table. I photocopied the line work so I could color it many different ways. Here is one of my colored versions. I used about 30 different markers on this illustration, which I forgot to write down, but I will mention as many colors as I remember. Also, I did not take step-by-step scans as I went along, so I'm just going to explain how I colored each section. Click on the image to enlarge it.
 Here is my cute little rabbit family, waiting under the umbrella during a shower of blossoms.
There are a few details I want you to notice. On the rabbits, you can see that I used a Warm gray color range, however, I accented this with a hint of E31 in the shadows. The Copic warm grays are very brownish, and throwing in a hint of a very pale brown really brings out the brown tones even more.
Scribbling texture
I started by laying my W0 and W1 over all the brown areas, then scribbled in the darker tones. Scribbling gave me the slight furry texture, without having to worry about using a rag soaked in blender and messing up the background area. When I had finished adding darker colors, I went back and scribbled in with the light color. This subtly washed the tones together, making them softer and less harsh.
This scribbling is the same process I used on the bushes in the background, and also on the umbrella (discussed below). The ground was simply the same tones used in the rabbits dotted onto the pebbled path. The rocks were scribbled mostly with cool grays, then I dabbed on my blender to add texture.
To get the white tail and bellies on the rabbits to stand out more, I shaded them with Cool Grays. Notice how white the little bunny's tail looks, even though it is in the shadow and is colored gray. Then I threw in a hint of RV00 and RV21 to the ears.
 Umbrella
The most tricky area on this image was actually NOT the bunnies, they are merely the focal point. The trickiest area is the shading on the umbrella. I can't tell you how many times I went over the umbrella to get the shadows correct.
When working on shadows, start light! I would carefully layer colors darker and darker to finally build up the tone I wanted. I had to be careful not to go too dark, as I didn't want to lose the color of the umbrella.
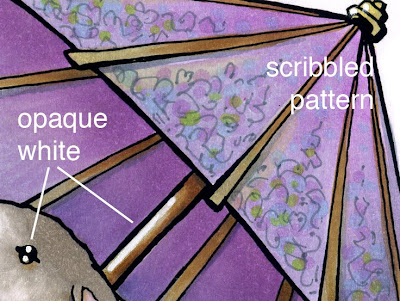
I used a wide range of V's, BV's and grays to build up the tone on the umbrella. Then, I used the same brown and gray families from the bunnies to color the wood on the umbrella. I used a gray multiliner to scribble a pattern onto the umbrella, then I dotted on pale blues, yellows, greens, and browns. From a distance, this looks like a complex pattern, but up close, you can see that it really is just scribbles and dots. The reason I used the gray multiliner was because it would remain crisp, no matter which colors I layered over the top.
 Choices in shading
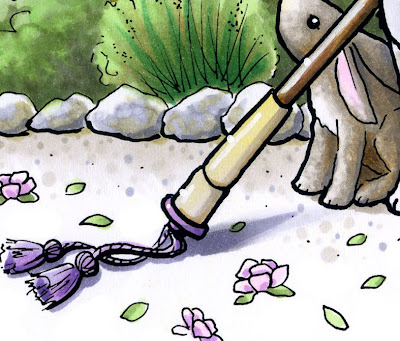
Notice the shadow on the ground. Where the shadow is close to objects- like the bunnies or the handle, I made it crisp and dark. However, I did not want the focus to go to my shadows, so I trailed them off, and faded them. This gives the illusion of bright sunlight (crisp dark shadows) but the viewer is not distracted by too much shadow. This was my own artistic choice, where I followed rules of shadows...up to a point. Then I chose to ignore them for the sake of my work.
Last, I picked out the highlights on the eyes and made the handle of the umbrella shiny with some Opaque white and a very fine paintbrush. My finished work is about 9" by 6 1/2" and took a couple hours to color.

36 comments:
I love all the info you provided on this post (and your other posts) and I would LOVE to practice with this image! Would you ever consider offering some of these images from you blog tutorials as downloads so that we could try these techniques? I love the bunny drawing!
This is absolutely wonderful Marianne! Thank you for explaining the different technique's that you have used and how to pay attention to the light source! You are very talented and I am so happy to be learning from you! I will be sure to purchase your new book in March! Thanks again and have a wonderful day! Happy Creating! Sara
I certainly hope that you are going to make a stamp or digi from this lovely image. It would be snapped up by many of us. Thanks much for the tutorial!
Absolutely beautiful! I do admire your colouring, and thanks so much for breaking down the technique here. I'd love to get your book....will it be available in the UK? CoB
OMGosh...I LOVE this drawing! Your coloring is absolutely phenomenal! I've been really paying attention to shadows lately and have been bringing in darker colors for dimension. Thanks for sharing your techniques...they help so much!
Your coloring and the image are exquisite. Thank you for the instructions. Could you please offer this image as a stamp or a digi image? I love bunnies (used to raise mini lops) and can think of many friends who would love to receive this. Thanks!
Please, please turn this image into a stamp, or at least a digi image! I (heart) bunnies, and this image is just delightful. And thank you so much for the coloring tips!
This is so beautiful. I agree with everyone else, please turn this into a digi stamp. I love bunnies. My Hollard Lop is hopping by as I type. She is such a love. Not that I make this anywhere near as lovely as you have, I know friends that would love to have it as a card cause they associate me with buns cause I am always showing her pictures. This is fantastic.
it might just be a stamp...;) one never knows
Marianne, thanks for all the wonderful details in thisi post. I was fine with everything until I came across your comment about only taking 2 hours!
Beautiful work and the drawing feels so god!
this is just absolutely gorgeous! You have such talent and I'm so happy that you are willing to share that with us. You give me inspiration.
Wow Marianne! You have inspired me to think more of texturing when colouring; it adds so much to the drawing! Your image is too cute! Thank you so much for your wonderful tutorials.
I think one thing that surprises me as a card stamper and copic colorer is that the size is REALLY big. I really appreciate seeing that size listed because it makes the final product much easier to imagine. When I first looked at it, trying to imagine coloring that image as small as a card front was difficult. I would also have to echo the sentiment of the others.......would love to practice on this image! ;-) Darling drawing. Looks like I need a grey multiliner
Fabulous, Marianne! Thanks so much for the great instruction!
This is an amazing image!! I love
the way you colored it and would love
to try my hand at it. Could you
make a digi of it for us to purchase?
As someone that is just looking to become part of the copic family, I am so inspired by your design/coloring in this blog post. I am looking foward to following your blog and learning more about the markers. I will be looking forward to your book and the stamp of this image (hopefully!)
I agree with Nancy K - it would be wondeful if you'd give us the image to copy so we could practice, practice, practice our little copics dry - having your finished product as our guide. Thanks for all your inspiration and info.
This is a cute drawing and amazing coloring! I love bunnies, too, and once had a Mini Rex bunny the same color as these bunnies. I thought of him the moment i saw your drawing. My Rex's fur was thee softest and you seemed to have captured that same softness in your bunnies with the coloring.
I would buy the digi stamp, too! And your book! I just love your blog!
This is absolutely beautiful!!!!! Thank you for all your tips on coloring, shading, etc. You are a true artist! you ROCK!!!
Incredibly cute image, fabulously colored of course -- this needs to be a stamp (wink)! Thanks for the great tips!
Oh wow!! It looks AMAZING! Awesome job!! :) Thanks for the explanation!
Sammi
xx
Wow - this is fabulous! Thank you for sharing your instructions
Oh....I feel like I can reach out and touch it, just beautiful!
I love your rabbits. It's amazing what you can do with the gray colors. The umbrella is to die for. The colors and the scribbles that look like a complicated pattern. I've just started using Copics and love them. Your instructions gave me some good tips.
Wow, that drawing is just incredible!
Wow!Your explanation is wonderful, your art work & coloring is awesome!I will be looking for the book when it is available. I practice, practice, but am still falling short of my copic goals. Thanks for sharing your knowledge.
Please please please make his image available to the rest of us. It is awesome!
I have saved this post to read it again and again - then realized I had not told you how absolutely wonderful it is!!! Everything is great...the drawing, coloing, tutorial....only thing missing is a stamp like the image - I would buy it in a minute!!!!
Jan
I was just referred to your site. As a new owner of a range of Copics, I have a lot to learn. Your work is absolutely stunning. Thank you for generously sharing your technique.
The new colors are awesome! The three colors that I can't live without are E000, E00, E0000, I use them all the time for the skin coloring, but jeez, I have so many I love! I need lighter colors, and in between colors, wishing I had them all :o) so much I need to learn!
Fantastic! Can't wait to meet you at the class in June, I think!
Fantastic! Can't wait to meet you and learn in June!
Wow, This is so cute. Is there any chance the rabbit family will become a series of stamps?? Maybe a digital stamp?
Just wanted to let you know I made cards with your sweet bunnies and put them on my blog! You're there too! :> Hope you have a great day!
doh! here's the link: http://llamatales.blogspot.com/2011/06/bunny-love.html
I want the bunnies - where can I get them? Bunnies, angels, and flowers are my FAVORITE images!!!!!
Post a Comment