Tuesday, March 1, 2011

Books are here!

Wow! I just completed a great weekend visiting art schools and art stores in the Northeast this weekend. I spoke with the Copic warehouse yesterday and got some great news...


Shadows and Shading
My new Shadows and Shading book is back from the printer and is now shipping!! You cannot buy it direct from us, but you can order it from your favorite local store or online. This book is devoted to beginners who want to learn how to put their shadows and highlights in correct places to make things look dimensional and believable.

If you are local, be sure to stop by our book signing party on Friday, March 4th at DIVA art gallery (Broadway & Lincoln in Eugene) from about 6 to 8pm. You can purchase copies of the book from us there, and see some of my artwork on display. It should be a great party, so stop by and say hello and get an autographed book.

Later this week I will have some more exciting news, and I hope to upload some photos from my demos this weekend on the Copic facebook page, so be prepared! Have a great week!

Friday, February 18, 2011

What colors do you love? Giveaway

Thank you for participating. Commenting has now closed on this contest.

I love Copics!

Do you love Copic markers as well? What Copic colors can't you live without? What 3-6 colors (besides the colorless blender) are colors that you MUST have any time you are trying to make a project?

Post your answer on this blog, or the official Copic blog, or on our Facebook fan page for your chance to win one of our new I Love Copic bumper stickers.

3 places to win, 10 winners per site!

Contest runs through noon on Monday. Winners will be selected randomly. Open to US and Canadian residents only. Limit one entry per site. Be sure to leave contact info so we can reach you if you win!!

Thursday, February 17, 2011

Coloring clouds

Yesterday I promised I'd show you a quick tutorial for coloring clouds. This is an easy technique that ends up looking really cool and very unique. I hope you give it a try. Remember, this effect only works on absorbent papers, not coated papers.

Coloring Clouds
It's always tricky to color something white with Copics, as you have to leave the paper white. Today's tutorial is super easy, and gives you a bit of flexibility with your sky designs, especially if you don't have an airbrush to mask off pretty, puffy clouds.

First, start by lightly feathering a pale blue into your sky (B41 in this case). Be sure to leave some white areas where the blue feathers in, as these will be your clouds. Try to keep the bottom of the area parallel with the horizon, as it will look more believable that way. It's better if they are slightly irregular shaped. Make sure the rest of the blue area is streak free, which may take a few light layers of color.


Next, go in from the middle of the white area with your colorless blender. Push the color from the middle of the white, out into the blue. Follow the natural streaks left in your work to create the irregular edges. How far out you push the color is up to you, but the more you push it out, the darker your edges will be.

This is a good time to experiment and try different effects or cloud shapes.


Try not to stop pushing until you are done with the whole shape, otherwise, you may get strange edges. It helps if your blender pen is really juicy and has been recently refilled. When you are done, your clouds should look something like this.

If you still see too much stray blue inside the cloud (like on the right edge of the bottom cloud in this diagram), you can always go back after the cloud is dry and push the color out again. If you try to fix it while the cloud is still wet then it won't do much.


Here are some other fun variations on the same effect. Each time the shapes are different, so play around until you get a look you like.

The bottom illustrations with a pair of clouds were made a little differently. First, the whole white area was blended out. Then, while the middle of the clouds were still wet from blender, I took the sky marker and drew in the puffy top of the bottom cloud. Because the base was wet, the line immediately became soft and fuzzy, just like the rest of the edges.

If you want to add a bit of color to the clouds, add it while the area is wet. Try adding some pale gray around the bottoms for a darker, ominous sky, or hints of pink or yellow for a cheery, whimsical effect.


The final image today of Easter Island is actually one I drew for the Shadows & Shading book. I could not run a marker coloring tutorial in the book on this technique, since I was using this illustration to explain a different concept. I can't remember which colors I used, but you can see that the clouds look convincing. I hope you have a great weekend and have a chance to color!

Tuesday, February 15, 2011

New Website & Spring Certifications


New Copic Website
Have you looked at the Copic website recently? If not, go check it out!! We have a completely new, redesigned website, just crammed with great photos, useful information, and some amazing interviews and tutorials...with new stuff being added every day.

Look around, let us know what you think, and learn something new about your Copic Markers. Check out the Copic blog, and download literature. The new 2011 catalog will be up in about a week, so check back for that as well.

Standard Papercrafting Certification Classes
I have been so busy with CHA and the final changes to the Shadows & Shading book that I realized it's been a while since I blogged. I'll try to get a tutorial up later this week, for drawing pretty fluffy clouds in a bright blue background. Meanwhile, time to update everyone on Certification classes coming this spring in North America. These classes are filling very fast, so sign up right away if you are interested in attending. Classes open to registration two months before they take place.

March 6, Sacramento, CA taught by Jennie Black Almost full!
March 14th Edmonton, Canada, taught by Sherrie Siemens Almost full!
March 19th St Louis, MO taught by Lori Craig Open to stores and Designers
March 25th, Milwaukee, WI taught by Debbie Olson Open to stores and Designers

April 10th, Phoenix, AZ taught by Jennie Black Open to stores and Designers
April 27th, Charlotte, NC taught by Colleen Schaan Opens soon

May TBA, Columbus, OH taught by Colleen Schaan Opens soon
May TBA, Pensacola, FL taught by Colleen Schaan Opens soon
May 22, San Diego, CA taught by Jennie Black Opens soon
May 28th, Toronto, Canada taught by Sherrie Siemens Opens soon

Intermediate Certification Classes
Intermediate Papercrafting Certification classes are doing great! We had a wonderful, enthusiastic bunch of papercrafters attend the class in L.A. last month. Remember, these classes are open to ANYONE who has taken the standard Certification class, and who wants to learn how to color and design more like an artist. The Phoenix Intermediate class is filling very fast, so if you are interested in that location sigh up ASAP!!

April 11th, Phoenix, AZ taught by Debbie & Colleen Filling fast!!
May, TBA Columbus, OH taught by Debbie Olson Opens soon
May, TBA Minneapolis, MN taught by Debbie Olson Opens soon

To register for any of these classes or to download class info, please check our Certification page on the Copic Website. If you have any questions, please e-mail Nancy@copicmarker.com for details.

Other events
Feb. 19-20 I will be demoing at the Oregon Asian Celebration in Eugene, OR in the Youth Art Room.

Feb. 25th, Jerry's Artarama, West Orange, NJ. I will be demoing from about 12pm until 4pm, so stop in and say hi, and bring your marker questions.

March 4th, Book Signing Event, DIVA gallery, Eugene OR. Ken O'Connell, president of Imagination International, Inc (Distributor for Copic Markers in North America and my boss) will be signing his book Sketching with Copic, while I will be signing my book Shadows & Shading, A beginner's guide to lighting placement. You can purchase copies of both books at the event. Come party with us and have a great time, from about 5:30 until 8:30pm! Note: DIVA Gallery has moved up two blocks to the corner of Broadway & Lincoln.

Tuesday, January 18, 2011

New Year Rabbits

2011 is the Year of the Rabbit, and so I wanted to share with you a piece of art that I made to celebrate the New Year.

New Year Rabbits
At first glance you may think "No way could I color that image! It's way too complex!" I beg to differ. You could color this image, you just have to work at it, piece by piece, rather than getting overwhelmed by the whole. Someone once said, the way to eat an elephant is one bite at a time. So, let's look at the rabbits, and tackle them, step by step.

When coloring a tricky image that you might mess up on, color the hardest part first. That way, if you really mess up, you won't have to go back and color the rest of the picture again. Remember, the only thing you're wasting is a piece of paper, so don't be afraid to experiment!

I started by drawing lightly with a pencil the main scene, then I traced the pencil work with Copic Multiliners using a TracePad light table. I photocopied the line work so I could color it many different ways. Here is one of my colored versions. I used about 30 different markers on this illustration, which I forgot to write down, but I will mention as many colors as I remember. Also, I did not take step-by-step scans as I went along, so I'm just going to explain how I colored each section. Click on the image to enlarge it.
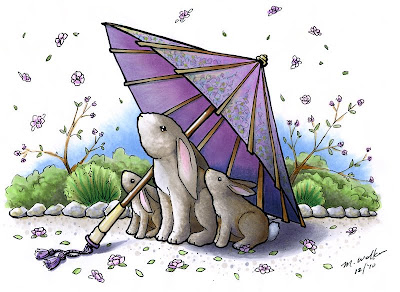
Here is my cute little rabbit family, waiting under the umbrella during a shower of blossoms.

There are a few details I want you to notice. On the rabbits, you can see that I used a Warm gray color range, however, I accented this with a hint of E31 in the shadows. The Copic warm grays are very brownish, and throwing in a hint of a very pale brown really brings out the brown tones even more.

Scribbling texture
I started by laying my W0 and W1 over all the brown areas, then scribbled in the darker tones. Scribbling gave me the slight furry texture, without having to worry about using a rag soaked in blender and messing up the background area. When I had finished adding darker colors, I went back and scribbled in with the light color. This subtly washed the tones together, making them softer and less harsh.

This scribbling is the same process I used on the bushes in the background, and also on the umbrella (discussed below). The ground was simply the same tones used in the rabbits dotted onto the pebbled path. The rocks were scribbled mostly with cool grays, then I dabbed on my blender to add texture.

To get the white tail and bellies on the rabbits to stand out more, I shaded them with Cool Grays. Notice how white the little bunny's tail looks, even though it is in the shadow and is colored gray. Then I threw in a hint of RV00 and RV21 to the ears.
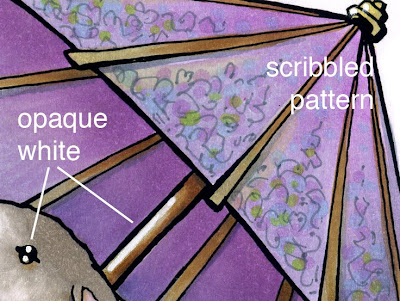
Umbrella
The most tricky area on this image was actually NOT the bunnies, they are merely the focal point. The trickiest area is the shading on the umbrella. I can't tell you how many times I went over the umbrella to get the shadows correct.

When working on shadows, start light! I would carefully layer colors darker and darker to finally build up the tone I wanted. I had to be careful not to go too dark, as I didn't want to lose the color of the umbrella.

I used a wide range of V's, BV's and grays to build up the tone on the umbrella. Then, I used the same brown and gray families from the bunnies to color the wood on the umbrella. I used a gray multiliner to scribble a pattern onto the umbrella, then I dotted on pale blues, yellows, greens, and browns. From a distance, this looks like a complex pattern, but up close, you can see that it really is just scribbles and dots. The reason I used the gray multiliner was because it would remain crisp, no matter which colors I layered over the top.
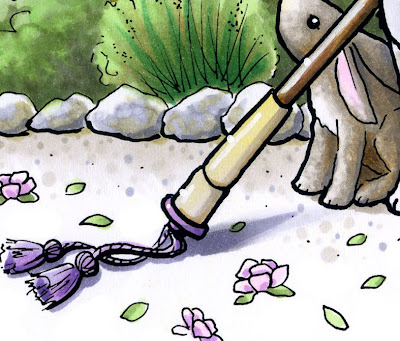
Choices in shading
Notice the shadow on the ground. Where the shadow is close to objects- like the bunnies or the handle, I made it crisp and dark. However, I did not want the focus to go to my shadows, so I trailed them off, and faded them. This gives the illusion of bright sunlight (crisp dark shadows) but the viewer is not distracted by too much shadow. This was my own artistic choice, where I followed rules of shadows...up to a point. Then I chose to ignore them for the sake of my work.

Last, I picked out the highlights on the eyes and made the handle of the umbrella shiny with some Opaque white and a very fine paintbrush. My finished work is about 9" by 6 1/2" and took a couple hours to color.

Monday, January 17, 2011

Upcoming Certifications

Its a new year, and I've had a chance to show you many new and exciting products coming out at the Winter CHA trade show in a few weeks. We also are starting to fill our calendars with Spring Certification classes, so sign up right away for the classes listed below. So you know, there will be fewer Standard Copic Certifications this year, since we are adding Intermediate Certifications. If there is a class coming in your area, register EARLY as they are filling fast!

Standard Certifications, North America
(Note: For International Attendees- We try to accommodate as many as possible, however, our training program is exclusively for North America and we need to save priority placement for US and Canadian attendees. As a courtesy, about once a month I will try to share upcoming European and Australian classes, however, Copic Certifications are currently not offered in any other territories).


Jan. 28 Los Angeles, CA (CHA) taught by Jennie Black Open to Public - only a couple spaces left!! Register now!
March 6 Sacramento, CA-taught by Jennie Black Open to stores & Designers- Filling Fast!
March 14 Edmonton, AB - taught by Sherrie Siemens Open to stores & Designers - Filling Fast!
March 19 St. Louis, MO - taught by Lori Craig Open to stores & Designers

Upcoming Certifications- Applications have not gone out:
April 10 Phoenix, AZ - Taught by Jennie Black


Intermediate Certifications
I must say, the people who have attended the Intermediate Certification classes so far have loved them. Sherrie and Debbie came to the Copic warehouse to have a test run of the new class and train the program organizers. The response was great! Nancy, our wonderful Certification coordinator thinks that everyone who can take the opportunity to attend an Intermediate class should jump at it, as she learned so much in one short day. You learn more than just coloring- from card layout to shadows and basic color theory. A must-have class for the cardmaker who wants to take their work to a whole new level.

ANYONE who has already attended a Standard Certification is eligible to apply to the Intermediate class.

Jan. 27 Los Angeles, CA (CHA) taught by Debbie Olson & Sherrie Siemens subject to approved application, a few spaces still available

April, 11, Phoenix, AZ taught by Debbie Olson & Colleen Schaan Applications are not available yet


If you need an application for either Intermediate or Standard certifications, you can download one here. Be sure to download the class information page as well as the application when you get to the application list on our website.


Monday, January 10, 2011

Copic New Products part 4

Blog Candy Winners
Before we get into the last, but certainly not least of the new Copic Products, I wanted to share the winners of my blog candy drawing from Friday's post- congrats! Please contact me if you do not get an e-mail from me... You will each be mailed a new 2011 Copic Swatchbook. Random.org chose the following three winners out of 397 comments.

Congratulations to:

#164
Blogger
Trena in Naperville said...

Thank you for the opportunity for more goodies Marianne! Can't have too many.
Take care and STAY POSITIVE!


#280
Blogger
Exquizeet said...

Oh Wow! Thanks for hosting this giveaway! I've heard great things about these markers but I've never actually tried them.


#330
Paula said...

Looks like lots of goodies will be revealed at CHA...your book seems like one that needs to be in every crafters/artist library. Thanks for putting it together and the chance to win the Copics.


My new swatchbook cover
In honor of the winners, I want to show you my new swatchbook cover. I colored the marker bodies with Neutral Grays, then I added the color strokes as listed.

Look close, because I think you'll see something exciting about the colors I used...


12 New Sketch Colors!!!

That's right! Copic now has 346 colors of Sketch Markers and Inks. If you stop by our booth at CHA you will be able to see the new set. These won't be shipping until March, so look for them this spring from your favorite Copic retailer. I have been working closely with Japan to add new colors that will expand the color offering, colors that people have been asking for- from new purples that aren't pink or bluish, to browns that could be brown or green depending on what you put them next to.

The new colors include:


V20 Wisteria
V25 Pale Blackberry
RV55 Hollyhock
RV63 Begonia
RV66 Raspberry
YR30 Macadamia nut
YG61 Pale Moss
BG53 Ice Mint
BG70 Ocean Mist
E23 Hazelnut
E81 Ivory
E87 Fig

So, thank you all for stopping by this weekend and leaving comments. Be sure to stop by the booth, or check out your local Copic retailer to find the new products as they are released over the next few months. Have a great week!