I recently got a newsletter from our Canadian Copic Distributor for papercrafting, Open Page Wholesalers. I thought it was cute story by Paula and that you would enjoy it (it also reminds you of the durability of the markers):
The tale of the yellow Copic Marker.
Once upon a time, some sample Copic Markers were sent to a
very enthusiastic distributor, who wanted to share her Copic joy with
all her retailers. She took them home and played to her heart's
content.
A day or so later, a sneaky little goblin (aka one of her 5
kids, which one we will never know) kidnapped the yellow marker and
whisked it away to his/her castle (sandcastle in the backyard).
During the next few weeks, as the leaves began to fall the
yellow marker watched the goblins at play and may even have become a
flag pole in one of their castles.
Fall turned to winter and the goblins retreated into the
warmth of their home leaving the poor little yellow marker to brave
the frigid and freezing temperatures beneath a small layer of sand.
The snow lasted from November through to April.
Finally, the sun returned and a spring clean-up took place in
the backyard, including a raid with a rake through the goblin sandpit
lair. Lo and behold, the enthusiastic distributor discovered her long
lost yellow marker, and what greater joy to her heart than to find the
marker no worse for ware and that the nibs were in tact and the ink
still flowed freely. The lids had remained on during the whole winter.
The moral of this story is to keep your Copic Markers locked
away from little goblins, and if they do happen to get kidnapped,
check the most unlikely places first. If you don't find them
immediately, don't worry - Copic Markers are the superheros of the
marker world.
I love my Copic Markers, especially the yellow one.
as told by Paula Jones, Open Page Wholesale

Wednesday, April 29, 2009
Tuesday, April 28, 2009
Coloring Rocks part 1 - Pebbles on the ground
I'm back from Chino. Although I was the substitute teacher, we had a great class and Prima has a fabulous facility. It was fun to teach there and meet so many crafters. I can't wait to go back!
 I realized as I was digging through topics that I've talked about that I haven't gone into depth about rocks yet. Here is the first of many posts about rocks. This technique is useful for adding a ground-plane to anything that needs some foundation, along a river, or livening up a garden path. It is very easy and very adaptable.
 Small Pebbles
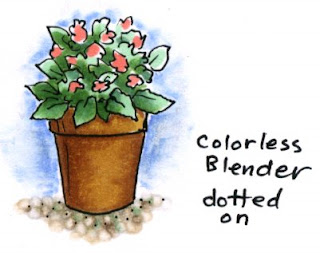
This is one of my favorite ways to color a rock path or add some simple ground where there was nothing before. It is an easy technique that involves a lot of scribbling and dotting. You'll need to work on a paper that gives nice, crisp special effects with the blender- for stampers I really like the Neenah Classic Crest Solar White or Copic Stamping Paper , for illustration I prefer either the Copic Sketchbook or Color laser Copier Paper.
If you look at this little flowerpot I drew you will see what I mean. I could have made a plain, flat shadow, instead I gave it a pebbly ground to sit on, which is much more interesting.
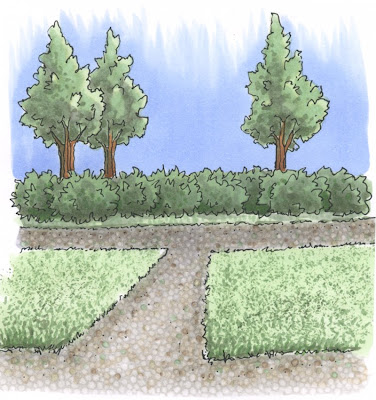
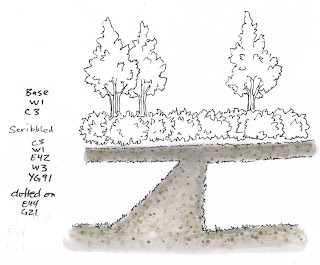 For my larger piece today I am working with a garden path that I drew on color laser copier paper. First, pick out some pale, earthy colors to give your path a base color. For things far away use cooler colors like Cool Gray 0, 1, 2 or 3. It's OK to use colors that are a little darker than you want for the final image because the colorless blender will lighten up all your colors in the end.
I like to work with a base of light gray or brown (in this case C1 & 3 and W1 & 3). I add all my shadows and shading now, without worrying as much about blending. I scribble in a slightly darker color. Scribbling leaves some spots of the base color showing through which is important to make the pebbles look irregular.
Last I add tiny dots of my darkest colors or hints of secondary colors (colors besides gray or light brown). Use little specks that are dark and larger specks that are lighter so that your final picture won't be overwhelming with dark pebbles.
 Why add tiny dots in different colors?
Adding small amounts of a variety of colors will make a big difference in the end. Dots add visual interest to areas that would otherwise be boring and flat. Look at my example here.
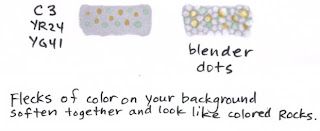 When you touch your blender to the middle of a dot it pushes the color out to the edge, making it look like there is a rock of a different color. Or, if a dot falls between two spots where you add blender it looks like a shadow of rocks that are slightly different. In this case I also added dots of G21, a pale green. Why green? Because where I live in wet Oregon, if you have a pebble path you're going to have moss. The specks of green will hint at moss in my final picture without being overwhelming.
Now I am ready to add pebbles.
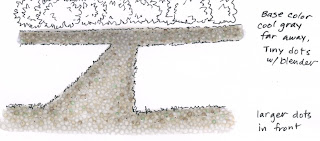 There are a couple of ways of doing this. I am using the most tedious method because I want the most control over my finished work. I am using the fine point on a Copic Original Colorless Blender and I simply touch straight down, hold it for a moment, and then the color pushes out, leaving a little pebble.
I like using this method because I can make the pebbles far away tiny and the rocks up close larger with a lot more precision. It takes a long time to make each dot for a picture this large, and I probably would have drawn a smaller picture if I had remembered how long it takes to make that many dots. If you want an easier way you can use a textured cloth dampened with colorless blender and dabbed on to create rocks. The longer you hold your blender in place the more it will push the base color out of the way.
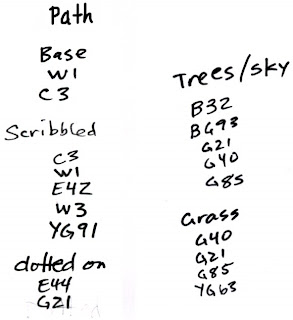 For my final picture you can see how all my careful dotting works beautifully for the evenly textured path. You can tell that the path far away is made with smaller dots, closer I used bigger, more defined dots. I dabbed the grass texture on using an old rag that I added a darker green onto. I could have drawn the picture more evenly, but I don't mind if the path is a little crooked since it's the technique that's important.
I used a LOT of colors for this single picture, however, It takes a lot of colors sometimes to get the look you are going for. The darkest colors I used very little of since I wanted people to know that this was a bright, sunny day.
Good luck with your own projects! I'll try to post more, different rocks over time.
 I realized as I was digging through topics that I've talked about that I haven't gone into depth about rocks yet. Here is the first of many posts about rocks. This technique is useful for adding a ground-plane to anything that needs some foundation, along a river, or livening up a garden path. It is very easy and very adaptable.
 Small Pebbles
This is one of my favorite ways to color a rock path or add some simple ground where there was nothing before. It is an easy technique that involves a lot of scribbling and dotting. You'll need to work on a paper that gives nice, crisp special effects with the blender- for stampers I really like the Neenah Classic Crest Solar White or Copic Stamping Paper , for illustration I prefer either the Copic Sketchbook or Color laser Copier Paper.
If you look at this little flowerpot I drew you will see what I mean. I could have made a plain, flat shadow, instead I gave it a pebbly ground to sit on, which is much more interesting.
 For my larger piece today I am working with a garden path that I drew on color laser copier paper. First, pick out some pale, earthy colors to give your path a base color. For things far away use cooler colors like Cool Gray 0, 1, 2 or 3. It's OK to use colors that are a little darker than you want for the final image because the colorless blender will lighten up all your colors in the end.
I like to work with a base of light gray or brown (in this case C1 & 3 and W1 & 3). I add all my shadows and shading now, without worrying as much about blending. I scribble in a slightly darker color. Scribbling leaves some spots of the base color showing through which is important to make the pebbles look irregular.
Last I add tiny dots of my darkest colors or hints of secondary colors (colors besides gray or light brown). Use little specks that are dark and larger specks that are lighter so that your final picture won't be overwhelming with dark pebbles.
 Why add tiny dots in different colors?
Adding small amounts of a variety of colors will make a big difference in the end. Dots add visual interest to areas that would otherwise be boring and flat. Look at my example here.
 When you touch your blender to the middle of a dot it pushes the color out to the edge, making it look like there is a rock of a different color. Or, if a dot falls between two spots where you add blender it looks like a shadow of rocks that are slightly different. In this case I also added dots of G21, a pale green. Why green? Because where I live in wet Oregon, if you have a pebble path you're going to have moss. The specks of green will hint at moss in my final picture without being overwhelming.
Now I am ready to add pebbles.
 There are a couple of ways of doing this. I am using the most tedious method because I want the most control over my finished work. I am using the fine point on a Copic Original Colorless Blender and I simply touch straight down, hold it for a moment, and then the color pushes out, leaving a little pebble.
I like using this method because I can make the pebbles far away tiny and the rocks up close larger with a lot more precision. It takes a long time to make each dot for a picture this large, and I probably would have drawn a smaller picture if I had remembered how long it takes to make that many dots. If you want an easier way you can use a textured cloth dampened with colorless blender and dabbed on to create rocks. The longer you hold your blender in place the more it will push the base color out of the way.
 For my final picture you can see how all my careful dotting works beautifully for the evenly textured path. You can tell that the path far away is made with smaller dots, closer I used bigger, more defined dots. I dabbed the grass texture on using an old rag that I added a darker green onto. I could have drawn the picture more evenly, but I don't mind if the path is a little crooked since it's the technique that's important.
I used a LOT of colors for this single picture, however, It takes a lot of colors sometimes to get the look you are going for. The darkest colors I used very little of since I wanted people to know that this was a bright, sunny day.
Good luck with your own projects! I'll try to post more, different rocks over time.

Monday, April 20, 2009
Just Chatting and Certification
Tomorrow I'll post a technique, but I have a couple of quick announcements today. This has been a busy Spring, so we have lots going on...
I just got back this weekend from the Spellbinders Design Team Training 2009. One of the team's surprise bonuses for being chosen to the Spellbinder's Design Team was that they got to be Copic Certified as well. If you get a chance, go check out the Spellbinder's blog to see who was at the class. It was a fabulous bunch of crafters!
 Certification
The San Francisco class is now full, as is the Chino class this week. For those of you heading to the Chino class there has been a slight change of plans. Sally Lynn has had something come up in her family so I will be teaching the Chino class. It looks like I get a double-dose of California this week!
Also, we have been updating the Copic website a little at a time. If you ever have questions about what is involved in the Certification Process you can check it out from the homepage under "Certification". This should answer most of your questions.
The Salt Lake City Class is set for Thursday, June 11th. Get on the mailing list as I will be sending out those applications soon, along with other June Classes.
 For Illustrators
I just found this fabulous Illustration challenge each week.
Illustration Friday
 They choose a word each week and you illustrate something that expresses that word to you. This week's topic is "Impossibility". I wish I had more time to draw, since I have so many ideas that fit into "Impossibility".
I haven't scanned in many of my really impossible pictures, but here's a quick little doodle of a sea-horse from my last week's to-do list that really shows Impossibility. This is the kind of thing that my sketchbooks and to-do lists are full of, (along with more traditional illustrations) but most people never get the chance to skim through my sketchbooks, so I'll try to share more from those as I remember.
I'll post some useful coloring tutorials over the next few days as I travel, so stay tuned.
Tuesday, April 14, 2009
Refilling Markers Part 5- Empty Markers and Custom Colors
I hope each of you had a great weekend. Sorry you haven't seen much of me in the last week - I have been out with the flu and am only now touching my computer again. I wanted to bring up something that many people have done, but you might want a bit more info before you try it yourself. Now is a good time to review my posts on refilling markers 1, 2, 3, 4, if you have never refilled before.
 Filling Empty Markers
Copic Original, Sketch, and Wide markers all can be purchased empty. You then have the freedom of filling them with whatever THIN ink that you wish. Mix your own custom colors, fill it with invisible ink, or whatever you want, as long as it is a thin liquid that is not opaque (like paint). Thick liquids or paint will clog the felt pores on the tips and won't flow correctly
 The same rules apply to filling empty markers as when you are refilling, the only difference is that empty markers will take about 1 cc more of ink for the initial filling.
The best way to mix your own custom Copic ink colors is to use an empty various ink bottle. The dropper tip pops off and you can pour ink in to the desired ratio. I strongly suggest that you test the color as you mix with a cotton swab to make sure it is the color you want. Then mix up a large enough batch that it will last a while. Write on the bottle what your recipe was so you can mix it again if you ever need to.
 If you don't have an empty ink bottle you can use a syringe. This is a good, accurate way to refill if you are doing a large batch of all the same color or you want more accuracy when filling dark colors and it's too hard to see the ink level inside the bottle. Just store your remaining ink in an airtight container until you need it again.
Why would you want a custom marker?
Some people just don't understand why you would need to mix custom colors if you have 322 colors to choose from. However, the more you use Copic markers the more you will find gaps in the color range that you NEED a color for and there just isn't the perfect match. This is the case with some of our design team members-
In fact, I had no idea that Debbie Olson just posted this photo yesterday on her blog. It shows exactly how and why she has filled custom markers. Click here to see what she made with these colors. Thank you Debbie for explaining this so clearly.

You'll note that she has one marker she filled empty (pale yellow), the custom blue marker is just a colorless blender that as it started going empty she added her custom blue. I know that Debbie uses these colors all the time in her work. Sharon Harnist is also kind enough to show her custom YR31 that she uses all the time also. I know a lot of other designers use the custom colors, but many of them don't list exactly which Copic Colors they use on each piece (Lori Craig is one of these - I KNOW you use the custom pale markers but you never list marker colors used!)
Filling with things other than Copic Inks
Besides custom colors for pale backgrounds I hear of lots of different uses for empty markers. One company fills them with narcotics and explosive residues to calibrate their Airport x-ray machines. I already mentioned invisible ink. Some people have filled them with food coloring (eat at your own risk, as Copic does not endorse this) or with India ink. Think of any inks you have around your workstation that you wish came in a brush tipped marker and fill your Sketch with those. Water-based inks work great though they won't blend on paper like the alcohol based Copics will. Also, think of what inks you have that you WISH you could airbrush with. By filling an empty Sketch marker with those inks you now have that capability.
Again I must warn you that whatever unusual substance you fill it with is at your own risk. Copic is not responsible if you fill a marker with something other than Copic inks and it ruins your marker permanently. That being said, many inks will work beautifully when put inside an empty Copic marker. Also, Avoid filling a marker that has already been used with Copic inks with something that might not be compatable.
I hope I have given you some ideas today. Here is a handout I made years ago on filling empty markers that you should find useful. Have a great week!
Tuesday, April 7, 2009
Certification Updates
 Another quick update on upcoming Certification classes. We have some New locations and mailings will be going out soon for June locations. Contact me only if a mailing has already gone out. Otherwise, please use the sign in on my sidebar to submit your request for an application.
Portland, OR May 20th, Taught by Marianne
I will be sending out the applications today.
Also, the Rockland, MA and Smithville, OH classes are now Open to the public. Please e-mail me for an application to reserve your spot.
New Classes upcoming, details TBA:
Salt Lake City, UT June 11th Taught by Marianne
Vancouver BC, July 11th Taught by Sherrie Siemens
April
19th Kingsport, TN full taught by Sally Lynn
22nd San Francisco, CA open to public taught by Marianne
26th Chino, CA full taught by Sally Lynn
May
17th Rockland, MA open to public taught by Sally Lynn
20th Portland, OR email for application taught by Marianne
31st Smithville, OH open to public taught by Sally Lynn
June
6th Winnipeg, Manitoba, Canada email for application taught by Sherrie
Applications have not been sent yet, please add yourself to the mailing list:
14th Belmont, NH taught by Sally Lynn
28th Durham, NC taught by Sally Lynn
July
Vancouver, BC taught by Sherrie
27th Orlando, FL taught by Marianne
August
16th Eau Claire, WI taught by Sally Lynn
30th Coconut Creek, FL taught by Sally Lynn
Tentative-
Please add yourself to the mailing list on the sidebar so we know how many people are interested.
Calgary and Edmonton, Canada, August
Texas, Fall
For those of you who have taken the Certification Class in Feb. or March please check the Copic website instructor listing to make sure your information is correct.
Monday, April 6, 2009
Airbrushed Easter Egg
 I have to admit that I was planning on making decorated eggs this weekend, but things came up, as things do, and I ate the eggs I was going to decorate. However, here is a photo from an egg I made last year. Later this week I'll try to post some of this year's creations.
Airbrushed Easter Egg
If you have an airbrush this is easy to make.
 1. Top of the egg, airbrushed with the chisel end of a sketch Y08 marker.
2. Middle of egg airbrushed with YG06
3. Bottom of egg airbrushed with BG34
4. Doddle flowers on egg with the Super Brush nib in RV25
5. Using the Super-brush nib in the airbrush system, spray larger speckles of the RV25 lightly over the whole surface. Practice the light speckling spray before you spray the egg!
Here are some eggs that Sharon Harnist made last year using stickers as a mask. I love it!
Ellen Hutson tried stamping onto here eggs last year and then airbrushed them. These are fun and simple also.
If you don't have an airbrush, don't worry! You can evenly color your egg with your favorite basic egg coloring kit, then once it's dry, add your doodles with the brush. You can add speckles by lightly coloring the fibers on an old rag and dabbing them on for texture.
If you would like to show off your Copic Easter Eggs, please add a link here. Thanks for sharing!

Saturday, April 4, 2009
Doodling with the Super Brush - Blob Bunnies
When I was in Toronto recently I was showing how to make blob ducks and blob fish and someone asked me how to draw a bunny. I figured I should share it with you since Easter is only a week away. Anyone can draw these cute blob critters, so don't get scared.Blob Bunnies
Bunnies are so cute and they have such neat poses that you get a couple variations on the blob bunnies. To make these today, pick 1 bunny colored Sketch or Ciao marker and a Multiliner 0.3mm or smaller.
 Sitting Bunny
Start with a round dot for the head and add a larger oval blob for the body. Pushing straight down with the brush, add a dot for the tail and then with the brush on it's side add a blob for the front paw.
With the point of the brush aimed at the head, lay the brush down to make the base of each ear. Then turn your paper around and point the brush away from the head and lay it down to make the top of each ear.
With the multiliner, outline the head first, going around each ear. Then do the main body without the tail. When I add the tail I am making it look fluffy even though it's a round dot. You don't have to make it puffy, you could just have a round little tail if the fluff is too tricky for you.
Last, add a back foot (kind of shaped like a squished, backwards 3) and the face. See the face detail steps to see how easy it is to draw a cute bunny face.
 If you really want to you could add whiskers as well.
Hopping Bunny
The only difference between the hopping bunny and the sitting bunny is
that you draw the body blob at an angle, and you have the front paws and back paws stick out more. Then outline it same as you did before (I think the hopping bunny might even be easier than the sitting bunny).
 Bunny Hugs
If you substitute little round ears for long bunny ears this could easily become a teddy bear. Just like before, draw a round blob for the head and an oval blob for the body.
The ears are trickier, since we are making one bent. Look at the exaggeration of the bent ear to see how you lay the point of the brush out to make the bent L shape. Add the 4 paws sticking out from the body. Outline the body as before, then look at the face detail for a close-up on the head.
This time, when you get to the bent ear, draw the line on the underside of the bent part half-way through the ear. Now it looks like the ear is really bent towards us. You could adapt this ear to your other bunnies as well. Add the face and you're ready to hop off to Easter!

I hope you have a wonderful weekend. Tomorrow I'll show airbrushed Easter Eggs, so if you want to get a head-start you can look back at the airbrushing post from a while ago. If you don't have an airbrush system you can still make fun textured eggs with this fur technique. You can do this right over the top of your dried, dyed eggs.
Thursday, April 2, 2009
Copic Certification Updates
The Chino, CA class on April 26th is now full.Don't worry if you didn't get in, there will probably be at least one class a year in the L.A. area.
There still spaces in the San Francisco class on April 22.
I mentioned before that Kingsport, TN is full, however, we had some spaces open up so if you are interested call Kris, ASAP at 866-662-6742 to register.
All other April and May classes still have available spaces.
Portland, OR will be a weekday sometime during the last two weeks of May, so e-mail me or sign up on the side-bar if you are interested. I am still getting details arranged so I can't be more specific.
I am also looking at a possible certification class in Salt Lake City, UT sometime the first weekend in June. If you are interested, please send me an e-mail.
Copic Coloring Challenge Blog
For those of you who are papercrafters there is a new blog which hosts a coloring challenge every 2 weeks Copic Creations Challenge Blog
This was started by the following lovely ladies. Go check it out!
They have some neat prizes as well as links to other tutorials online for coloring each challenge topic. The challenge this time is coloring faces and skin tones. Go look around and see what kinds of neat cards people are coloring these days.
Wednesday, April 1, 2009
A little Art Journaling
 I have been working on my art journaling recently and I wanted to post a piece I made this week. This is most of a 12 x 12 scrapbook page, which didn't quite fit on my scanner, but taking a photo would have lost the details.
I wanted to make something that would use up a lot of the random scraps that I have been collecting and what better way than showing it off with some creative Journaling and doodling. Years ago, when we first brought Copics in Tracy Moore found our products and loved them. I strongly suggest you go check out Tracy's work and get some great inspirations
 Altered-Art Journaling With Copic
Journaling is a great way to explore altering objects and playing with your products in ways you wouldn't usually explore if you were giving it away or had a sweet little card to make for someone. It's a very relaxing, freeform means of expression that I challenge each of you to try sometime. It's low-key and exploratory. I was just reading a report by a leading Japanese researcher who was explaining that art exercises more of your brain waves than other, passive activities and helps keep you alert as you age. I think sometimes I just need to be more alert in the afternoon, let alone old age. Having a journal/doodle page is a great way to do this.
 I won't list everything that I used, but I used a smattering of almost all Copic products to get my final results-
Backgrounds- Made with Wide markers and dripped inks, added blobs of hand-sanitizer for color variation.
Journaling- Copic Multiliners in sizes 0.05mm - 0.5mm, Atyou Spica Glitter Pens, Colored Multiliner SP, Drawing Pen F01, fine point on Copic original
Altered materials- Die-cut metal with inks dabbed on, plastic with color airbrushed on or directly colored. Tissue paper colored and doodled on with Sketch or Multiliners, Rhinestones colored with inks, Ribbon colored with inks, chipboard letter airbrushed.
Stamps- I colored directly onto my stamps and then stamped quickly for immediate results, rather than dampening the paper. The red fish/blob was made from a stamp colored with a wide red marker then I spritzed on colorless blender to re-wet it.

 Mixed Media
A quick reminder about working with altered surfaces. When working with mixed media, like paints or colored pencils, do all your marker first then add your extras later. This protects your marker tips from picking up the solvents or particles of your media and ruining your marker tips. Or, add color with the airbrush. Since the tip does not touch the surface then it won't get damaged. Test any guache, gel mediums, or spray on solvents to make sure they won't cause your marker to bleed. Anything with Alcohol will react and cause the marker to run.
Coloring Onto Silk with Spica pens
I added dark purple blobs onto the pink silk flower with my Spica Glitter pen (the flower was white when I first got it but a little marker took care of that). The ink will run with the flow of the fabric- it spreads very fast. However, the glitter doesn't spread as much and it pools right at the point where you touch the fabric. Knowing this, use a very light touch and move the pen quickly so that the glitter spreads around but the
Lightfastness
Copic Marker inks are a dye, so if you are going to be exposing your work to harsh light you'll want to protect it from UV rays. The Multiliners and Spica pens are archival, acid free, and lightfast pigments. These will do fine when exposed to strong lights.
I hope this gives you a little jolt of something out of the ordinary to spark your creativity today. Have a great week!

Subscribe to:
Posts (Atom)