Showing posts with label just chatting. Show all posts

Tuesday, September 13, 2016

Re-coloring old art

A few days ago I showed you how I re-drew an old piece from my portfolio and colored it from scratch. This time I want to show you a piece I drew and colored back in 2005, then decided to update the colors.

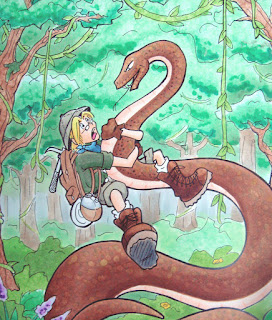
Here is an old, kinda washed out photo of the original. The colors were pretty soft, the trees were washed out, and the whole thing was a bit flat (the photo also makes it look worse, but it was pretty bad). I had been experimenting with the markers at the time, learning how to use them better, so this was not a fabulous coloring sample, but I did like the drawing itself.

I realized when I was flipping through my portfolio that I had actually never finished coloring the image, but it looked "good enough" so I'd ignored it all these years.

Well, I pulled it out. This was a line drawing that I had photocopied onto color laser copier paper. I had colored it and stuck it away. Now, 11 years later, I pulled it out to tighten up a lot of things.

One of the most amazing traits of Copic markers is that on uncoated paper you have an infinite working time. Meaning, just because I colored something 11 years ago doesn't mean that it's done. I can pull it out and re-work the colors at any time. Once the ink is wetted with another marker again, I can mix and blend.
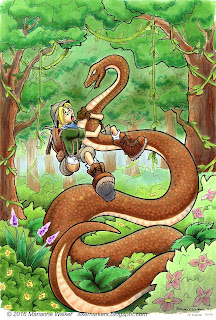
So, I throughly worked over this piece. Biggest priority was fixing the lack of contrast in the trees. Years ago I had dabbed on hand-sanitizer to affect the texture in the trees. Trouble is, hand sanitizer really fades out colors. It looks cool, but I learned through trial and error over the years since 2005 that I should have started darker on the base color first. I also crated more depth on the bushes and shrubs. Now you can clearly see which trees are in front, which bushes are in the foreground, and how dimensional the fern-things are.

Next, I made him look less flat. Again, deepening the shadows on my character makes him pop and look much more dynamic. (by the way, Tad is his name, as in "A Tad Bit of an Adventure", the comic series I was working up at the time). I added better skin tones, shadows on the snake, and generally punched up the contrast on the character.

Last, I spent a lot of time on the snake. In the first sample, you can see I had a few, irregular scales dotted in with a variety of colors. This time, I increased the contrast in the shadows and more clearly defined the scales on the belly with the colorless blender. Once all the contrast was done, then I went, scale-by-scale with the colorless blender and added more regularity to the scales.
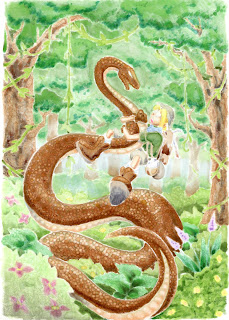
To create dots, I simply touch the tip of the colorless blender to a colored area and it pushes the color out the backside of the paper. To show you what I mean, here is a scan of the backside of this picture. Because this is on such thin paper, you can clearly see the contrast and effects of the blender on a colored area.

What is really amazing is that except for the shadows, the brown ink on the snake is the same ink I put down 11 years ago. So, all the ink pushed out the back of the paper came from a marker more than a decade ago, and I was still able to move it around. Love that about my Copic Markers!

Have a great week, and I hope to see you at some upcoming event!


Thursday, September 8, 2016

Updating Old Work

This year has been pretty busy. I know I haven't been around for a while, but never fear, I am still here. Recently I was at Salt Lake Comic Con and I was flipping through my old portfolio. It is sadly in need of updating as a lot of the artwork I'd made was about 10 years old.

Some of the artwork I look at and cringe...I'm so much better at drawing than I was 10 years ago! (A big reason to keep a portfolio is to remind yourself how much you've improved over time).

Other artwork I looked at and decided it just needed coloring touched up, since I colored many of the pictures during conventions, with limited supplies, or while I was talking to others. And, my coloring has improved a lot in the last 10 years.

Redrawing & coloring old artwork
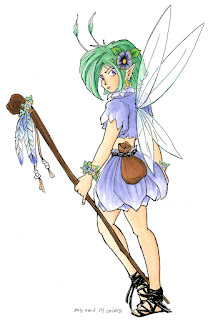
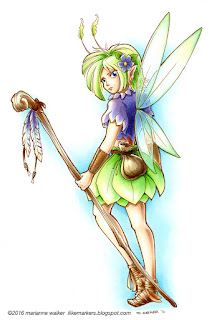
This first piece is one I originally drew about 12 years ago. Apparently when I was at a demo I only used 14 colors the first time. I've always liked this spunky fairy, so in flipping through my portfolio this weekend I figured now was the time to update her.

First, I traced her outline onto a clean sheet of our sketchbook paper using a brown multiliner 0.3mm. I have also changed my style of drawing a bit over the years, so I cleaned up my line work a little. Sometimes, just redrawing something you made previously makes all the difference in changing something from good to great.

I colored this version with way more than 14 colors! B00, BG000, YG11, Y000, E000, BV11 are the main colors used throughout, then I enhanced each area.

The wings are colored with B00, BG000, YG11, Y000, and a glitter pen (you can't see it but it sparkles). I used the colorless blender to lighten up the transparent areas that show the shirt and arm through.

The purple areas are colored with BV11, B66, and BV17, with highlights of B00 and Y000 (Heck, I used highlights of Y000 and B00 throughout all areas of the picture). Green things are colored with YG11, YG13, G02, YG17, Y000 and B00.

I used a few different earth tone families. E40's for the sack and base coat on the staff. The skin is colored with E0000, E11, BV11, E13, E15, B00, Y000. The shoes and wrist cuffs are in the E30's family, with the B00 and Y000 thrown in for good measure.

I'm excited! This came out so much cleaner, crisper, than the one I made 12 years ago. Now, at least one page in my portfolio is updated (only like 30 more images that bug me to go!). Doing this exercise really helped me see just how much I have improved in that time, so I strongly encourage you to also go through and re-color something you made a long time ago.

Ok, I'll share another updated artwork soon!


Friday, May 13, 2016

Thoughts from my hotel room...

I'm on the road this week, it's the middle of the night, but I had this thought that I wanted to share...

Last night, a store owner at the event I'm at made my favorite comment of the day:
"How do you manage to get those 13yr old girls coming into my store, dragging their parents, to buy them art supplies?!?"

He's not the first store to tell me that, and that makes me so happy! That 13 is a kid who sees value in creating, and has convinced their parent that making art is a core part of who they are.

Making things defines us and gives us a deep satisfaction. How do you feel when you say the words "I made that!"

I made that art, that cake, that flower arrangement, that goal, that dream, that life ambition...we celebrate and cheer, we pat each other on the back. And we learned long ago that once that was made, we move on to the next thing to make, always striving to make more.

For some people, "I made that" is much harder. I made that bed, I made that step without the use of crutches, I made it out in public for the first time in months. Celebrate!!! You might feel that those are minor things, but not to the person in those shoes.

You know what makes me sad? Giving up before trying. Deciding not to make anything because you feel that it isn't going to be amazing. Doing nothing because someone you've never met in person on the Internet can make it faster, better, prettier, or cooler than you ever could. Thinking that your best friend can make a better cake, so why should you bother, it won't be as good.

I don't know the skill of the 13yr old girl the store owner mentioned. I know my skill as a 13yr old and I see 13yr olds in my classes all the time that are way more skilled than I was at that age.

I do remember that at 13 I didn't really care what I couldn't do, I was focused on making what I could do, making what I wanted, pushing myself to make and make and make. I'd scrounge up my paper route money and bike down to the craft store for twine, beads, paints, cake stuff...whatever creative things I was experimenting with at the time.

I didn't know my future self. I didn't know I'd be typing something like this in a hotel room thousands of miles from my hometown, helping teach art techniques to store owners...not because I'm the most amazing artist ever, (I'm not). I'm here because I was the 13 year old who also felt that constantly making stuff was the coolest thing I could be doing (besides reading books) and I never told myself that I wasn't any good.

I guess my long winded conclusion is really this: Don't get hung up on Pinterest, Instagram, Facebook, or blogs, telling yourself you'll never be that good, so why bother trying? Everyone had to start somewhere. Be that awesome 13 year old in an art store! Celebrate everything you make!

Make what YOU want, and be proud of every bit of it....then start again, and make more.

Wednesday, March 23, 2016

Blog Winner and Gift Tag

Happy Wednesday! I am thrilled to announce the lucky winner from my blog giveaway- Dani Chapman!


Dani Chapman said...
I think this book will be a must for anyone who uses Copics! I love coloring books but this one will be perfect for me so I can get better and more confident using my Copics!
Congrats Dani and I hope that this book will give you some useful tips for any of your future projects with Copics. If you would also like to pick up a copy of this book, you can find Intro to Coloring with Copic Markers here.

Quick Spring Card Project
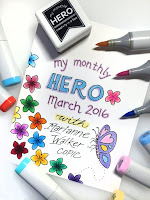
And, since you are looking around my blog today, I figured I'd share a quick gift tag/card I made from the March Hero Arts Monthly Kit. If you haven't ordered one of these awesome kits yet, don't worry, there are still a few in-stock. Just pop over to Hero Arts to pick it up.  It has been a lot of fun to work with them in adapting my Coloring Flowers with Copic Markers book into stamps and projects!
This little gift tag is made with the cluster of flowers from the Marianne's flowers add on set, stamped with Memento New Sprout colored ink. I colored it using only 6 Sketch markers: G20, Y00, Y21, BG000, R81, and colorless blender. I used the techniques shown in the second project of the Coloring Flowers with Copic book, except instead of having 3 shades of a color, I used only 2, and on the leaves, my lighter green was actually colorless blender, and my darker green was simply allowing the G20 to dry before adding a second layer to get the color just a tiny bit darker. 
I'm thrilled with the final color scheme, and how it matched the card base from the kit perfectly. I chose a clean, simple white ribbon bow and was trying to figure out how to make it just a little bolder. After digging for a bit, I found a perfect little pop of yellow bling in my "drawer-o-stuff" to add to the bow. I held the bow and bling in place with a dab of the X-press it Gel Glue
Have fun coloring!

Monday, March 7, 2016

Hero Arts Blog Hop

You know what I like to do? I like to draw and color! I also like to make neat things for my family and friends. So, I partnered up with Hero Arts to work on their March Hero Kits. Then all my online friends can also share the fun of coloring the things I enjoy drawing. These kits are packed with all the supplies you need to make a bunch of beautiful cards to share with the people you love. You add the color, and the kit comes with the rest:

The kit contains: 12 coloring cards on XPressIt paper, coordinating stamps and dies, an Intense Black ink cube (alcohol marker-friendly), extra XPressIt paper, assorted notecards, and a package of gems.

There are 3 optional add-on items -
PS755 Coloring Foundation Book - Flowers: https://heroarts.com/shop-sidebar/ps755-coloring-f…ion-book-flowers/

You can see more at the Hero Arts blog post: https://heroarts.com/my-monthly-hero-is-here-5/

Notice that you can order my Coloring Flowers with Copic book? As an added value I autographed all the books that Hero Arts is selling (I almost got a blister on my drawing finger from signing so many books!). This is a great chance to pick up the coloring flowers how-to book for any of your friends that also love working with Copic Markers.

Flowers are popping up in my yard, and they are popping up on blogs as well.  Join our talented designers for this awesome coloring flowers blog hop and see all the neat projects made with the March Monthly Hero Kit: 

The kit is available for a limited time only - once it's gone, it's gone, so order soon.

Here are some of the fun cards I made using the stamps, dies, stamp pad, flowers coloring cards, notecards & gems. All you need to add are the markers and your own creativity!

Friday, March 4, 2016

Hero Arts Sneak Peek

March is here and I'm so excited! Why am I so excited? Because I have been working with Hero Arts to design a fabulous March My Monthly Hero Kit.This kit was based on my Coloring Flowers with Copic Markers book, and now you can have a pile of flowers to color in, using the techniques you learn from the book! 

Jump over to The Hero Arts Blog and leave a comment for a chance to win a couple of prize packs!  We will have two prizes during the hop: a kit ($29.99 value), and also a prize package from Marianne consisting of a 3 pack of Sketch markers, a Flowers Line art pack, and 3 Kirarina 2win scented markers. Over $40 retail value!

Prizes will be announced on Monday, when the full kits are announced. Order your kits on Monday, March 7th.  Be sure to check back then, as you can also follow along with our inspiring designer blog hop. 
Then, once you see the great things you can make from these fun stamps and kits, order your kit quickly! Because the kit is available for a limited time only - once it's gone, it's gone.

Wednesday, December 9, 2015

Free Poinsettia Line Art download

I can't believe it's December already! This year has really flown by. Anyways, this week I am working on a fun tutorial and I figured that I would share the line-art with you ahead of time, so you can experiment on your own, before you see how I color it.

This is my early Christmas gift to you. You are welcome to click and download and share this line art coloring page. I encourage you to color it, then display your finished creation around your house.

May you find some peaceful time during this hectic season to just sit down and color. Have a great week!

Tuesday, September 8, 2015

New Coloring Faces & Hair Book

Coloring Faces and Hair with Copic Markers
Hurray! I've been waiting a month or two for the main shipment of my new book to arrive. We just got our shipment from the printer and so finally, you can purchase your very own copy of the new Coloring Faces and Hair with Copic Markers book. This book is full color, 52 pages, of great information, and suggested price is only $9.95!

Coloring Faces & Hair book
Autographed Faces & Hair Book

I tried to fill this book with useful tips and tricks for anyone who is trying to color faces, skin tones, and a wide variety of hair styles. The back of the book has blank images and assorted color charts you can photocopy and practice right along with the tutorials.  Even if you've been using Copic markers for a while, I think you'll find some great stuff in here.


Book and Art Packs
Don't want to make photocopies of the artwork? Don't have the right paper to print on? You can also order kits which include pre-printed images and color charts. These kits are available for both he Faces and Hair book as well as the Coloring Flowers book.

Coloring Faces and Hair Book Kit
Coloring Flowers Book kit

The whole Coloring Foundations book series is intended for new users, as well as people who have some experience. Either way, once you finish the tutorial images in the books, you might be looking for more fun things to color with your Copic markers. Never fear! We have the perfect partner product:

Coloring Pages to match the books
Along with the books, there are matching Line Art packs, images that go along with the books but are full pages printed on high-quality marker paper. I drew these images in styles that match the art and tutorials found in the books. So, you get a wide variety of fun images, all 8.5" x 11" printed on high-quality marker paper, ready to be colored in.

Coloring People Line Art Pack
Coloring Flowers Line Art Pack


I'm so excited to see all these great products now available for purchase! (I nearly got a blister on my drawing finger from drawing all the artwork for these projects...there is a LOT of art for you to color. )

 Right now I am deep in the process of writing the next two books in the series, Intro to Coloring with Copic Markers and Coloring Cats and Dogs with Copic Markers. Look for those titles coming out in a couple months.

Monday, July 20, 2015

Workshops and updates

Another week,  and I hope you had fun coloring with someone you love. I have some great workshops coming up that I thought I should share with you.

Free kids workshops in Oregon
July 29  - Downtown Eugene Library, Free Teen Workshop, Drawing Superheroes 2-4pm
July 30  - Bethel Branch, Eugene Library, Free Teen Workshop, Drawing Superheroes 2-4pm
July 31  - Sheldon Branch, Eugene Library, Free Teen Workshop, Drawing Superheroes 2-4pm

Aug. 1  - Kid's Create Eugene, Jordan Schnitzer Museum, 11-3pm
Aug. 4 - Springfield Library, Kids Drawing Comic Strips 1pm
Aug. 15 Art & Chalk Festival, Springfield, All Day - click here for more details


Then, I have some adult workshops coming up around the country in August

Aug. 8th Coloring Faces & Hair Book workshops, Main St. Stamping in Tigard, OR
Aug. 21, Coloring Flowers & Tracing Memories workshops, Boulder, CO - register here

Whew! A busy month ahead.

New Faces & Hair Book - coming soon
I am eagerly waiting for the first shipment of my new Faces & Hair book. It should arrive any day now. I'm excited, as I know it will have some great stuff in it for beginners who are trying to improve their coloring skills. I'll let you know when it is ready for sale. (this picture is one of the tutorials from the book)

So, last week I asked who you like coloring with, and I got so many wonderful comments. We randomly selected a winner: Terri!

terriavidreader (IN-USA) said...
I love coloring with my little granddaughter Dahlia. She's 4 1/2 and is so into crafting with grandma! It's fun to watch her start learning to color inside the lines and wanting to make a card!

Monday, July 13, 2015

Relax with a Coloring Party- giveaway

Coloring Is Relaxing
A few months ago, I had the pleasure of teaching a Tracing Memories/Coloring Photo Line Art class at my local library. What made this class different is that I actually got my Mom to attend.

A little backstory- My Mom has an art degree. She was an amazing oil painter, both portraits and landscapes, but she gave it up when I was very little because she had a house full of 6 kids and no room for painting. So, she shifted to self publishing quilting books as part of her creative outlet. She hasn't drawn or painted much in the intervening years. She always told me growing up, "Never get an art degree, you'll never make any money with it." I think that my family expected me to be a doctor or a lawyer or something like that (Not a chance!). Mom didn't really like my simplified, cartoony drawing style, and she just couldn't relate as well to my simplified, over-blended Copic illustrations.

Flash forward- Mom comes to my workshop where we are coloring a photo from a local park. It was a much more painterly, realistic style and it resonated with her. She got into it. She connected with a sweet family who took my class. And then, mom started her own relaxing coloring group at the local library. Mom would bring her markers, until the others built up their own collections. They would meet once a week to color whatever images struck their fancy: Mandalas, photos, manga...anything they found that they liked. They gabbed about life and family and whatever. It became the highlight of their week.

They had fun coloring. It brought peace and stress reduction to their life.

Look around you. Are you happier when coloring? Are you in the zone? Do you feel the peace that comes when you tone out the world around you and color what you love?

Have you seen all the articles in the news recently about how popular coloring is, and how good it is for your health? Coloring is Awesome!

I really want to hear your coloring story. 
What motivates you to color? Is it to cope with the loss of a loved one? Is it because you can squeeze it in on long road trips? Is it because you remember coloring with your grandma when you were little?

Please send me an email with YOUR coloring story and maybe a couple photos. I will choose some stories here and there and share them with others for inspiration (Don't worry, I'll let you know if your story is chosen).

(This photo is from a class I taught at a local assisted living facility a couple years ago.)


Host a coloring party
If you've felt that relaxation that comes from coloring, then I challenge you with this- have you gone out of your way to spread that happiness with others? Have you invited someone over to color with you? Someone who has never tried coloring before?

This Summer, take a moment and color with someone who needs a break. It could be a stressed out co-worker, a friend in an assisted living center, a child or an aging parent. Just block out some time and color!

Giveaway
Please leave a comment on this post, tell us who you love coloring with or who you want to color with, for a chance to win a copy of my Coloring Flowers book + a selection of flowers line art printed on our specialty marker paper.

 My goal is to encourage people to relax, and more than that, help someone else relax. One thing this busy world needs more of is simple relaxation. Go back to your happy coloring place and bring someone with you.

I will choose a winner on Friday.

Thanks and have a colorful week!!

Wednesday, May 27, 2015

Coloring a knight in armor

Shiny Metal
A few weeks ago I was at a demo up in Winnipeg, Alberta. I had a chance to make a quick sketch of a knight and color it in the second day of their open house event. I don't remember exactly what colors I used, but I will try and guess as I show you a few step-by-step pictures.

I drew this guy with a 0.05mm multiliner onto Copic Alcohol Marker Pad paper. Then, I photocopied my outlines onto the new Art Paper Pack paper (Copic Sketchbook paper).

I began coloring his blue surcoat. I think I used B000, B32, B45, BV13, Y00, and maybe a couple others. Notice how I left the highlights on each wrinkle a clean, crisp white. This enhances the shadows and adds a nice contrast on a fabric that is supposed to appear pale.

Then I moved onto his reflective metal. Notice the strong contrast, the bright whites that I left, right next to the dark grays. I used a wide range of the cool gray markers, then added highlights of Y00, and extra shadows with B000.

I can't remember what colors I used on the back of the shield, but I gradually built up colors and contrast until I got the look I wanted.

Notice the light sketch suggesting a background. I didn't want hard lines to define the background or foreground, as I wanted to keep the knight the most important/highest contrast  object in the picture.

I kept working around his image, darkening the chain mail with the same cool grays I used on the shinier metal areas.

On his arm bands, I wanted a different feel. I honestly don't remember what material I was trying to achieve, just something kinda dusty so it didn't conflict with the other metal in his ensemble. The leather straps were closed with a range of E11, E13, E15, E18, and some grays.

Again, notice how I left strong contrast on the metal sword, but included faint highlights of pale yellow to enhance the white areas.

Here is a quick photo of the final image. I colored the cape with R24, R29, R59, Y00, and B39.

To simulate depth of field in the illustration, I kept my highest contrast on grass and shrubs in the foreground, with details and color range getting lost as it heads off into the distance. I finished up with highlights of Opaque White on many of the metal objects.

Overall, I liked this more when I was drawing and coloring it, but now that I look at it a month later, it's hard for me not to see the flaws. (We tend to be our own worst critics sometimes)

If you are working on a piece of art, don't get hung up on the flaws! Just try next time to do it better. I know what I want to change next time I draw a knight. However, the parts I really like are the colors on the surcoat and cape. I also like how I colored the helmet and steel boots.

Meanwhile, don't forget to come visit me at my free book signing events for my Coloring Flowers book!

Friday, May 29, 1-4pm, U of O Bookstore, Eugene OR
Saturday, June 13, 4-5pm, Main Street Stamping, Tigard OR

Friday, May 15, 2015

Coloring Flowers with Copic Markers Book - Giveaway

It's here! It finally arrived!!

I've been waiting weeks and weeks for the main shipment of my new book, Coloring Flowers with Copic Markers.

I'm so excited because this book is not just a book, it's part of a whole series of awesome information. Who is this book written for?

• If you like flowers -flowers of all kinds- and you're a paper crafter, or an artist, or an illustrator, or just someone who likes to color, then this book is for you!

• If you're a beginner, this book is for you!

• If you're skilled and looking for tips to make your work look more professional, with depth and interesting coloration, then this book is for you!

• Hablamos EspaƱol? ¡Esta libro es para tĆ­! Es todos en EspaƱol y English.
(and that right there is the extent of the Spanish I remember from High School, luckily I'm not the one who translated the books!)

For only $9.95, you can order a copy of the book by clicking here. Or, for $2 more, you can order an autographed copy.

Coloring Foundations Series
What's even better is that if you are a beginner and you ONLY care about flowers, then you don't need any other books. That's the great part of this new series. Each of these new books stands alone. So, the next book in the series that is going through final proofing now is Coloring Faces and Hair with Copic Markers. And after that, I'm finishing writing the Intro to Coloring with Copic Markers book, which is more generic. This week I'm also coloring the artwork for the 4th book, Coloring Cats and Dogs with Copic Markers, and next I'm drawing pictures for...

Do you get the picture? This series is going to be a lot of books that are all about exactly what YOU want to learn how to color! All in easy to follow along tutorials, with multiple color variations for each image.

Blank Art is in the back
In each book, there are blank outlines for each tutorial that you can photocopy to color along with the beautiful step-by-step photographs.

People ask me all the time what is my favorite paper to color on. I actually use our Copic Sketchbook paper, a super-smooth, medium weight paper that is very crisp and great for drawing illustrations. But, pulling a page out of your sketchbook isn't feasible. So, we are now selling the sketchbook paper as our new Art Pack- Paper for Markers. These packs of letter-sized paper are meant to run through a photocopier. In fact, this is the paper I use for just about any workshop I teach.  All those blank images in the back of the book will look great on this paper, because this is the paper I colored all the original artwork on for the books!

Note: If you are outside the US and Canada and are interested in purchasing the book or paper, please email us- orders@copicmarker.com  Wholesale inquiries are also welcome.

Download even more art
Now, you've bought the book, you got the special paper that I use, and you've colored some of the tutorials. You're pumped, you're excited, you are now an amazing Flower-coloring-machine!

But what else can you color? I've got you covered there as well.

Brand new to the Copic website, we are selling 8.5" x 11" downloadable line art to match the new books. For only $0.99 a download! And, the flowers incorporated in the illustrations are the same kinds of flowers taught in the book. I drew those pictures just for you, so you can have even more great things to color.

Right now there really aren't many images uploaded...yet.

Every couple weeks we will be uploading new artwork, and not just flowers. See the cool green bug on the paper pack? I posted a tutorial last Fall about that bug. Well, now you can download the outline and color in that exact bug! Maybe you really like that butterfly I colored earlier here on my blog, well that is uploaded to the website as well. Isn't that cool!?!? I am so happy I can finally share my favorite blog illustrations so you can also color along! And, anyone around the world can download these images, no problem.


Win a Free Autographed Book and Paper pack
Whew! That's a lot of information in one post, but I am so excited! In fact, I'm so excited, I want to give away some of these books and share the awesomeness with you.

• If you want to win your own, autographed version of the Flowers book and a pack of paper, please leave a comment on this blog post. Include your email so we can get in touch with you. Tell me what topics you would love to see written into future books or made into downloadable line art (besides Flowers, Faces & Hair, Cats & Dogs, since I'm already working on those).

Next Friday, when I am back in town, I will choose 3 lucky winners.

Easy as that. Good luck, and thanks in advance for letting me know what you want to see a book about!

Thursday, May 7, 2015

Dragons, Demos and workshops

I bet you're wondering where I've been off to, since it's been so long since I updated my blog. Well, I've been a lot of places and been busy doing a lot of things, writing books, drawing pictures, coloring with markers- you know, the usual.

This week I am in Winnipeg, Canada, doing demos with Artists Emporium.  Their open house theme this year is Medieval, so of course I'm drawing and coloring cool things. Last night at their open house I had the fun chance to color this image of a dragon and wizard. I think today I'll draw a castle of some sort, since I love castles.

This whimsical picture was colored with W1, W3, W5, W7
BG02, B05, B95, B29, B39, B00, B02
V22, V25, E31, E33, E35, E39
Y11, y02, Y28, Y35, Y38, YG11, YG13, YG17, YG06, G20, G24, G28, G07, Colorless blender, R22, R24, R29, RV69, and probably a few more I forgot to list!

It took about an hour to draw the picture, then it took about 4 hrs to color, since it is a full sheet of paper. I used our new Art Paper Pack paper for coloring my final illustration (same paper as the Copic Sketchbook), but I drew it on a piece of Alcohol marker pad.

So, where in the world will Copic be over the next few months? Lots of places! Did you know that you can find a list of all sorts of events and workshops on our website?

Events- click here
Workshops- Click here

For instance, I bet you didn't know that we now offer Fine Art intro to Copic workshops, and they will be coming to a city near you! Seattle fine art workshop is a few weeks away, May 30th, and more locations will be added this Summer. Fine Art workshops are only $99.

If you are looking for Papercrafting workshops, we have a great variety of those as well. Just look at our site for more great locations, one hopefully near you.

If you haven't had a chance to visit the Copic website recently, I think you should take a moment and see what's on there. We are constantly adding new products, running great contests, new tutorial manga from Chihiro and Alisa, and much, much more!

So, if you are in Winnipeg, I hope to see you tonight. If you are somewhere else, then I hope to see you sometime in the future. Meanwhile, enjoy the Copic website!

Thursday, April 9, 2015

We'll miss you Sherrie!


I'm sitting here, in an airport, with a sketchbook pen and pencil. I'm far away from family, my friends, my bed and thinking about an awesome person. Someone who I've had the pleasure of traveling with for many wonderful years.

Way back in 2008, when the papercrafting world was just discovering Copic markers, I watched a neat little video someone made about coloring rubber stamps with Copic markers. It was a sweet little piece about coloring, drinking coffee, and eating grapes. 

Who was she?!?

Well, it was my Northern neighbor, Sherrie Siemens! And that little video (along with her all-around awesomeness) earned her a spot on our first team teaching Copic Certification classes.

Back then, we didn't have manuals yet, our classes were much bigger, and fewer people knew what the heck you could do with these markers.

Over the years, I can't tell you how many classes Sherrie has taught for us, how many lives she has touched, but I can tell you that if you've ever had a chance to take a class from her, you were in for a wonderful time.

Sadly, it's now 2015. Sherrie is moving on to a new chapter in her life. We sure will miss her on our teaching team! The laughs, the stresses of travel and problems in random cities, the fun times, the lame Canadian jokes I tell her...sigh...I know there will be a big hole in my heart that can only be filled by Sherrie.
 
 As I sit here wiping tears from my eyes and keeping them from dropping on the doodles in my sketchbook, there is a silver lining.

I know that one thing Sherrie loves almost as much as markers, coffee, and grapes is Disneyland. Luckily, Copic headquarters is right on her path to Disneyland! So, I'll still get to see my beloved Sherrie, as she and her family pass through on her way to sunny So Cal each year.

Sherrie, all of us on the Copic team will miss you so much! We are proud of your new opportunities, and we wish you the best as you go back to college. Your new career will be lucky to have you, as you're one of the best!

So, although sadly I'm not in an airport on my way to see you, I'm thinking of you and our many great times. I'm sending you virtual hugs from all your coloring family! If you would also like to share digital hugs with Sherrie, please visit the rest of our team's blogs to wish Sherrie a wonderful future.

Friday, February 13, 2015

Be My Inchie!

Welcome to the Colorful Copic & ART SQUARES blog hop!  
You are in for treat today as Copic pairs up with the ever popular Art Squares by Inchie Arts.  There are so many things to love about this pairing! 

Did you know: 
  • Art Squares are the perfect canvas for creating small-format art!
  • They come in 6 sizes (1 inch, 1.5 inch, 2 inch, 3 inch, 4 inch, and ATC).
  • Art Squares come in 7 colors (black, dark gray, light gray, kraft, dark cream, light cream and white).
  • They are perfect for wet or dry mediums.  
  • Copic markers and inks look amazingly vibrant and deliciously rich on Art Squares!
  • Copic multiliners glide smoothly across the surface.
  • Work on the “top” or toothy side for the best results. 
  • You can mix and match your mediums! No warping, bending or curling.  

You can find more information about both Copic products and Inchie Art Squares at the links below. 


Our teaching and design teams have been challenged to put marker (or ink) to these precision-cut matboard surfaces and see what happens!  (You are not going to BELIEVE these samples… trust me - they rock!)


Hop along with these talented designers as they show you some more interesting and exciting ways to pair up two great products!  

Friday, February 6, 2015

Welcome Jennifer Dove!

Welcome Jennifer dove to the Copic Fine Art team!!


The Copic Regional Fine Art team is a little different than our Papercrafting team. The Fine Art Teaching Team is made up of a bunch of super-talented professional artists and instructors who travel across the country demoing and teaching at fine art stores and art schools. 

I bumped into Jennifer again a few months ago, (it had been years since I'd last seen her.) We had so much fun coloring cactus! After chatting with her, I was so happy when she agreed to accept the Fine Art team invitation. 

Jennifer has been using Copics since 2010 and her passion and enthusiasm are apparent to everyone she works with.  As an artist by nature, Jennifer is currently busy teaching Copic Boot Camp retreats, working on her own DoveArt Designs stamp line, and designing in mixed media, jewelry making, card making and altered arts.  She also has a number of video classes available with Annie’s Publishing.  She is very excited to be adding this new teaching venture into her line-up.  

We know that Jennifer will ROCK THE SOCKS OFF of those art schools and stores and we are so thrilled to be able to welcome her to the Copic teaching family.  

To see more of Jennifer’s work, check out her blog at just4funcrafts.blogspot.com
___________________________________________________________

In celebration of Jennifer’s joining us, we want to give YOU a chance to celebrate too.  Our current Papercrafting Teacher Team has joined up for a welcome hop and we are EACH giving away a Copic T-Shirt to one lucky winner. 
T-Shirt
To be entered here on my blog, please leave a comment telling me what your favorite Copic color is... just for fun!  Comments will be closed at midnight on Sunday and I'll post the winner here on Monday. 

Visit the blogs below for another chance to win & make sure to stop by Jennifer’s Blog and give her a big welcome! 

Lori Craig
Jennifer Dove
Michelle Houghton
Cindy Lawrence
Debbie Olson
Colleen Schaan
Sherrie Siemens
Marianne Walker -- That's me!

Tuesday, January 20, 2015

Art for Oregon Asian Celebration, 2015

Once again, I want to share my artwork created for the Oregon Asian Celebration. Each year, I am honored to work with the celebration on some great illustrations. This is their 30th anniversary, and this is the 10th year in a row that I have had the honor of creating their artwork! I am so excited to be a part of this event.

This year, the theme was Celebrating 30 Years of Love and Diversity. In brainstorming for the design, I asked myself, "What do I think of when I attend the celebration?" That's easy! The food, the music, the vendors and the variety...variety of people, of cultures, of art, and amazing performances.

We've shown the diversity of the people before, and as much as I would love to draw a yummy plate of all the foods you can find at the celebration, we decided to work with the theme of music from around Asia and the Pacific islands.

This year's poster is a compilation of 13 instruments from different countries. Each instrument is a separate, detailed marker rendering.

Starting at the top, going clockwise:
Mrindangam (drum)
Kulintangan (set of small gongs)
Buffalo horn trumpet
Pipa
Sompoton (bamboo/gourd pipes)
Pattala (ornate xylophone)
Ukulele
Dhyangro (leather drum beat with a bent stick)
Vina (stringed instrument with a resonating chamber)
Kutiyapi
Tibetan Trumpet
Sarangi
Center: Taiko Drum with the Kanji for "love"

With any of my work, especially with a client that I am trying to explain a concept to, I start with a rough sketch. Not very detailed, just enough to convey the idea. Here is the first pen sketch for the client. Needless to say, they were a little skeptical when seeing this sketch.

But after they were receptive to the initial idea, I made a slightly more refined sketch, not with final drawings, just showing more details.


At this point, the Celebration committee added input about instruments and countries represented by the instruments, so I had enough direction to make the final sketches.

For each instrument, I looked at extensive reference photos on the internet. Then I drew a top-view in pencil, traced it on my light table in multiliner, then scanned it into the computer. I fixed any line work that was wrong, then I scaled it to the size I needed (about 2x what the final artwork would be, so it had plenty of detail). I printed each instrument on nice paper so I could color it. It took me probably 2-4 hrs. per instrument to make this drawing.


Here are a few of the more complex instruments for you to see up close. All of these instruments are colored with Copic markers. I used a bunch of colors, so I can't tell you exactly what colors I used where.

Most of the instruments had a variation of wood texture. You can find many tutorials on this blog for coloring wood, just run a quick search. iIt seems like I used every E marker that Copic makes when coloring these instruments.


The brass trumpet was colored with a nice range of yellows and browns. I faded out the highlights on the ornate areas with the colorless blender. The little blue gemstones were tricky to keep clean while I was blending all the other colors around them.

The leather texture on the Taiko drum was made with the colorless blender, pushing color out.  The only digital addition is the pink heart and the Kanji symbol for "love".

If you live in Oregon, I hope you can make it to Eugene for the celebration. Each afternoon, Copic will be sponsoring a table in the Youth Art area. You can come and color your own instruments, or artwork from the past years that I have drawn.

See you there, Feb 14 & 15th.


Thursday, December 11, 2014

A Colorful Holiday Story

The other day I was going on a date with my husband.  I was suffering from a touch of BG05’s. Something needed to change my mood, so hopefully a nice date would work and decided to be YR18 about the whole thing. I was in the bathroom, getting ready for our dinner. Usually I go for the E04 look, but I decided tonight should be special so I reached for the R29 and proceeded to get ready. 

From the other room, I could smell the YR14 G14 that my husband was making. I love those! I hope he added some crushed E89 or YR30….mmmm! After finishing in the bathroom, I wandered out to the kitchen. Along with the YR14, he had bought some RV11 RV52. It was such a RV23 it made me smile, and it made my mouth water. 

“I love you Y38,” he said, as he presented me a bouquet of V12, V20, V05, and R43. I must admit, it made me R20! 

“What do we have BV29ed for tonight’s date?” I asked, as I looked into the deep E08 B79 of his eyes.

“I was thinking a romantic dinner date.” He said, reaching for his E39 wallet, tucking it into his E84s. 

I threw on my Y32 sweater and headed out the door with him. The B97 B24 was beautiful. The pale BG11 glowed on the YG17 and G29.  It casted soft  BG10s on the G24 across the street, along with our neighbor’s E01 in the yard.

Later that night, we sat down to a lovely dinner at a charming restaurant. Our table was decorated with V06 and RV69s. The Y17 candlelight  warmed up the dark E59 table. It was so romantic!

We stated out with some R24 appetizers, followed with a small YG05 with sweet slices of YR16 and BV04, and a side dish of some sautĆ©ed V28. We then enjoyed the main course of E23 encrusted RV42 with just a hint of Y26. For dessert, we had a lovely RV66 and V25 cheesecake. 

As we were leaving the restaurant, I grabbed a BG53 off the waiter’s stand. Waiting in the doorway, my husband paused and looked up. There, under the G46 he looked at me, his eyes twinkling from his E13 face. 

“I love you Y38!” he whispered as he gave me a tender kiss.

I returned the favor, leaving R29 on his cheek. Just then an older couple came up to the door. As we scooted to the side, the dear sweet lady said to my husband how he had such a nice face. My poor husband! He realized then that the R29 was perfectly planted on his cheek. It made him R20 RV29. We both laughed as we headed back to the car.

I could truly say that after that date, my BG05s were over. 

Happy Holidays!- From Marianne

Wednesday, July 2, 2014

Welcome Michelle!


The Copic Papercrafting Instructor and Design Teams are so excited to add a new instructor to our fabulous team… Michelle Houghton!

Michelle has done a number of special events and demos for us over the years and we are thrilled to finally have her on our teaching team.  Michelle has a BS in Fine Arts and an MA in Teaching with years of experience teaching high school art, live workshops, and online crafting classes. 
Michelle likes to work with a variety of mediums and styles, often experimenting and looking for unique and interesting ways to use them.    We look forward to working with her and can’t wait to see her in action!

And of course we can’t have a celebration without gifts… so we are giving away some great Copic prizes! 

Join us in welcoming Michelle by visiting each of the blogs listed below for a chance to win.  Don’t forget to leave some love at each blog because EACH TEAM MEMBER will be giving away a Copic T-Shirt and a 7-piece Doodle Kit to one lucky winner. 
Commenting will close at midnight on Sunday, July 6th and winners announced on individual blogs on Monday, July 7th (Note: Prizes are limited to the US and Canada).

Copic Design and Instructor team blogs:
Michelle Houghton  http://www.scrapweaver.com/

Meanwhile, if you are heading to Anime Expo this weekend, be sure to visit me in the Copic room, #507. The room will be jam-packed with fabulous things to do, prizes to win, and awesome new workshops. I can't wait to see you there!