Thursday, January 28, 2010

Back from CHA

Whew! I am finally back from CHA. What a whirlwind of fun and excitement. There were so many old and new friends to meet and share hugs with. A big THANK YOU to Splitcoast Stampers for their promotion with Copic and the loan of the cute furniture.

Now you're probably all wondering what was happening around the Copic Booth. Our new item to be on the lookout for later this Spring is a 72pc. wallet. Check this out! It comes with an adjustable carrying strap and holds 72 of your favorite markers in a similar case to our existing 24 and 36pc wallets. Again, these will be available in a few months so don't go bugging your local store for them quite yet.

Also at CHA we had a whole lot of fabulous guests and visitors. Thank you all for your hugs and for helping our Regional Certification Instructors feel loved and appreciated. Among some of the guests:

Jenny Doh stopped by and snapped this cute photo of me with my new hair (thank you christy from spellbinders!!). The "Art Saves" sign we're holding up is to remind you that art saves lives. Jenny has a product line where 100% of the proceeds go to charity. It's her way of making sure that art saves.

Traci Bautista also stopped by for some altered arts demos in the booth. Our whole team was inspired by her free-form doodles and creative energy in her journaling. Traci's work has been featured on the Copic website for the last few months as our featured artist.

I wish I had more chances to wander the show and see all the fabulous things. At the CHA SuperShow it was so much fun to see everyone coloring at the SplitcoastStampers booth. A lot of beginners had a chance to use Copic markers for the first time. Hopefully if you couldn't make it to the Winter show you'll be able to stop by their booth at Summer CHA.

We had our whole instructor crew at the show. There were many giggles, hugs, and of course lots of coloring going on. Here is Debbie Olson showing some blending techniques to a few of the many people who were curious about how to use Copic Markers.

I need to head to bed now, but I can promise that the second surprise from CHA will be announced next week, with a blog candy prize, so stay tuned!

Friday, January 22, 2010

CHA

I am headed off for CHA today, and before I leave I wanted to update a few things...

1. The Certification Student Manual is finally done!! People at the certification classes this weekend will be getting a copy of the book to take home. It is 72 pages jammed full of useful tips for people who are going to be teaching Copic marker coloring to other papercrafters. These should be available to order near the end of February, look for details e-mailed directly to past attendees. If you get it today, leave a comment here telling people what you like about it.

2. If you will be at CHA, stop by to get a sneak peak at a few new surprises. I can't spill the beans, but if you're going to the Wholesale show our booth is 2562. Otherwise you'll have to wait a week or so to see the announcements. If you're at the consumer Supershow, then stop by the SplitcoastStampers booth to color witht he markers and glitter pens, and say Hi to all the wonderful people. Look for other make-n-takes across the show floor.

and, this just in...

Feb. 17th & 18th Frankfurt, Germany Certification classes taught by Marianne Walker.

If you are interested please e-mail Nancy. We do not have applications out yet, as this was just approved last night, but we will start our contact list and send out applications as we get pricing and details hammered out. I know it is short notice, but we will try to accommodate as many people as we can reasonably fit in the classes. To get on the interested list, e-mail nancy@copicmarker.com

Otherwise, stop by the Copic booth to meet our regional instructors, find a class near you, set up your own special event with the Copic Team, and learn some tips for teaching your own successful Copic Classes.

Meanwhile, I'll try to post while I'm at the show. I really need to post some new tutorials. What do you want to learn that I haven't already covered? Leave a comment and I'll see what I can do :) Have a great week!!

Note: March 6 is the actual date for the Des Moines Certification class. My last post was incorrect.

Friday, January 1, 2010

Happy 2010!


You may have thought that I've dropped off the face of the earth. Not so! I have been enjoying a bit of time recouping from a very busy Fall and getting ready for the next busy season and CHA, which is part of my next announcement:

I know that over the last year or so many of you have asked me for a book of things covered in this blog. While I am not announcing a book for the general public, I have been working very hard on a book project...

Over the last two years, and with much trial and error we developed the Copic Certification Program. This Fall we added and trained our new instructors who will begin teaching right after CHA. Colleen, Lori, Kathy, Sherrie, Debbie, Sharon and Sally Lynn all got a new instructor manual with their training, but I hadn't finished the Student Manual when we had our meetings in November.

Now, as of 2010 CHA, ALL people attending Copic Certification will walk away with the new Copic Certification Student Manual. This book, which is being completed in the next two weeks, will be about 50+ pages of instruction geared for anyone who is attending (or has attended) Copic Certification classes. It is NOT a book that stands alone, rather it is a workbook or refrence book to accompany the class.

Anyone who attends a class in 2010 automatically gets the new manual. People in the Sarasota class will get manuals mailed to them in a few weeks, as the books will still be at the printer's and not quite ready yet.

If you have already taken a Certification class and would like to purchase the new manual we will have more information following CHA on purchasing the book and you will get an e-mail with ordering information. This is ONLY for people who have taken the Certification Class at this point! I know all of you are eagerly awaiting a book for the general public, but first things first. In the meantime, enjoy my blog and register for a Certification in your area :) Keep looking for more details when those manuals will be ready.

Please DO NOT e-mail us at this point asking for more info about the manuals, as they are still in production.

Certifications
We are getting our lists narrowed down for the first quarter classes. More classes are being finalized each day, so keep checking back for a class in your area. If you need an application or to get on the mailing list for any of these locations please e-mail nancy@copicmarker.com
This list will be updated, so keep looking for more locations near you in 2010!

Jan. 10th, Sarasota, FL
taught by Sally Lynn -Open to the public

Jan. 22nd, Anaheim, CA
Taught by Sherrie Siemens, Colleen Schaan, & Kathy Sanders Open to Stores and Designers, Opens to the public next week

Jan. 23rd, Anaheim, CA
Taught by Sherrie Siemens, Colleen Schaan, & Kathy Sanders Open to Stores and Designers, Opens to the public next week

Feb. 21st, Shawnee, KS Taught by Sally Lynn. Open to Stores and Designers

March 5th, Des Moines IA Taught by Lori Craig. Applications have not gone out yet.

March 7th, Memphis, TN Taught by Sally Lynn. Applications have not gone out yet.

March 13th, Lafeyette, LA
Taught by Colleen Schaan. Applications have not gone out yet.

March 21st, Long Island, NY Taught by Sally Lynn. Applications have not gone out yet.

Friday, December 11, 2009

Class updates & winner

Printers & Coloring
I want to thank everyone for their help in commenting on printer types and coloring earlier this week. As you can see if you read the comments there are many kinds of printers and inks out there. Some work for coloring with Copics, some don't, some need to be heat-set, others just need to have the printout sit for a while.

Skim through the comments to see if your printer type is listed. Otherwise, just carefully test your printer's ink before you print up a bunch of things to color. If in doubt, just photocopy it.

Prize winner
There were 120 comments, and our cute little bird has a lot of things he could be saying. I went to Random.org to use their number generator to find our Prize winner:

The winner of the prize pack is Carly!!
Carly said...

. "I guess Santa Claus really does exist" or
"Yes, Crafters there IS a Santa Claus"

2. I have a HP Photosmart C7280 All in One.
And I'm a Copic Virgin so I have no idea how they do with my printer. But, maybe it will be my lucky day & I will soon find out!

Carly, it IS your lucky day! send me an e-mail to claim your prize so you will no longer be a Copic Virgin.

There were a lot of really cute sayings, so I had a hard time picking a new saying for the birdie. Check back for the final colored image and what the little bird thinks about the snowman with the giant Copic Marker.

CHA, CHA, CHA
As we get closer to the January Craft & Hobby Association shows, we are also getting closer to having all the Certification classes for Feb-April picked out. If you or your local stamping store will be attending the wholesale only Winter CHA Show you can stop by our booth, #2563 to meet all of our instructors. Get to know your regional instructor and get a special workshop set up at your store. You can also get ideas about teaching your own Copic papercrafting workshops, so stop by and chat.

There are a few options during both the CHA Consumer Craft Supershow and the CHA Wholesale Show.

• If you are a store, design team member, or instructor/employee for a papercrafting store you can register now for one of two Certification Classes. These are Beginner/Intermediate classes and are intended for people who will be going on to teach what they've learned to others. Certificatins are technique only, and no finished product will be made. Classes run from 9 am to 4pm and you can pick either Friday, Jan. 22nd or Saturday, Jan. 23. Send an e-mail to nancy@copicmarker.com for an application. Note: Remaining spaces will open to the public after the first of the year. Get an application in now to be on the waiting list for these classes if you are not affiliated with a store or company.

• If you are a papercrafter searching for a good beginner workshop where you make a finished card and learn basic techniques you can take the Copic Cardmaking class during the CHA Craft Supershow. Friday Jan. 22nd from 1 to 3pm. Cost is $30 and you make 3 finished cards. Note: If this fills they will add extra sessions, so register NOW!

• If you are just wanting to hold, touch, color, and know why people are obsessed with Copic Markers you can stop by the SplitcoastStampers booth for a fun and cute make n' take all day, both Friday or Saturday of the Craft Supershow (if you're early they may also have cupcakes!)

Papercrafting Copic Certifications
Although the San Antonio classes this weekend are full and closed, there are still some classes currently open and will be opening to the public in the next few weeks. Sign up now for the waiting list even if you are not affiliated with a store or other papercrafting company!

If you need an application or to get on the mailing list for any of these locations please e-mail nancy@copicmarker.com
This list will be updated, so keep looking for more locations near you in 2010!
Jan. 10th, Sarasota, FL taught by Sally Lynn -Open to Stores and Designers
Jan. 22nd, Anaheim, CA Taught by Sherrie Siemens, Colleen Schaan, & Kathy Sanders Open to Stores and Designers

Jan. 23rd, Anaheim, CA
Taught by Sherrie Siemens, Colleen Schaan, & Kathy Sanders Open to Stores and Designers

Feb. 21st, Shawnee, KS Taught by Sally Lynn. Applications have not gone out yet.

March 5th, Des Moines IA Taught by Lori Craig. Applications have not gone out yet.

March 13th, Lafeyette, LA
Taught by Colleen Schaan. Applications have not gone out yet.

March 21st, Long Island, NY Taught by Sally Lynn. Applications have not gone out yet.

Have a great day, and have fun coloring!!

Monday, December 7, 2009

Digital Printouts, Testing Inks, & Giveaway

I know many of you like to print out blank pictures and color them in with your Copics. This is the technique I use when doing an Illustration, I draw it then scan it in, touch it up, and print it out. However, a lot of you still have questions.

Digital Printouts
Copic Marker inks will not destroy lines printed out from a laser printer or standard photocopier. This is because they are toner-based devices and the toner is fused to the paper so the alcohol ink from the markers will not destroy it.

Many of you are working with inkjet printers though. This gets a little more tricky and I can't say it will work or not. Each printer uses slightly different inks and you really need to test your printouts before you color and make a mess. My mom uses a really old inkjet and any kind of moisture will destroy a printout from her machine. However, we have a newer, large format Hewlett Packard printer with archival, pigment inks at work and the markers color just fine on things I've printed from there.

Testing Inks
Testing a printer ink is the same as testing any other inks. Print something out on the same paper you would regularly color on, then follow the steps on this older post to see if your ink will hold up without destroying your marker nib.

Another technique I frequently use is to make a blob with my marker next to the ink I'm going to be testing and "push" the marker into the ink line by over-soaking the paper. Here I am testing a cheap ballpoint pen ink to see if it will bleed with my markers. I'm careful to not let the tip of my marker touch the ink line. Work with a light colored marker so you can easily tell if it's messing up the line. This is the technique I show during Certification Classes.

As you can see, cheap ballpoint pens do not work well with Copic markers. However, if you have a large colection of ballpoint pens you can donate them to kids in Africa who need them for school through the nonprofit organization Pens for Kids. This would help them have a happy Holiday season and help you clean out some of the clutter in your drawers.

Happy Holidays Giveaway
Meanwhile, I have an early Christmas gift for you. Your very own blank picture to download and try coloring with markers.

I'll be coloring this later this week, but I first need your help coming up with something for the little bird to say.

You could be the lucky winner...

Simply leave a comment today with:

1. A suggestion for what the bird should say .

2. If you have an inkjet printer let us know what model (or kind of ink in the printer) you use and how well Copics work when you color printouts. If you decide to print this out and color it then you can also leave a link here to your finished piece.

Thanks for playing! On Thursday I will choose a random winner from the comments to get a mixed goody bag worth about $40 in Copic products. And I'll show some of my favorite things for the bird to say.

By the way, I was going to have the bird say "Now all we need is a Dame singing love songs..." You could probably come up with something better :)

Good Luck!

Note: This Contest is now closed. Comments are still welcome on printer types but prize winners have already been chosen.

Friday, December 4, 2009

Friday Art Links

This year has flown by and next year is just around the corner. Amazing how fast the years go when you're busy. I have a couple fun links for people today, and I hope you enjoy them or feel inspired by them.

For Papercrafters-

Archivers
When I was at Scrapfest in September Archiver's filmed a quick coloring tutorial for their website. This link will take you to my Beginner Coloring with Copic tutorial.

You can check out all of Archiver's other fabulous product tutorials here.

Fine Art Links-

Medical & Instructional Illustration
I was recently contacted by a fabulous illustrator and I wanted to show you his work. Jason Laramie uses many mediums to create his illustrations, including Copic Markers. Dig through his gallery a bit for some examples of his images.

Beginner Illustration Technique-
I love this blog in general, and here is a neat tutorial for beginners on how to take a photograph and with some simple filters in photoshop use it as a base for making an illustration. Dig through Holly's site, as she has some gems in there.

Ok, so I'll post another great tutorial next week. Have a creative weekend!

Monday, November 23, 2009

Shadows Part 13 - Shading & Cast Shadows

Someone in a recent class asked me why I had soft blends in some areas when I color and crisp lines on my shadows in other areas. This got me thinking that I haven't really explained the difference clearly enough between shading and adding cast shadows.
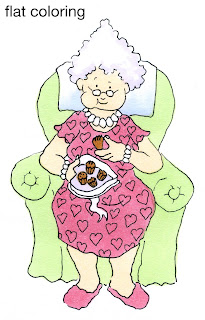
Flat Coloring
The first thing that people notice about images colored with Copic markers is how smooth everything looks. By coloring in small circles and evenly soaking your paper you can finally get a flat area to look perfectly flat.

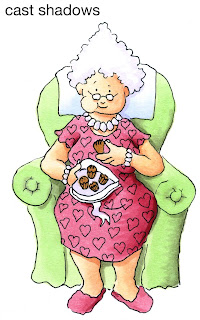
This also gets boring real quick because we know that the world is not flat. This Granny image is from the new release over at Our Craft Lounge. She looks pretty lifeless with plain, flat coloring. I used R83, YR000, YG11, E35, B41, and BV31. I like Granny because she is a character who is very much alive and has personality - NOT destined to be flat her whole life (especially with all those chocolates she's eating).
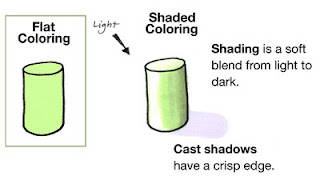


Shaded Coloring
When we want things to look more alive we add shadows. If you look at the whole list of shadow posts you can see all my directions over the last year or so about adding shadows. I have tried to simplify shadows as much as possible, so don't get overwhelmed if you think you can't do it, just scroll to the beginning and start there.

If you look at this simple diagram you can see the difference between something flat and something with volume and substance.
When Shading, the first step is to pick our light source. In this case, it is coming from the upper left corner. I leave my green cylinder (YG11) white on the side closest to the light and faded in BG93 to create the shading. Because this object is rounded my shading from light to dark is smooth.

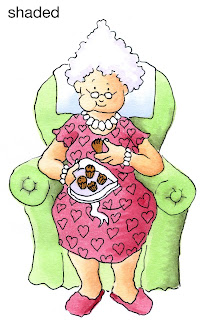
Here is Granny with simple shading added. She looks much more alive than she did at first. I added R85 & R89 to the R83, E11 to her skin, and BG93 to the chair. I smoothed darker colors in by layering light-dark-light, so an area like her skin would have been colored YR000 + E11 + YRooo. So far, all of these are smooth blends from light to dark.

I think she's still missing something, though.

Cast Shadows
If you look back at the shading diagram you'll see the volume of the cylinder has left a shadow on the ground, or a Cast Shadow.

On a cast shadow you see the edges are crisp, with no soft shading. This is because the light is blocked in a straight line by the hard edges of the object. This adds to the illusion of volume and we can really feel that our object has substance. However, this is a simple object.
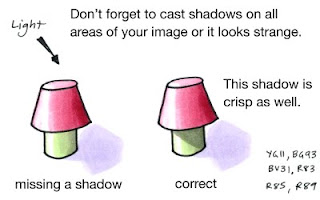
The world is made up of much more complex shapes and objects than the cylinder. If we add a top to our shape then the shadow changes as well.

Look at the first "lamp" in my diagram. The shadow it leaves on the ground mimics the shape that we know the object would have in real life. So we have the cast shadow of the whole image.

But look at where the "shade" overlaps the base. There needs to be a shadow here as well because the top is blocking light on the ground AND on the base.
The shadow the top casts will have hard edge because it is blocking the light in a straight line. By adding the darker shadow on the green area we can really get feel for the dimension this "lamp" has.

Let's look at Granny again.

Her dress hangs over her legs, so let's cast a Crisp shadow on her legs. Her head sticks out over her neck, so she gets a shadow there, too. Don't forget the chair, as Granny is blocking the light that is hitting the chair, so those will be crisp shadows as well. Her hair casts a shadow, as does her box of chocolates.

By deepening the shadows and making some crisp while leaving the basic shading smooth you can really get a sense of granny's volume. Look at how much more dynamic her legs are in particular (you never thought of granny's legs as being dynamic, did you?)



Here is my final Granny. I used a gray multiliner 0.05mm to add scribble flowers to the upholstery and I added a hint of B41 to the ground and behind the chair just to give her a bit more life. I hope this helps you in your coloring. Have a great week, and enjoy eating your own sweets. Don't forget to check out the other fun stamp sets in the new release from Our Craft Lounge!