Showing posts with label smooth coloring. Show all posts

Monday, August 30, 2010

Feather Blending, again


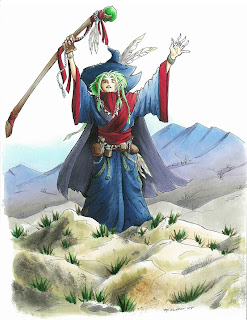
I had a great time at the Manga demo in Portland this weekend, and I had a chance to color this wizard picture I had drawn years ago. It's always fun to re-visit old images and color them with fresh eyes. I like this version a lot better than the version I colored oh so long ago.

Just to give you an idea of scale, these large manga pieces that I occasionally show are full-page sized, they are not small pictures, and are made for my example book. If you ever meet me at a show, bug me to let you look through my example books- it's fun to see bigger work sometimes, and see how I use techniques on a large scale.

You'll note in this picture how I show distance by making things in the back blueish. I know I've explained the blue-things-far-away before, but it never hurts to talk about how to make it look correct in a finished piece.

Feather Blending - Purple Mountain Majesties
I wanted to use this piece as an example of good feather blending. I've talked about feather blending a few times before (1, 2) but it never hurts to review.

Many of the Intermediate Applications I received I have had to turn down because they did not show proper feather blending. To me, this means I must not be explaining it well enough. This is a tricky concept, so it's getting an advanced label. What really makes it tricky is the amount of practice you need in order to find good color combos and time it takes to figure out the proper technique.

If you look at the mountains in the background, you'll see that they blend from blue, to purple, to warm gray. Blue and Warm Gray are opposites, in that Warm Gray is brownish toned and Blues and Blue violets are far away from them on the color wheel.
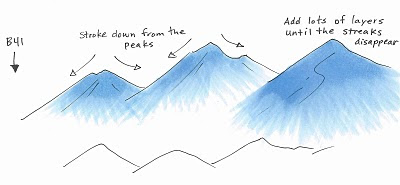
I started the mountains by coloring with B41. I stroke from the top of each peak, down to the base, flowing in the direction of the mountain. I am lifting up at the end of each stroke so that I have less ink at the base and more at the peak. As you can see from the third peak, I apply lots of very light layers to achieve the look I'm going for. I did criss-cross my strokes slightly for a proper feather, but I am consistent with the base feathered and the top of the peak dark.
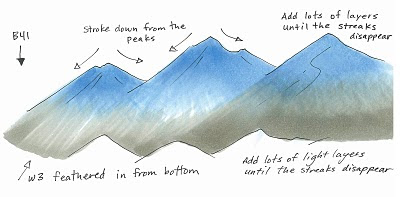
Next, I feathered in W3 from the bottom in exactly the same technique, this time, making the base dark and the feathering go back up into the mountain. I added lots of very light layers to achieve the proper blend. I think on the actual picture I used W2, not W3, but you get the idea.

You can see on the third peak how the layers blending more and more, and you notice the streaks less and less. Sometimes I'll come back with the blue and add another light layer after I added the second color, just to get it a little smoother.
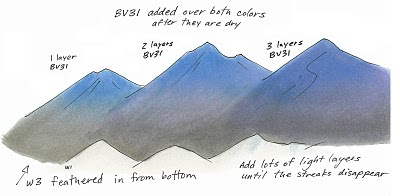
Last, you'll notice on my final mountains that it has the pretty purple fade. After I was done feathering the blue and the gray I added a faint layer of BV31. How much is a matter of personal taste.

You can see from these mountains that the more you layer the pale purple over the whole area, the more it shows through. The third mountain is colored as if it is in front, but it looks like it has more shadow than the others, so it could have been colored as if it were in back simply by adding more BV31. The purple is strongest in the middle because there is the least amount of dye on that spot on the page. This gives the purple a place to fill in, if that makes any sense.

On the final mountains in the main picture I added a faint streak of BV23/BV25 to darken the shadows on the left side of each peak. This makes it look a little less flat, but not so much that it detracts from the main image.

I used too many random colors to list, but I did use one other technique, which you might not have noticed. On the rocks in the foreground I dampened my nasty rag and blotted off some browns and grays that were already on there. This added the hint of texture you see on the front rocks.

I hope this has inspired you to practice the feather blending again. This is tricky, but when done right, it looks really good. Have a great week!

Monday, August 24, 2009

Feather blending, revisited

I know that sometime last year I discussed feather blending, but as this is the trickiest blending technique using the markers I want to cover it again and show you step-by-step how to make more dynamic color blends.

Blending opposite colors
Feather blending is the technique we use when we want to blend colors that are very different, say a pink and a green.

If we were to layer those colors on top of each other they would turn into a muddy mess of color, however, we want them to look like they smoothly blend into each other. You can review my older post here.

This is advanced because this is the trickiest technique. I'm also adding another layer of color so my blend is going to end up more dynamic than it would if I just used 2 colors. If you can't figure this out just by reading the blog don't feel bad. This is a very tricky technique to understand unless you see it done. Even then it is hard to duplicate and takes a steady, light hand.


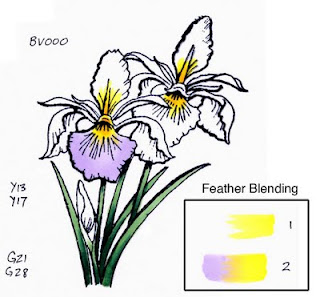
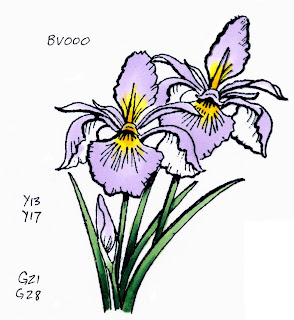
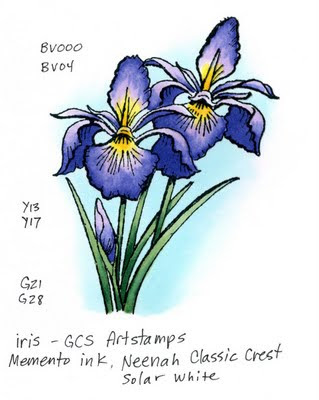
Today I'm working with this Iris image by GCS Artstamps. Irises are hard because they fade from a deep, rich blue-violet purple to a bright yellow center. I start by laying down my yellow centers. I put a base of Y13 and feather it out into each petal. Then I darkened the middle with a hint of Y17 on each flower.


If you look at the inset diagram above you can see how I am going to layer on the BV000. I feather the yellow one way, VERY LIGHTLY, then I feather in from the opposite direction the light purple. When I'm done I will get a natural looking blend from yellow into BV.


If you still see streaks on either layer then review the steps in my earlier post. You should also color in many very light layers until you've built up the smooth area you need. This is very tricky, and it works best with the side of the brush nib. Practice flicking the brush to get the proper technique.

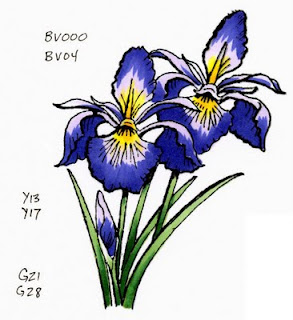
Next, I feather in my dark BV04 to each petal, following the same direction as the BV000. I am going about half-way into each lighter area. I am leaving plenty of the light purple before it touches the yellow, likewise, I am giving myself plenty of the dark area to blend back in.

Note: If it seems like your marker layers are starting to bleed outside your lines then STOP! It is very easy to oversoak the paper when using this technique. Let your paper dry out a bit before adding more of the light color, then it won't bleed so much.


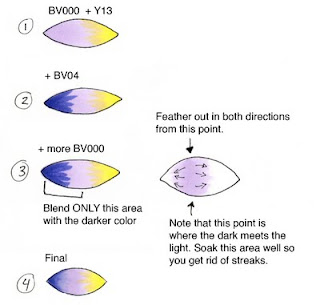
At this point I want you to look at the diagram below. Note the 3rd step where I am adding in the BV000 to blend the light and dark together. Right where the dark meets the light I am putting the heaviest flow of ink. Then I lift up and feather out in both directions from there. This pushes the darker color back into itself (note also that I am not going all the way back to the far edge of dark, but almost that far).


When you look at my final Iris image you can see how the color fades smoothly from the rich, vibrant yellow to the much darker blue-violet. I could go in even more and darken the underside of each petal with an even darker purple, but I think I'll leave it for now.

Image stamped with Memento ink onto Neenah Classic-Crest solar white cardstock and touched up with a 0.1 mm multiliner SP.

Saturday, December 27, 2008

Glossy cardstock part 3, blending

I hope everyone has had a chance to recover from a long and busy Christmas week. My life gets so frantic it's hard to sit down and mellow with my markers. However, here is the continuation of my discussion on glossy cardstock.

Not all glossy papers are created equal
What I am showing you is a glossy paper that doesn't work very well, in my opinion. Some will work better, and some will work more like vellum with your markers. Some glossy papers you might prefer coloring on and some you might never want to look at again.

Don't avoid it until you've tried it.

Blending on Glossy paper
Here are my blending experiments on glossy. You'll have to dig through my archives for June/July '08 to see the comparison techniques on absorbent cardstock.

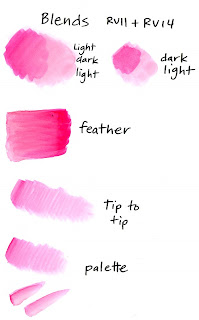
As you can see, starting with the light color, adding dark, then going back with your light marker doesn't really work on this paper. You still see the edges on the dark colored blob. Likewise, starting with dark and adding light doesn't work.

Feather blending looks a little better, but it's still pretty streaky. Also, you quickly run the risk of adding too much ink and creating blobby edges with ink buildup. Not very pretty.

Tip-to-tip blending and palette blending look much better. This is also good for the tiny areas you color in, so maybe this is going to be your best bet for smooth blending when working on glossy papers. Keep practicing to tell how much darker ink you have on your light marker tip until you get the look you are craving.


Colorless Blender on Glossy
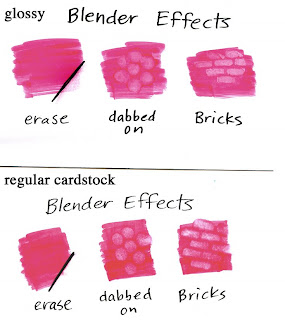
The colorless blender does not work the same on glossy paper as it does on regular cardstock. Look at my comparison here between glossy and regular paper. I strongly suggest that you compare the two for yourself side-by-side to see the subtlties, since my scanner makes the glossy look better than it does in real life.

First of all, it won't erase. The ink has no-where to suck into, so it doesn't go anywhere. It also leaves a residue in the fibers which, because they are coated they won't go away.

Special effects look different. Look at the blobbing and the bricks. You can see how the color pushes out of the way on the regular paper, but on the glossy it just gets lighter. It doesn't stand out quite as much, but the edges are crsiper than they are on regular paper. You might like one better than another.

Personally, losing the ability to erase makes glossy paper unappealing to me. This is a basic blender technique that is way too useful, so I'm not a big fan of glossy (I make a LOT of mistakes and I rely on my blender to make those mistakes go away).

The blender is a good tool for removing heavy ink buildups even if it won't erase completely on glossy, but it also discolors the area around it slightly and can cause even more little ridges like the ones you were trying to remove in the first place. Use it carefully as a removing tool but be careful since a little goes a long way. Also remember to clean the tip really well after using it with glossy paper.

Try other colorless blender techniques on your own- Nasty Rag techniques will still give you good results. If you are dabbing blender on, test to see how juicy to add your blender, since it will spread more on glossy.

Dirty Blender tip
Glossy paper makes the tip of your blender dirty very quickly because the ink doesn't soak into the paper, it just gets on your blender tip. Keep a piece of absorbent paper as scratch paper to clean off the tip frequently (you can't clean it off on glossy- the glossy won't soak the color off). Don't put your blender away dirty! the next time you come to use it the color will have diffused throughout the pen and might not be clear anymore.

Test each and all of your papers before you decide whether it's a winner or not. This is not to say that one is better than another, rather, each will feel different and you will like the way one works better than another. The way I test a paper that is absorbent is posted here. This doesn't work on glossy papers. Glossy you'll want to test a little differently, since you won't have feathering problems.

To test glossy paper
1. Evenly color a blob (see glossy paper part 2). Does it seem to streak more than other glossy papers? If you can tell a difference then maybe this will be a deciding factor.

2. How well does it blend? Make swatches like I did above to try it out. Test each blending method before you make a decision.

3. How does the colorless blender work on it? Again, try making swatches just like I did to see if you like the way it works.

4. Always test your markers and inks on a new paper. This is accomplished in the same way as you would on regular cardstock, since it's the line bleeding that we're worried about, not the paper fibers spreading the ink.

Whatever paper you choose to work with, the key is practice. The more you practice techniques on that paper, the more it will look good to you. Don't give up. If someone else shows you great results on the same papers and inks that you're using ask them how they got that look.

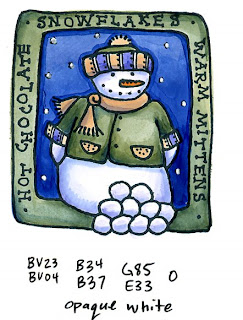
For my final example today I've colored this adorable little snowman stamp by Lockhart Stamp Co. I used Memento Tuxedo black ink on glossy cardstock. I used a lot of palette blending for the tiny details, and used the colorless blender to remove excess ink buildup. For the stars (or snowflakes) in the sky I waited until I was totally done and added opaque white. I don't like how crisp the edges are and how unforgiving this paper is, but with practice you still can get beautiful results on glossy.

Monday, November 24, 2008

Coloring large areas, Part 4-Removing Streaks

To conclude coloring large areas for a while, let's combine a couple of the techniques I talked about last week. Remember, as you find things that work, WRITE IT DOWN with an example so you don't forget.

When you are coloring a large area that is already streaky, your best bet to fix it is to color over it. However, if the area is already dry you may still see streaks unless you are smooth an even and soak the paper extra well.

On areas that are already colored and dry, remember this when coloring over it.

• If you use the same color your picture will get one shade darker

• If you color over it with the colorless blender it will get lighter

• If you color it with a color from a different family the tone will change (this might be a good thing if your original color just wasn't quite what you need).

• If you use a color that is one or two shades LIGHTER than the original color, then it will smooth out to being very close to the color you desire

If you look at these examples you can see exactly what I'm referring to. The streaky E31 just looks bad, but I have to very carefully choose the right color to get it to look correct but not too light or dark. Notice how by adding E40, while it's close to E31, it's not the same color family, and therefor adds some gray. E30, by being a shade lighter in the color family keeps the blob similar in feel without getting too dark.

Here is a larger example of this in progress. Notice how the streaky background has darker edges in a grayish BG. My overall color is BG11 though, so I'm going to color over the whole thing with a nice juicy BG10. I color very slowly and soak the paper even more than regular since I need to blend my ugly streaks in. Yes, the picture got darker, but unless I add blender in, this is the lightest shade in this blending family.

After I layered on the BG10, I came back, touched up the darker BG93 (I didn't mind that the edges got darker). Now my whole picture looks nice and smooth, no streaks.

Amateurs vs. Professionals
I like to say, the only difference between Amateurs and Professionals is how well they hide their mistakes. Other people say "They're not mistakes, just opportunities."

My last example today is the last resort. If you just can't get rid of the streaks, then hide them in other ways. Make a mottled background like you see here by dotting on some color. Or, I showed how you can make a neat pattern by soaking an old, nasty rag in blender and dabbing it on. Either way is great for covering up the pesky streaks. I think I like this background a lot. Have a great day!

Friday, July 25, 2008

Marker Blending on a Palette

Yesterday I mentioned painting with your markers by applying the ink to plastic and painting it on with a paintbrush filled with blender solution to get watercolor-like effects on watercolor paper. This is a version of our last main blending technique.

Marker Blending on a Palette
This technique can be done without a paintbrush however, and is an old blending technique that people have been using for years with alcohol-based markers onto whatever paper surface they are working on. Professors at art schools have students work in this manner to mix and blend colors, since in the old days other marker brands weren't as easy to blend as Copics.

With this post, we'll have covered the 4 main methods of blending Copic markers:
1. Marker on paper
2. Feather Blending
3. Marker tip-to-tip
4. Blending on a plastic palette

This technique was also featured as a tutorial on Splitcoaststampers last year by one of our demo designers, Kathy Sanders, who has been teaching this technique for years to stampers.

This is very similar to the Marker Tip-to-Tip blending that I showed last month, in that you are using a lighter colored marker or the blender marker to pick up color and apply it to your artwork to create blends.

1. Take a few dark colors and make small dabs on your plastic palette. For my example I'm using an old CD case, though anything glossy plastic would work. Really juice up the spots, since you'll use most of that ink quickly.

2. With the lighter color that you want the dark to blend into, pick up a spot of dark and color onto your image. This is great for small spots of blended colors that would be hard to get a good feather on, or are too small for blending on the paper itself without making a blob. If you want a color to blend to white, use the blender.

See how one stroke is blue fading out? If you need a larger area, then keep picking up color and feathering it into your work in exactly the same direction as the first stroke.

3. Scribble off the darker color onto some scratch paper to keep your light marker tips nice and clean when you're done (this blender marker is really old, so the tip is already stained).

So, why would you use this technique over tip to tip blending?
It's easier to see how much ink you're picking up. You can keep your little palette and use any residue in the future as well. You can mix a tiny "batch" of a special color blend. In the case of my finished work today, I want everything to have an antique tone, so if I have a limited color range I can use a pale gray (in this case a warm gray) to apply my colors and then everything will have undertones of warm gray.

Otherwise, it's about the same. Both techniques are good for small areas, and they work with very different color blends as well. These are also good techniques to use on glossy or coated papers, where you don't want to heavily soak the cardstock to get a blend. It looks very much like watercolor, but it doesn't soak through the paper.

How did I choose my colors?
In this example I want my blues of the water and sky to be nice, clean, and bright. I apply those with the colorless blender. See how pale the sky is? That is B34 mixed with BG49- both very dark colors on the soft paper I'm using. Yet see how subtle and washed out they look? This is thanks to the blender, and adding blender to my drops of color on my palette. If I want to darken any of these areas I can always go in and do final touch-ups directly with the markers.

The second step is with my browns. I want these to be antiqued and muted, so I'm applying them with a pale warm gray, W2, since there is brown in the Warm Grays. The sails on the finished piece are applied with the neutral gray, N1 because I want them to feel antique, yet look different than the browns. Also, I wanted subtle hints of the YG and E colors, and the Neutral tone helped to keep those from getting too brown (W) or blue (C). The markers in the photo give you an idea of how small this picture is.

I am leaving all my highlight areas white, since my paper is a slight off-white (photoshop shows it as more true-white). The whole effect is rather nice and muted for a general antique feel.

You may notice that your marker makes nice spots of color on your plastic. Later I'll talk more about using the markers on clear acrylic pages and projects, I'm just waiting for my supplies to get back from CHA to show some fun things.

Image: Cutter Shark that I drew last year and photocopied onto 100 lb Rag sketch paper by Aquabee

Thursday, July 10, 2008

Feather Blending

This week our internet at work is in transition, so some of my e-mails have been not working or going out as promptly as usual. Be patient! If you don't think I got your e-mail at all, you can call if it is something that can't wait (like details about Copic Certification that I e-mailed last week but many people missed). Use our toll free number 866-66-COPIC (866-662-6742)

For those of you in the Milwaukee area who can't make it to the Certification Class, but still want a chance to visit and get help with your work, be it Manga, coloring stamps, or rendering techniques I will be doing a FREE evening event at Artist & Display. I'll have markers to play with and will be happy to answer any questions. Monday, July 14th, 5-6 pm (unless my flight is late!). The address is 9015 West Burleigh, Milwaukee WI. You can visit their website for directions.

Here is another quick technique post. This is one of the basic ways of blending two colors. Unlike the Marker on Paper blending, this is a good technique when you're trying to blend very different colors. This also works best with the Super Brush nib from a Sketch or Ciao, though it can work with a Copic marker, it's just a little harder to get the perfect feathering.

Feather Blending Colors Together
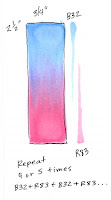
1. Start with two lighter colors (colors that end in a 4 or less). Pick two colors that are fairly different. In this case I'm working with B23 and R83, since they won't blend using the technique from a couple days ago, and I don't want them to fade to white, so I won't be using a blender. Note that whatever colors you choose will get darker, so start light.

2. Work in a long, thin area. The trick is to work this while the marker is still wet, and we'll be layering ink in one direction, NOT coloring in smooth circles like we have in the past. The back of your paper will only soak through on the darker edge at first, but when you're done, it will be even on the back most of the way through.

3. Apply the first/lighter color about 3/4 of the way through the area (it may be hard to figure out which one is lighter). Lift up at the end of each stroke so you have denser color at the start and less color at the end of each stroke. This takes a bit of practice if you're not used to the softness of the Super Brush. the same principle applies when using a Copic marker, except you won't have the distinct brush-streak. Work in the same direction, but layer enough so you loose the streaks at the base and see them in the middle.

4. Come in from the opposite direction with your second color. Use the same techniques as step 3. Work while it's still wet. This will still look streaky, but have patience. Also, look at how light the marker is in this step, then compare it to the colors in the next step.

5. Repeat. Go back with the first color, then back with the second, then back with the first... you get the idea. Every now and then let the paper dry so you can see the true effect. Also, if the paper gets too saturated you'll see some splotchiness, so if you see ink glistening on the surface, let your paper dry a bit (not all the way, just enough so you're not going outside your lines- do you see the weird lighter area on either end- I should have let it dry more between layers). See how much darker this swatch is, yet there we have a smooth transition from blue to pink.

If you have done this correctly you should loose most of the individual streaks, unless you look close. On smaller areas you won't have to repeat as often to get the smooth look.

Image: Eloise Greengrass by Bella Stamps, Paper: Neenah Classic Crest Ink: Memento Tuxedo Black

Monday, July 7, 2008

Marker Blending on Paper

I hope all of you had a rejuvenating weekend, and are ready for the daily grind again. Thank you to the few stampers who stopped by and visited me at the show. My workshops went well, though not as many people laughed at my cheesy jokes on the second day. Hmm, maybe I need some new material. Anyone know any good marker jokes? ;)

Anyways, I can't believe that CHA is less than 2 weeks away. Aaack! I am not ready- and I leave next Monday to teach the Milwaukee Certification class and Chicago classes. I am really looking forward to meeting all of you that have registered. I'll have a better idea tomorrow how many spaces I have left. I think Milwaukee is almost full, but I still have room for Chicago on the 16th. If you contacted me over the weekend I will get back to you, don't worry. For those of you coming to CHA, stop by booth 2848 and see demos by Debbie Olson, Michelle Wooderson, Kathy Sanders, as well as me and the rest of the Copic Crew.

Marker blending on Paper
Today I am going to elaborate on the technique I showed on thursday for blending colors. This technique is the one I use most, since it works well for larger areas, and I tend to color larger things than the average stamp. This works best with similar colors, or colors in the same Natural Blending Group on matte cardstock.

I'm showing you this with Sketch markers, though it works with any of our marker types. I strongly suggest that the first times you try this, use lighter colors, since the darker colors take more effort. Once you are comfortable with how this works, then you can move to darker colors.

Note: This is only one way of many to blend. This can be a tricky way to blend, so if it doesn't work for you, don't feel bad. One of the other blending techniques will probably fit you better.

1. Color evenly, really soaking the paper. Color in circles to keep you edges wet and to avoid streaks.

2. While it is still wet, add your darker color to one side. Lift up at the end of the stroke, so you have more ink on the shadow side and less on the edge where it will be blending. You can do this step after your base color has dried, it is easier however to do it while the base is wet.

3. Go back over the darker color with your first color. Add a lot of ink and really soak it in. This is what hides those rough edges and mixes the two colors together to get a smooth blend. If this doesn't work for you, try using colors that are closer in value to each other, or use lighter colors to begin with.

I repeat steps 2 and 3, layering more and more ink until it gets as smooth as I want it. You won't destroy your paper, don't worry.
4. Add a third color if you wish, again, using the same technique. Start with your lightest, add your middle color, go back with your lightest to blend those two layers together, then add your darkest, then go back with your middle to blend the dark into the rest of the picture. Finish up by using your lightest color.

5. If you really want to, use the colorless blender to add a highlight back in. Now my circle really feels like a ball and not a pancake. For a stronger highlight, use Opaque White and paint a white spot back in.

Troubleshooting: If you find your color feathering out too much, and your paper usually doesn't feather, then let your colored area dry a little bit before adding your darker layer. You're really adding a lot of marker in one spot, so be aware of how much it might bleed, and keep plenty of scratch paper underneath. If you are getting a line when you try blending in the lighter color, try saturating the whole area with the light color, not just the feathered edge. The line means that something is dry and you need the whole shape to be wet to look smooth.

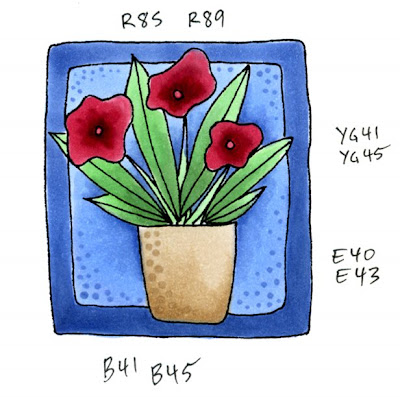
Stamped Image: Flowers in a Pot by Lockhart Stamps, Paper: Neenah Cardstock Ink: Memento Tuxedo Black.

Thursday, July 3, 2008

Coloring Eyes

Short week, wasn't it? Tomorrow, while most of you are enjoying, friends, barbques, and fireworks I'll be down in L.A. teaching coloring workshops at the Anime Expo convention. I love teaching the comic workshops! There are so many enthusiastic people, in amazing costumes that all gather together for their love of Japanese Comics (manga) and Animation (Anime). I'll try to post some photos next week if I get the chance. In our booth we have some wonderful guest artists from Japan, whose work is simply stunning! Every year I wish I could draw half as good as they can.

In honor of Anime Expo, and the Japanese comics, or Manga, I wanted to cover an important part of the distinctive look to Manga characters- the big, beautiful eyes. These oversized eyes are stylized, but I want to explain a bit about the idea behind the way they are drawn and how you too can get the cute-eye look.

Eyes
Eyes are not flat, just like the world isn't flat, or a ball isn't flat. Eyes are also reflective, and have beautiful but complex patterns just below the surface of the lens. So how can we capture all those qualities in one tiny little picture? I want you to try this: stand outside with a piece of white paper and a friend (hopefully it's a bright Summer day). While standing about 2 feet apart, hold the paper just under your chins. Now, look into each other's eyes.

Understanding light and reflections
Our eyes catch light and bounce it back at the person looking into our eyes. The strongest reflection you see will be from the sun. It is above us, so it hits the top of our eyeball. The next brightest thing we see is the reflection from the white sheet of paper. This is below our eyes, so it causes a smaller reflection on the bottom of our eyeballs. So? What does this mean for how we understand eyes?

Understanding Cute Things
Cute, innocent things tend to be drawn with eyes wide open. When your eyes are open large people thing you're trusting, sweet, and innocent. Look at these two bear heads. Which one looks cuter and more inviting? The one with reflections! They are identical, except for the light reflections.


Understanding how eyes are drawn
So a Manga eye is stylized to be cute & innocent (except bad people). The eyes are drawn oversized (eyes open extra wide). There are usually a minimum of two light reflections, and if the character is super-cute, there may be more. In black and white it looks kinda bland though. So how do we color this to really make those glints of light stand out?

Coloring Eyes step-by-step
1. Choose 3 colors from a Natural Blending family. In this case I'm using YG03, YG07, and I didn't have a darker shade in YG so I had to use a G09. Color with your lightest color, but leave your white areas white.

2. Add your next darker color to the top of the eye. Why the top? Because our eyebrows cast a shadow over the top of our eye, making it look darker on top and lighter down below.

3. Add your darkest color to the very top.

4. Take your lightest color and color over the top of both darker layers. This acts as a blender pen and smooths the colors together. You may have to carefully do this a couple times to get it smooth enough.

5. It's hard to see, but you need to draw the shadow of the eyebrow over your white areas. This is tricky because many times the sides of the eyeball are not defined. In this case I used C1 to add a pale shadow to the top of the eye.

6. Finish by adding skin around the eye. Leave the sides of the eye white to show where the eyeball is. (sometimes I do the skin first, then the eyes, other times it's eyes first and then skin)

Adding white
If you have a hard time leaving the white areas white, then this is the perfect time to use Copic Opaque White- a thick white paint applied with a paintbrush to add pure white back into a picture. If you have a picture like the bland bear head earlier in the post you can make it cute by using opaque white to add the light reflections on dull, black areas.

For my finished artwork today, I decided it was time to show a guy, since my last two manga posts were of girls. Manga guys tend to look a lot like their female counterparts sometimes (i think his bottom lip is too pouty and I messed up on his hair). Otherwise, he looks like a handsome, pleasant, green-eyed boy.

I drew this picture in my Copic Sketchbook, starting with a loose pencil sketch, then inking it with a 0.1mm Multiliner.

Since the picture was so small, I cut back on my eye colors to the light and dark, no middle color, but I still used the same technique.

I hope this post helped you understand eyes a little better. Have a great weekend! I'll think of you while I'm teaching my workshops. If anyone will be at the show, my Friday workshop is from 1:30 to 3 in workshop room 1, and my Saturday workshop is from 3 to 4:30, same place. Show up early, since these classes fill quickly to standing room only.

Tuesday, June 24, 2008

More about the colorless blender

I am still sloughing through past e-mails, so have patience if I am a couple days behind. Also don't worry, I will post sometime this week the features that make a Sketch or Ciao marker different from the Copic original.

Meanwhile, I still have a bit to say about Colorless blenders.
So far, we've figured out that the colorless blender marker does a few things, but it still might not work the way we anticipate. That's because it's called a colorless blender, we expect blending, but it really does the following best:

1. It lightens colors
2. It pushes colors
3. It fades to white
4. Great for special effects
5. It blends colors (note that I list this last- in my opinion this is a side-effect of what the blender does best- lightens, pushes, and fades to white)

We've made bricks and we've fixed mistakes, but there is so much more it can do. I'm not even going to touch on all the blender can do right now, but I will show some more ways of using what we already know about the blender to color images better.

Fade to white by pushing colors
This example is almost exactly the opposite of what we did yesterday. Instead of pushing color from the outside into the stamped area, we're pushing color from the middle of an area out to the edges. Same rules apply as yesterday though.

1. Start with an area that you've only colored the edges. In this case I'm using BG93 that I haven't colored very smoothly. Make sure you have good scratch paper under your work for this technique.

2. Color from the lightest spot, out towards the edges. Don't stop in the middle or it will give you ugly lines/streaks. In this case I'm using a lot of blender, so it's really juicy and is shoving that color around very strongly.

3. Color almost to the edge, but not over. Remember, you color is getting pushed in front of your blender, so if you color up to the line it will go over. Also note how dark the color is around the edge. This is at least 1 or 2 shades darker than my original color, so try this technique with lighter colors until you get an idea of how it will react. If you need it lighter then let it dry and repeat (just like erasing). Keep a swatch in your swatch book to remember what you did.

If you want a nice subtle shadow that fades out from your image like you'll frequently see on Debbie, Trudee, or Michelle's blogs, then try the same thing, only use a lot less blender and a much lighter touch. Debbie mixed her own B0000 marker a while ago (note that it has 4 zeros, making it super-light) because she is always fading out from pale blue to the color of her paper.

Here are some examples I shared on Splitcoaststampers a while back. This is a page from my swatch book. Note that the pink frosting on the cupcakes fades to white and the ground shadow fades from color to white as well.

Color Note: I chose these shadow colors to show that not all shadows have to be gray. These are supposed to give you the idea of light bouncing off the cupcake cup and reflecting a bit of color on the white background.