Showing posts with label Sketch Marker. Show all posts

Wednesday, June 3, 2009

Rumors and Prizes

I want to thank everyone who has participated in the giveaways this week. You still have through tonite to enter my giveaway by making a post here.

If you want a chance to come to the Salt Lake City Certification on June 11th you can send an e-mail to ilikemarkers@gmail.com (the odds of winning are pretty good right now, so don't hesitate). Click here for more details.

Rumors:
You may have heard rumors on the internet this Spring about new colors coming from Copic.

The rumors are true and confirmed!!
Copic is coming out with 12 new colors, available in Sketch and Various ink only. This will bring the total to a whopping 334 colors of markers available. Wow! That's a lot of choices.

They are NOT available for purchase...(yet)...just keep reading...

The fabulous new colors are:
COPIC Sketch BV0000 Pale Thistle
COPIC Sketch V0000 Rose Quartz
COPIC Sketch RV0000 Evening Primrose
COPIC Sketch R0000 Pink Beryl
COPIC Sketch YR0000 Pale Chiffon
COPIC Sketch Y0000 Yellow Fluorite
COPIC Sketch YG0000 Lily White
COPIC Sketch G0000 Crystal Opal
COPIC Sketch BG0000 Snow Green
COPIC Sketch B0000 Pale Celestine
COPIC Sketch C00 Cool Gray 00
COPIC Sketch W00 Warm Gray 00

Then the question comes, What do I do with all those super pale colors?

Well, I know that our design team will love the pale yellow (Y0000) and pale blue (B0000) , as they have been making their own markers in these colors right now. The color "Snow Green" is perfect for...well...snow. That pale red is going to be great for subtle, rosy cheeks, and I would use YR0000 for a pale skin color. Once I get my hands on these I'll try to color something and use these soft colors (see, I can't even play with them yet!! my patience is wearing thin...)

So when will they be available??!!!
Soon. I know you want them NOW. It is very hard to know exactly when the boat is coming over from Japan, but the first few may arrive in time for an Anime Expo sneak peek (July 2-5, Los Angeles Convention Center) Keep your fingers crossed! If you are coming to Summer CHA from July 28-30 you can see them in our booth (not the Supershow). It may be a while before these are in your retail stores or online though. Just be patient and keep looking for them.

Meanwhile, check out the giveaway from Monday and I'll have more ideas tomorrow.

Monday, April 6, 2009

Airbrushed Easter Egg

I have to admit that I was planning on making decorated eggs this weekend, but things came up, as things do, and I ate the eggs I was going to decorate. However, here is a photo from an egg I made last year. Later this week I'll try to post some of this year's creations.

Airbrushed Easter Egg
If you have an airbrush this is easy to make.

1. Top of the egg, airbrushed with the chisel end of a sketch Y08 marker.
2. Middle of egg airbrushed with YG06
3. Bottom of egg airbrushed with BG34

4. Doddle flowers on egg with the Super Brush nib in RV25

5. Using the Super-brush nib in the airbrush system, spray larger speckles of the RV25 lightly over the whole surface. Practice the light speckling spray before you spray the egg!

Here are some eggs that Sharon Harnist made last year using stickers as a mask. I love it!

Ellen Hutson tried stamping onto here eggs last year and then airbrushed them. These are fun and simple also.

If you don't have an airbrush, don't worry! You can evenly color your egg with your favorite basic egg coloring kit, then once it's dry, add your doodles with the brush. You can add speckles by lightly coloring the fibers on an old rag and dabbing them on for texture.

If you would like to show off your Copic Easter Eggs, please add a link here. Thanks for sharing!

Saturday, April 4, 2009

Doodling with the Super Brush - Blob Bunnies

When I was in Toronto recently I was showing how to make blob ducks and blob fish and someone asked me how to draw a bunny. I figured I should share it with you since Easter is only a week away. Anyone can draw these cute blob critters, so don't get scared.

Blob Bunnies
Bunnies are so cute and they have such neat poses that you get a couple variations on the blob bunnies. To make these today, pick 1 bunny colored Sketch or Ciao marker and a Multiliner 0.3mm or smaller.

Sitting Bunny
Start with a round dot for the head and add a larger oval blob for the body. Pushing straight down with the brush, add a dot for the tail and then with the brush on it's side add a blob for the front paw.

With the point of the brush aimed at the head, lay the brush down to make the base of each ear. Then turn your paper around and point the brush away from the head and lay it down to make the top of each ear.

With the multiliner, outline the head first, going around each ear. Then do the main body without the tail. When I add the tail I am making it look fluffy even though it's a round dot. You don't have to make it puffy, you could just have a round little tail if the fluff is too tricky for you.

Last, add a back foot (kind of shaped like a squished, backwards 3) and the face. See the face detail steps to see how easy it is to draw a cute bunny face. If you really want to you could add whiskers as well.

Hopping Bunny
The only difference between the hopping bunny and the sitting bunny is
that you draw the body blob at an angle, and you have the front paws and back paws stick out more. Then outline it same as you did before (I think the hopping bunny might even be easier than the sitting bunny).

Bunny Hugs
If you substitute little round ears for long bunny ears this could easily become a teddy bear. Just like before, draw a round blob for the head and an oval blob for the body.

The ears are trickier, since we are making one bent. Look at the exaggeration of the bent ear to see how you lay the point of the brush out to make the bent L shape. Add the 4 paws sticking out from the body. Outline the body as before, then look at the face detail for a close-up on the head.

This time, when you get to the bent ear, draw the line on the underside of the bent part half-way through the ear. Now it looks like the ear is really bent towards us. You could adapt this ear to your other bunnies as well. Add the face and you're ready to hop off to Easter!


I hope you have a wonderful weekend. Tomorrow I'll show airbrushed Easter Eggs, so if you want to get a head-start you can look back at the airbrushing post from a while ago. If you don't have an airbrush system you can still make fun textured eggs with this fur technique. You can do this right over the top of your dried, dyed eggs.

Sunday, January 25, 2009

Doodling with the Super Brush - Blob Fish

Time for another doodle! Although I'm busy here at CHA, and we had a wonderful first day and two great certification classes, I figured now is a good time to show another quick and easy doodle with the Super brush end of a Ciao or Sketch marker. This doodle is one of my favorites because it is so versatile and easy. If you liked the blob duck, then you'll love the blob fish.

Blob Fish
This is a super-easy doodle that I know anyone can make. Pick a good fishy color, here I'm using BG32, but it really doesn't matter. You'll also need a multiliner or some other outlining device. I'm using black because it has the best contrast, but you can also pick a colored multiliner that is darker than the marker color you use inside the fish. So if your fish is light blue, outline it with a Cobalt multiliner.

Rounded Fin Fish
1. Draw a blob/circle.
2. Touch the side of your super brush to the top and bottom of the fish to make fins.(Turn your paper, not your hands to get the right angle on your fins).
3. Add the tail in the same direction
4. Outline the body and fins.
5. Add final details, like eye, mouth, gills

See how easy that was! Here is another variation:

Pointy Fin Fish
All I changed was the direction I pointed my brush and the shape of the body blob. Now you can doodle up a whole ocean of cute fish.

Again, you will find it much easier to turn your paper than to turn your wrist to match the direction you want the fins.

Variations
The level of detail you add with the multiliner is entirely up to you. If you don't like the gills, then don't add them. You may prefer having a line drawn between the body and tail of the fish. These are your doodles.

Try using multiple colors, have the fins a different color than the body. Try adding lips or stripes or bubbles. Make a whole school of fish for a background, or a single fish for a pool party. The best thing about making the fish yourself is that they will coordinate perfectly with whatever else you color on that page.

These blob critters I have shown you are great projects that you can have a little one help you with. If you don't want kids using your markers, try this same thing with a set of watercolors. It's the outline that really makes the colored area pop off the page, so after they paint their blob go around the outlines with a nice pen (watercolors won't mess up a multiliner).

Here is my final little school of fish, ready to chomp the poor worm. It's super cute and super simple. I hope I've inspired you to doodle a little something for yourself.

Have a wonderful day and I'll try to post photos of CHA later. Some of you have stopped by and figured out what I was getting at in my obscure post about chocolate. Some of you have guessed, and for those of you who haven't wellllll....

We have new atyou Spica Glitter pen colors! There are 11 new colors and Chocolate happens to be one of them. I really will take some photos of the new colors sometime soon, promise! Otherwise, you'll have to stop by the booth to see the other new colors.

Wednesday, January 7, 2009

Doodling with the Super Brush - Blob Ducks

It's time for me to post another Draw It Yourself. This one is super easy, I promise. Before you try this technique I suggest you read this old post on doodling to get your technique down, then try this easy duckling.

Blob Ducks
You'll need two Sketch or Ciao markers (it can be done with Copics, it's just easier with the super-brush). Get a nice vibrant yellow and a nice orange, and a multiliner (either black or sepia, gray, or orange would also look nice).

1. With the yellow marker, draw a dot by pressing the brush straight down.
2. Add a larger half-circle below the circle and slightly off to one side.
3. With the orange marker, lay it on it's side to draw a beak and feet.
4. With your multiliner, outline the orange beak and feet first, then draw a line around the yellow area.
5. Draw a dot for the eye and a curved line for the wing.

Presto! You have a very cute little duck.

Here is my final scene, with hearts drawn by blobbing two drop-shapes from the super brush and tracing around them. I used Y15, YR04 for the ducks and R83 for the hearts. Perfect for a quick baby card or an Easter scene. I hope you try this super-easy technique for yourself. Think about what other shapes you can doodle in this manner. Try adding wings sticking out or drawing smiles on the beaks. The creativity is limitless. People will think you are so talented that you can draw such cute little ducks, but you'll know the secret of how simple these really are to make.

For another example, here is a quick background paper I made with this technique but this time I used an orange multiliner SP to draw the outlines. I like how much softer it is than the black outline, especially for background paper. I'm going to use this for something I'm doing in my duck-themed bathroom. Cute, quick, and I know the colors will match perfectly.

Think of using elements like this for repeating patterns. Try using softer colors for backgrounds as well, or mix and match dark and light ducks. If these ducks are too vibrant, then use the colors that are 2 digits lower, or Y13 and YR02. It will give you much lighter ducks in the same color family.

Have a great day doodling!

Thursday, October 23, 2008

Airbrushing Part 4, Sketch markers

Sketch markers are the most popular style of Copic markers not only for their wide variety of colors, but also for their ability to airbrush. Unlike the original Copic marker, Sketch markers will give you two different airbrush spray patterns. This simple variety helps make your airbrushed areas look a bit more exciting, as if airbrushing wasn't exciting enough.

Basic Airbrushing
Once you have set up your ABS, insert either a 
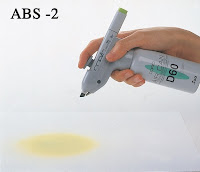
Sketch or Copic marker's chisel end into the air grip. Make sure the point is up (see photo) for the best spray pattern. Push it until you feel it snap into place. Now you are ready to go. (Later I'll get into troubleshooting your spraying patterns, but today I want to cover fun stuff).

Here I'm picturing the ABS-2 that I mentioned yesterday, shown with a Copic marker inserted properly. Also note how they are holding the unit with the pointer finger activating the spray button, and the hand wrapped around the aircan, or for the other set-ups it would be around the air adaptor (This is an old photo that Japan gave me years ago, and I just noticed that the person in the photo seems to be either missing a finger, or they have a spare finger hidden behind the air grip- ETA: now I look at it this morning and the finger is there- weird).

The marker will spray slightly in front of where ever you think it will spray, so unlike the photo, aim STRAIGHT DOWN until you feel comfortable with where the spray is hitting your surface (I've been sprayed a few times by people wondering where their spray is going since they're not aiming down).

Airbrushing with Sketch Markers
Many people have asked me "Why does the Sketch marker even come with a chisel end? I like the brush, but the chisel is useless." This is because these people have gotten used to the smooth coloring and blending with the brush and now the streaky, chunky chisel marks don't seem as nice. It's really hard to fill in a large smooth area with the chisel (or the brush) without a lot of effort and ink.

This is where airbrushing comes in handy.

If you look at the comparison on the left, the medium broad, chisel nib allows you to smoothly airbrush. This is great for filling in backgrounds, adding soft color blends, or coating irregular shaped objects. The chisel end disperses the spray in a very uniform, fine-particle way (if you are using the original Copic markers, then the spray patterns are almost identical between the Sketch chisel and the Copic Chisel).

Note that when you compare the marker drawn straight onto the paper and the airbrushed examples, the airbrushing is a shade or so lighter than the marker would normally be. Especially on pale colors you will see that the airbrushing is very light, sometimes you won't even be able to see it at all (I had to increase the contrast on my scan to get the light blue to show up better here). Keep this in mind and try to airbrush with darker colors for more vibrancy.

Sketch markers, unlike Copic original markers have two ends that work in the airbrush. The chisel end gives smooth, predictable spray patterns, but turn it around and the Super-brush nib gives you a larger, irregular speckle pattern. This is more apparent on darker colors, or if you are spraying very lightly. The results are not as predictable however, and I strongly suggest testing and practicing to see what pressure and which colors will give you the best results. Juicy markers will give you better speckles as well.

Look at this pale blue masked example. The stars were created from Spellbinders Nestabilities Star dies placed on the paper. The stars on the left are from the chisel, the star on the right is from the brush end. Either way looks good, but like I say, the chisel is easier to get a predictable even coverage, while I had to work a little harder to find the perfect spray on the brush.

Used in conjunction with the even coating from the chisel nib, and you can achieve a neat duo-tone effect.

Here is a copper die-cut star from the same Spellbinders dies I've been using to mask with. At first glance the star looks like a nice dark red. Clock on it to see up-close and you'll see that it's not flat red, rather I added darker speckles of purple to darken up the vibrant R29. This helps add to the antique feel. The nice thing about airbrushing on metal is that if you don't like it, just wipe off the marker with some hand-sanitizer and you can start over.

How I most commonly use the two together is shown below on these paper flowers from Kaiser Craft. I pick a lighter color as my base color then with a darker marker I add accents of color that are more subtle. This is how I got the egg to look speckled a couple days ago and this is how I like layering my airbrushing on most projects.

You can see that with the airbrush it becomes much easier to color irregular shaped items, unusual surfaces (in the case of the metal star, if I had tried to color the red directly it would ahve probably been streaky and look uneven). When I buy embellishments, ribbon, or lace, I tend to always get clear or white/pale colors, since I can color them to match whatever I'm working on. If you have an airbrush you should try spraying something unusual- you might be surprized at your results (more on airbrushing tomorrow).

Monday, June 30, 2008

Picking Between Markers part 3 - Sketch

I know I promised last week that I would share the differences between the marker types and why you would want one over the other. Sorry about getting sidetracked on colorless blenders, but there is just so much you can do with a blender pen, in fact you can take a blender pen and...wait...no... I'm talking about Sketch Markers today, NOT blender pens :)


Sketch Markers
Copic released Sketch markers over 15 years ago and with that move they revolutionized fine art markers. The original Copic Marker feels like a nice, solid, firm traditional marker. The Sketch marker came with one end that feels like a brush - A really juicy, flexible brush that never frays and lasts a long time. Finally, here was a marker that didn't feel like a marker, but it would put the high quality Copic inks onto paper in a smooth, paint-like way.

This is what makes the Sketch marker the most popular of all Copic marker types. That's why Japan makes 322 colors of Sketch, and they may even make more (I have some colors I would love to see that Japan doesn't make yet).

The other end has a Medium Broad nib, which is a firm chisel tip that is perfect for airbrushing or for coloring large areas. This tip is only slightly smaller than the broad nib nib on a Copic marker.

The Sketch marker gives two different patterns when airbrushed. The chisel end gives a fine, smooth spray, the brush end gives a larger speckled pattern. So if you enjoy airbrushing you may prefer this marker over the Copic, even though you'll have to refill this one sooner.

If you don't like the chisel nib, then you can swap it out with a Medium Round Nib. This firm round point is great for writing. It's a little larger than the fine point on a Copic, but it is great for people who are used to working with a firm ended marker and want something they can write with that is better than the chisel nib. Note that if you remove the chisel then the airbrushing doesn't work the same (more on this when we cover airbrushing). This tip works on either side of a Sketch or Ciao marker.

Most of the time I choose Sketch markers because I love how smooth the Super Brush allows me to color. Also, there are so many more colors than any other marker out there that it's hard to beat the selection offered by Sketch. I like how it takes me a while to run one dry, since I tend to be lazy about refilling. If I had only one style to pick, I'd go with Sketch for my everyday coloring needs.

The rest of this week I'll be sharing things that relate to comics as well as stamping, in honor of Anime Expo, so stay tuned for a guide to skin colors and more. Enjoy coloring!


Stamp Image: Pumpkins in Wheelbarrow by Lockhart Stamp Co, Paper: Neenah Classic Crest Ink: Memento Tuxedo Black Markers: YG17, YR02, YR04, E35, E37, W3, W5, BG10, Colorless Blender